Understanding Bucket ACLs in Terraform
Bucket Access Control Lists (ACLs) are an essential part of Terraform configurations that involve AWS S3 buckets. ACLs define the level of access that different AWS users or groups have to specific resources. The error message “The bucket does not allow acls” typically occurs when Terraform attempts to apply a configuration that includes an ACL to a bucket that does not have ACLs enabled.
Bucket ACLs are crucial for managing access to S3 buckets and the objects within them. They allow for fine-grained control over who can access the bucket and what actions they can perform. For example, you can use ACLs to grant read or write access to specific users or groups, or to deny access to everyone except yourself.
Enabling ACLs on a bucket is a straightforward process in Terraform. You can use the “acl” argument in the “aws\_s3\_bucket” resource block to specify the ACL for the bucket. For instance, you can set the ACL to “private” to deny all access or “public-read” to allow anyone to read the bucket’s contents.
However, if you encounter the “The bucket does not allow acls” error, it may be due to a misconfiguration in your Terraform code or a conflict with the bucket’s policies. To troubleshoot this error, it’s essential to review your Terraform configuration and ensure that the “acl” argument is correctly specified. Additionally, you should check the bucket’s policies to ensure that they are not conflicting with the ACLs.
In summary, bucket ACLs are a vital component of Terraform configurations that involve AWS S3 buckets. Understanding how they work and how to troubleshoot common issues can help you ensure that your Terraform configurations are correctly applied and that your S3 buckets are secure.
Reviewing Terraform Configuration
To ensure that bucket ACLs are set up correctly in Terraform, it’s essential to review your configuration files thoroughly. Here are some common mistakes to look out for:
- Missing “acl” argument: Ensure that the “acl” argument is specified in the “aws\_s3\_bucket” resource block.
- Incorrect ACL value: Verify that the ACL value is valid. For example, “private” or “public-read” are valid ACL values, while “public” is not.
- Conflicting ACLs: Check for conflicting ACLs in your Terraform configuration. For instance, if you have two resources that attempt to set different ACLs on the same bucket, it may result in the “The bucket does not allow acls” error.
To review your Terraform configuration, you can use the “terraform plan” command, which shows you the proposed changes to your infrastructure. If you see any errors or warnings related to bucket ACLs, you can use the “terraform show” command to view the current state of your resources and identify any misconfigurations.
Additionally, it’s a good practice to use Terraform modules to manage your infrastructure. Modules allow you to reuse and share code, ensuring that your ACLs are set up consistently across all resources. You can also use version control systems like Git to track changes to your Terraform configuration and collaborate with your team.
In summary, reviewing your Terraform configuration and checking for common mistakes can help you ensure that bucket ACLs are set up correctly. By using Terraform modules and version control systems, you can manage your infrastructure more efficiently and prevent the “The bucket does not allow acls” error in the future.

Checking Bucket Policies
Another common issue that might arise when working with bucket ACLs is conflicting bucket policies. Bucket policies are JSON documents that define permissions for a specific S3 bucket. If a bucket policy conflicts with the ACLs, you might encounter the “The bucket does not allow acls” error.
To check bucket policies, you can use the AWS Management Console or the AWS CLI. Here are step-by-step instructions for checking bucket policies using the AWS CLI:
- Open a terminal or command prompt and run the following command to list all S3 buckets:
aws s3 ls - Find the name of the bucket you want to check and run the following command to view the bucket policy:
aws s3api get-bucket-policy --bucket Replace
- Check the bucket policy for any statements that might conflict with the ACLs. For example, if you have a statement that denies all access to the bucket, it will override any ACLs that grant access.
To modify a bucket policy, you can use the AWS Management Console or the AWS CLI. Here’s an example of how to modify a bucket policy using the AWS CLI:
- Create a JSON document that defines the new bucket policy. Here’s an example:
{ "Version": "2012-10-17", "Statement": [ { "Effect": "Allow", "Principal": "*", "Action": "s3:GetObject", "Resource": "arn:aws:s3:::/*" } ] } Replace
- Run the following command to apply the new bucket policy:
aws s3api put-bucket-policy --bucket --policy Replace
In summary, checking bucket policies and ensuring that they don’t conflict with ACLs is crucial for preventing the “The bucket does not allow acls” error. By using the AWS CLI or the AWS Management Console, you can easily view and modify bucket policies

Using the AWS CLI to Modify Bucket ACLs
In addition to using Terraform to manage bucket ACLs, you can also use the AWS Command Line Interface (CLI) to modify ACLs. This can be useful when you need to quickly make changes to a bucket’s ACLs without modifying your Terraform configuration.
Here are some examples of AWS CLI commands that you can use to modify bucket ACLs:
- Add a grant to a bucket: To add a grant to a bucket, you can use the
put-bucket-aclcommand with the--grantoption. For example, the following command adds a grant to themy-bucketbucket that allows theuser-1user to read objects in the bucket:
aws s3api put-bucket-acl --bucket my-bucket --grant read --acl-policy file://my-bucket-acl.json Here’s an example of the my-bucket-acl.json file:
{ "Version": "2012-10-17", "Statement": [ { "Effect": "Allow", "Principal": { "AWS": "arn:aws:iam::123456789012:user/user-1" }, "Action": "s3:GetObject", "Resource": "arn:aws:s3:::my-bucket/*" } ] } - Remove a grant from a bucket: To remove a grant from a bucket, you can use the
put-bucket-aclcommand with the--remove-grantoption. For example, the following command removes the grant from themy-bucketbucket that allows theuser-1user to read objects in the bucket:
aws s3api put-bucket-acl --bucket my-bucket --remove-grant '{"Grantee": {"ID": "12345678901234567890"}, "Permission": "READ"}' - View a bucket’s ACLs: To view a bucket’s ACLs, you can use the
get-bucket-aclcommand. For example, the following command
Verifying Bucket ACLs with the AWS Console
If you prefer to use the AWS Management Console instead of the AWS CLI, you can still view and modify bucket ACLs. Here’s how to verify bucket ACLs using the AWS Console:
- Sign in to the AWS Management Console and navigate to the S3 service.
- Select the bucket you want to verify.
- Click on the Permissions tab.
- Under the Bucket Policy section, click on the Edit bucket policy button. This will allow you to view the current bucket policy. Make sure there are no conflicting policies that might prevent ACLs from being applied.
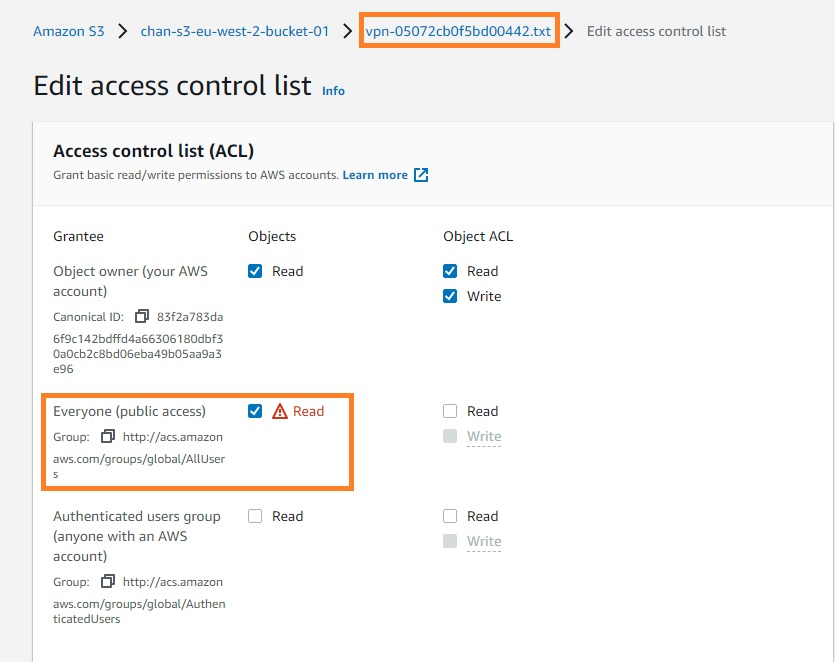
- Under the Access Control List section, click on the Edit button. This will allow you to view the current ACLs for the bucket.
- Review the ACLs to ensure they are set up correctly. If you need to modify the ACLs, you can do so by clicking on the Add entry button or editing an existing entry.
- Once you have made any necessary changes, click on the Save changes button to save the ACLs.
It’s important to note that modifying bucket ACLs directly in the AWS Console should be done with caution. Any changes made in the console will override any ACLs defined in your Terraform configuration. Therefore, it’s recommended to make any necessary changes in your Terraform configuration and apply them using the
terraform applycommand.By verifying bucket ACLs using the AWS Console, you can ensure that your buckets have the correct permissions and are not conflicting with any bucket policies. This can help prevent the “The bucket does not allow acls” error and ensure that your Terraform configurations are applied correctly.
Troubleshooting Common Bucket ACL Issues
Even with proper configuration and management, you may still encounter issues when working with bucket ACLs. Here are some common issues and how to troubleshoot them:
- Permission denied: If you receive a “permission denied” error when attempting to modify bucket ACLs, it may be due to insufficient permissions. Check your IAM policies to ensure that you have the necessary permissions to modify bucket ACLs. If you are using an IAM role, make sure that the role has the necessary permissions and that it is assumed by the correct user or service.
- Conflicting policies: If you have both a bucket policy and bucket ACLs, make sure that they are not conflicting with each other. A bucket policy that denies all access to a bucket will override any ACLs that grant access. Review both the bucket policy and ACLs to ensure that they are allowing the necessary access.
- Incorrect ACLs: If you have set up bucket ACLs but are still encountering access issues, double-check the ACLs to ensure that they are set up correctly. Make sure that the correct users or groups have been granted access and that the permissions are set correctly. If you are using canned ACLs, make sure that you have selected the correct canned ACL for your use case.
- Propagation delay: If you have recently modified bucket ACLs, it may take some time for the changes to propagate throughout the AWS infrastructure. If you are still encountering access issues after waiting a few minutes, try refreshing your credentials or checking the ACLs again.
By understanding these common issues and how to troubleshoot them, you can ensure that your bucket ACLs are set up correctly and consistently across all resources. This can help prevent the “The bucket does not allow acls” error and ensure that your Terraform configurations are applied correctly.
Best Practices for Managing Bucket ACLs in Terraform
To ensure that your bucket ACLs are set up correctly and consistently across all resources, follow these best practices:
- Use canned ACLs: Canned ACLs are predefined ACLs that provide common access configurations. Using canned ACLs can help ensure that your ACLs are set up correctly and consistently across all resources. For example, you can use the
aws_s3_bucket_acl.privatecanned ACL to deny all public access to a bucket. - Review ACLs during development: Review your ACLs during the development process to ensure that they are set up correctly. Use the
terraform plancommand to preview any changes to your ACLs before applying them. This can help you catch any mistakes before they become issues in production. - Use variables and outputs: Use variables and outputs to make your ACLs more flexible and reusable. For example, you can define a variable for the ACL type (private, public-read, etc.) and use it throughout your Terraform configuration. This can help ensure that your ACLs are consistent across all resources and make it easier to modify them in the future.
- Use Terraform modules: Use Terraform modules to manage your ACLs in a more modular and reusable way. Modules can help you encapsulate your ACL configurations and make them easier to manage and update. AWS provides a number of S3 module examples that you can use as a starting point.
- Regularly review ACLs: Regularly review your bucket ACLs to ensure that they are up to date and consistent with your security policies. Use tools like the AWS Trusted Advisor or AWS Config to monitor your ACLs and identify any potential issues.
By following these best practices, you can ensure that your bucket ACLs are set up correctly and consistently across all resources. This can help prevent the “The bucket does not allow acls” error and ensure that your Terraform configurations are applied correctly.
Conclusion: Preventing the “The Bucket Does Not Allow Acls” Error
In this article, we have discussed the importance of bucket ACLs in Terraform and the common issues that might arise when working with them. We have provided solutions to these issues and outlined best practices for managing bucket ACLs in Terraform. To prevent the “The bucket does not allow acls” error, follow these steps:
- Review your Terraform configuration: Ensure that your Terraform configuration files are set up correctly and that bucket ACLs are defined appropriately. Check for common mistakes such as missing or incorrect ACL values.
- Check bucket policies: Review your bucket policies to ensure that they are not conflicting with ACLs. Modify policies as needed to allow ACLs.
- Use the AWS CLI to modify ACLs: Use the AWS CLI to modify bucket ACLs as needed. Use the correct syntax and options to add or remove ACLs.
- Verify ACLs using the AWS Console: Verify bucket ACLs using the AWS Console. Use the console to view and modify ACLs as needed.
- Follow best practices: Follow best practices for managing bucket ACLs in Terraform. Use canned ACLs, review ACLs during development, use variables and outputs, use Terraform modules, and regularly review ACLs.
By following these steps, you can ensure that your bucket ACLs are set up correctly and consistently across all resources. Proper configuration and management of bucket ACLs can help prevent the “The bucket does not allow acls” error and ensure that your Terraform configurations are applied correctly.