What is Amazon Web Services (AWS) and Why Sign Up?
Amazon Web Services (AWS) is a comprehensive, secure, and scalable cloud computing platform offered by Amazon. It provides a wide range of services, including computing power, storage, databases, and content delivery, to help businesses and individuals build and manage applications, websites, and services. By signing up for an AWS account, users gain access to these powerful tools, enabling them to create, deploy, and manage applications with ease.
The main keyword “sign up aws account” is essential for those interested in leveraging AWS’s capabilities. By creating an account, users can unlock the potential to build robust, secure, and scalable solutions that cater to their specific needs. AWS offers a wide array of services, such as Amazon Elastic Compute Cloud (EC2) for computing power, Amazon Simple Storage Service (S3) for storage, and Amazon Relational Database Service (RDS) for database management. These services, among many others, empower users to create and manage applications in the cloud without the need for extensive on-premises infrastructure.
Preparing to Sign Up: Prerequisites and Considerations
Before signing up for an AWS account, it is essential to prepare by gathering necessary information and understanding the implications. First, ensure you have a valid email address, as this will serve as your primary means of communication with AWS. A credit card is also required to activate your account, although AWS offers a Free Tier for 12 months, which includes many services free of charge.
The AWS Free Tier is designed to help new users explore and experiment with AWS services without incurring additional costs. However, it is crucial to understand the limitations of the Free Tier to avoid unexpected charges. Be aware that some services, such as Amazon S3 and Amazon EC2, have usage limits even within the Free Tier. Monitoring your usage and staying within the Free Tier limits is essential to maintain control over your expenses.

Step-by-Step Guide: Signing Up for an AWS Account
To sign up for an AWS account, follow these straightforward steps:
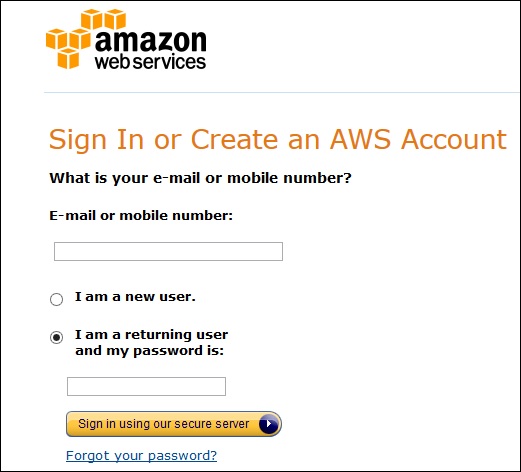
- Visit the official AWS homepage (https://aws.amazon.com/) and click on the “Create an AWS Account” button, usually located at the top right corner of the page.
- You will be redirected to a sign-up page. If you already have an Amazon.com account, you can use it to expedite the process. Otherwise, fill in the required fields, including your name, email address, and a password. Ensure you comply with AWS’s password requirements for a strong and secure password.
- After providing your email address and creating a password, click the “Continue” button. You will then be prompted to input your phone number for multi-factor authentication (MFA). MFA adds an extra layer of security to your AWS account by requiring a unique verification code sent to your phone whenever you sign in.
- Once you have set up MFA, you will be asked to input your company or personal information, such as your name, address, and phone number. Ensure the information you provide is accurate, as AWS may use it for billing and communication purposes.
- The next step is to set up a payment method. AWS accepts various payment methods, including credit cards and debit cards. Make sure you understand the payment terms and conditions before proceeding.
- After providing your payment information, you will be asked to review and confirm your account details. Read through the information carefully and ensure everything is correct. Once you are satisfied, click the “Create Account and Continue” button.
- AWS will then send you a confirmation email. Click the verification link in the email to complete the sign-up process. Your AWS account is now active and ready to use.

Verifying Your Email Address and Creating a Root User
Once you have completed the sign-up process for your AWS account, you will receive an email from Amazon Web Services asking you to verify your email address. This step is crucial to ensure the security and integrity of your account. To verify your email address, simply click the verification link provided in the email.
After verifying your email address, you will be prompted to create a root user account. A root user has complete and unrestricted access to all AWS resources and services. Therefore, it is essential to establish strong passwords and enable multi-factor authentication (MFA) for your root user account. MFA adds an extra layer of security by requiring a unique verification code, sent to your phone or an authentication device, every time you sign in.
To set up MFA for your root user account, log in to the AWS Management Console using your newly created root user credentials. Navigate to the “My Security Credentials” page, found under your account name in the top right corner of the console. From there, select “Multi-Factor Authentication (MFA)” and follow the on-screen instructions to enable MFA for your root user account.
Remember, it is best practice to avoid using the root user account for daily tasks and interactions with AWS services. Instead, create individual IAM users with specific permissions tailored to their responsibilities. This approach enhances security and makes it easier to manage access to AWS resources.

Configuring Your AWS Account: Personal Information and Payment Method
After understanding the AWS Management Console and its features, it’s time to configure your AWS account by providing personal information and setting up a payment method. Accurate information and secure payment options are crucial to ensure seamless interactions with AWS services.
Providing Personal Information
To provide personal information, navigate to the “My Account” section in the AWS Management Console. Here, you can input your full name, phone number, and address. Ensure that all the information provided is correct and up-to-date, as AWS may use it for communication and billing purposes.
Setting Up a Payment Method
To set up a payment method, go to the “Billing & Cost Management” section in the AWS Management Console. From there, click on “Payment Methods” and then “Add Payment Method.” AWS accepts various payment methods, including credit cards and debit cards. Make sure you understand the payment terms and conditions before proceeding.
It is essential to keep your payment information secure and up-to-date. AWS uses your payment method to automatically charge you for any services or resources that exceed the Free Tier limits or your pre-defined budget. By maintaining accurate payment information, you can avoid service interruptions and ensure uninterrupted access to AWS resources.
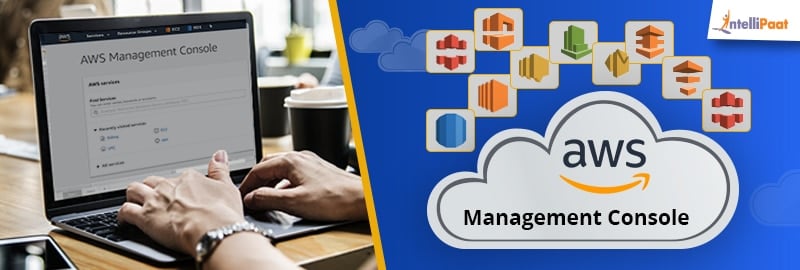
Understanding the AWS Management Console
The AWS Management Console is the primary web-based user interface for managing your AWS services and resources. It provides a centralized location to access, monitor, and configure various AWS offerings. Familiarizing yourself with the console is essential to effectively manage your AWS account and make the most of the Free Tier.
Key Features and Services
The AWS Management Console offers several key features and services, including:
- AWS Services Dashboard: This is the central hub for managing your AWS services. It provides an overview of your usage, billing information, and notifications.
- EC2 (Elastic Compute Cloud): This service allows you to rent virtual computers to run your applications and services in the cloud.
- S3 (Simple Storage Service): This is a highly-scalable and durable storage service that enables you to store, retrieve, and manage data in the cloud.
- IAM (Identity and Access Management): This service helps you manage access to AWS services and resources securely.
Navigating the Console
The AWS Management Console is designed to be intuitive and user-friendly. The navigation pane on the left-hand side allows you to quickly access different services and features. You can customize the navigation pane by reordering, hiding, or showing items based on your preferences.
Additionally, the console offers search functionality, making it easy to find and access specific services or resources. You can also use the “Services” dropdown menu at the top of the page to browse all available AWS services.
Exploring the AWS Free Tier and Managing Costs
One of the significant advantages of signing up for an AWS account is the AWS Free Tier, which provides new customers with free access to a variety of AWS services for 12 months. The Free Tier allows you to explore and experiment with AWS services without incurring additional costs. However, it’s essential to understand the limitations and manage your usage to avoid unexpected charges.
Understanding the AWS Free Tier
The AWS Free Tier is divided into three categories:
- Always Free: These services are always free, regardless of the duration of your AWS account.
- 12 Months Free: These services are free for the first 12 months after signing up for an AWS account.
- Trials: These services offer a free trial period, usually ranging from 30 days to several months.
Managing Costs
To manage costs and avoid unexpected charges, follow these tips:
- Monitor Usage: Regularly review your AWS usage and billing information to ensure you stay within the Free Tier limits. You can monitor your usage through the AWS Management Console, AWS CLI, or various third-party tools.
- Set Up Billing Alerts: Configure billing alerts to notify you when your usage exceeds a predefined threshold. This feature helps you stay informed about your spending and take action when necessary.
- Understand Service Limits: Be aware of the Free Tier limitations for each service and plan your usage accordingly. For example, the Free Tier for Amazon S3 provides 5 GB of storage and 20,000 Get and 2,000 Put requests per month.
- Clean Up Resources: Regularly delete unused resources, such as unattached EBS volumes or idle EC2 instances, to minimize costs.
Getting Started: Next Steps After Signing Up for an AWS Account
Congratulations! You’ve successfully signed up for an AWS account, verified your email address, and set up your payment method. Now it’s time to dive into the world of AWS and start exploring the vast array of services and features available to you. Here are some next steps to help you get started:
1. Familiarize Yourself with AWS Documentation
AWS provides extensive documentation covering all of its services and features. This documentation is an invaluable resource for learning how to use AWS effectively. Visit the AWS Documentation page and explore the various guides, tutorials, and reference materials available.
2. Join the AWS Community
The AWS community is a vibrant and active group of developers, engineers, and IT professionals who share their knowledge, experiences, and best practices. Join the community by participating in forums, attending AWS events, and connecting with other AWS users through social media.
3. Experiment with AWS Services
Now that you have access to the AWS Free Tier, take advantage of the opportunity to experiment with various AWS services and features. Try out Amazon S3 for storage, Amazon EC2 for compute capacity, or Amazon RDS for database services. This hands-on experience will help you become more familiar with AWS and its capabilities.
4. Monitor Your Usage and Costs
Even though you’re taking advantage of the AWS Free Tier, it’s essential to monitor your usage and costs to avoid unexpected charges. Set up billing alerts, review your usage regularly, and delete any unused resources to ensure you stay within the Free Tier limits.
5. Seek Additional Resources
AWS offers a variety of additional resources to help you learn and grow as an AWS user. Consider enrolling in AWS training courses, obtaining AWS certifications, or leveraging third-party tools and services to enhance your AWS experience.