
Understanding SSH Authentication and Common Errors
Secure Shell (SSH) is a widely used protocol for securely accessing remote servers over an unsecured network. SSH authentication typically involves using a pair of cryptographic keys, a public key and a private key, to verify the identity of the client and the server. The public key is stored on the server, while the private key is kept secret by the client. When the client attempts to connect to the server, the server will present its public key, and the client will use its private key to verify that the public key is genuine. If the verification is successful, the client is granted access to the server.
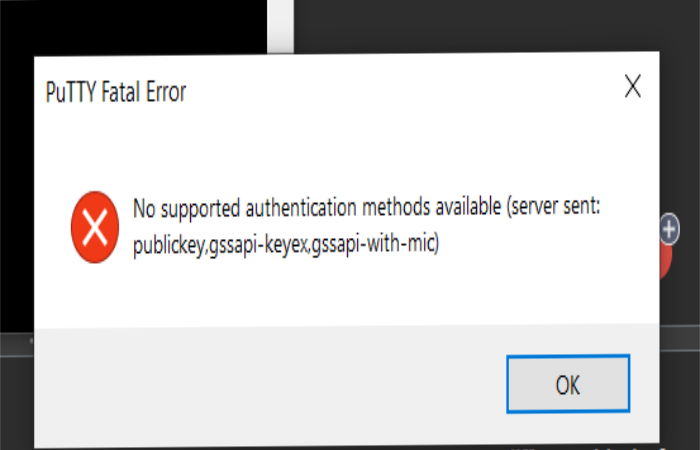
The “Permission denied (publickey,gssapi-keyex,gssapi-with-mic)” error message is a common SSH authentication error that indicates that the server does not accept the client’s public key for authentication. This error can occur for a variety of reasons, including incorrect file permissions, missing keys, or incorrectly formatted keys. In the following sections, we will discuss how to diagnose and fix these issues.

Checking for SSH Key Configuration Issues
As mentioned in the previous section, the “Permission denied (publickey,gssapi-keyex,gssapi-with-mic)” error message can occur for a variety of reasons. One common cause of this error is incorrect file permissions. The SSH daemon (sshd) is very strict about file permissions, and will not allow authentication to proceed if the permissions on the user’s home directory, .ssh directory, or authorized\_keys file are too permissive. To check for this issue, run the following commands on the server:
$ ls -ld ~ $ ls -ld ~/.ssh $ ls -l ~/.ssh/authorized\_keys The output of these commands should show that the user’s home directory and .ssh directory have permissions of 700 or 755, and that the authorized\_keys file has permissions of 600 or 644. If the permissions are too permissive, you can fix them using the chmod command. For example, to set the permissions on the .ssh directory to 700, you would run:
$ chmod 700 ~/.ssh Another common cause of the “Permission denied (publickey,gssapi-keyex,gssapi-with-mic)” error is missing or incorrectly formatted keys. To check for this issue, you can use the ssh-keygen and ssh-keyscan utilities. The ssh-keygen utility can be used to generate and manage SSH keys, while the ssh-keyscan utility can be used to retrieve the public key from a remote server. To check for missing or incorrectly formatted keys, run the following commands:
$ ssh-keygen -H -f ~/.ssh/known\_hosts $ ssh-keyscan -t rsa,dsa,ecdsa,ed25519 server.example.com > ~/.ssh/known\_hosts The first command will check the known\_hosts file for any missing or incorrectly formatted keys, and will update the file as necessary. The second command will retrieve the public key from the remote server and add it to the known\_hosts file. If the public key has changed since the last time the client connected to the server, the ssh client will display a warning message. If this occurs, you should verify the new key fingerprint with the server administrator before proceeding.
Setting Up SSH Key-Based Authentication
As mentioned in the previous section, SSH key-based authentication is the recommended method for securely accessing remote servers over SSH. To set up SSH key-based authentication, you will need to perform the following steps:
-
Generate a new key pair on the client machine using the ssh-keygen utility. This can be done by running the following command:
$ ssh-keygenThis will prompt you to enter a file in which to save the key. You can press enter to accept the default location and file name, or you can specify a different location and file name if desired. You will also be prompted to enter a passphrase for the key. It is recommended that you use a strong passphrase to protect the key from unauthorized access.
-
Copy the public key to the remote server. This can be done using the ssh-copy-id utility, which is included with most SSH clients. To use ssh-copy-id, run the following command:
$ ssh-copy-id [email protected]This will copy the public key to the remote server and add it to the authorized\_keys file in the user’s home directory. If the ssh-copy-id utility is not available, you can manually copy the public key to the remote server by following these steps:
-
Display the public key using the following command:
$ cat ~/.ssh/id\_rsa.pubThis will print the public key to the terminal. The key will be in the following format:
ssh-rsa AAAAB3NzaC1yc2EAAAADAQABAAABAQDLk... -
Connect to the remote server using SSH.
-
Edit the authorized\_keys file in the user’s home directory (e.g., ~/.ssh/authorized\_keys) and add the public key to the file. If the authorized\_keys file does not exist, you can create it using a text editor such as nano or vim.
-
-
Configure the ssh client to use the key for authentication. This can be done by modifying the ssh client configuration file (e.g., ~/.ssh/config) and adding the following lines:
Host server.example.com IdentityFile ~/.ssh/id\_rsaThis will tell the ssh client to use the specified key (id\_rsa in this example) when connecting to the remote server (server.example.com in this example).
Once you have completed these steps, you should be able to connect to the remote server using SSH key-based authentication. To test the connection, run the following command:
$ ssh server.example.com If the connection is successful, you should be logged in to the remote server without being prompted for a password. If you are prompted for a password, there may be an issue with the key configuration. In this case, you should check the file permissions and the authorized\_keys file on the remote server, as described in the previous section.
Using SSH Agent for Key Management
SSH agent is a utility that is included with most SSH clients. It is used to manage SSH keys and simplify the authentication process. When you add a key to the agent, you only need to enter the passphrase once, and the agent will automatically provide the key when you connect to the remote server. This can save time and reduce the risk of typing errors.
To use SSH agent, follow these steps:
-
Start the agent. This can be done by running the following command:
$ eval "$(ssh-agent -s)"This will start the agent and print the agent PID to the terminal. The output will look something like this:
Agent pid 12345 -
Add your key to the agent. This can be done by running the following command:
$ ssh-add ~/.ssh/id\_rsaThis will add the private key (id\_rsa in this example) to the agent. You will be prompted to enter the passphrase for the key. Once the key has been added, the agent will automatically provide the key when you connect to the remote server.
-
Configure the ssh client to use the agent for authentication. This can be done by modifying the ssh client configuration file (e.g., ~/.ssh/config) and adding the following lines:
Host server.example.com IdentityFile ~/.ssh/id\_rsa IdentitiesOnly yes AddKeysToAgent yesThis will tell the ssh client to use the specified key (id\_rsa in this example) and the SSH agent for authentication. The IdentitiesOnly option tells the ssh client to only use the specified key, and not to try any other keys that may be available. The AddKeysToAgent option tells the ssh client to automatically add any new keys to the agent.
Once you have completed these steps, you should be able to connect to the remote server using SSH agent. To test the connection, run the following command:
$ ssh server.example.com If the connection is successful, you should be logged in to the remote server without being prompted for a password. If you are prompted for a password, there may be an issue with the key configuration. In this case, you should check the file permissions and the authorized\_keys file on the remote server, as described in the previous section.
Troubleshooting GSSAPI-Related Authentication Issues
GSSAPI (Generic Security Services Application Program Interface) is a standard for providing security services, such as authentication and encryption, to applications. In the context of SSH, GSSAPI can be used as an alternative authentication method, in addition to public key authentication. GSSAPI authentication is typically used in enterprise environments, where it is integrated with a centralized authentication system, such as Kerberos.
The “Permission denied (publickey,gssapi-keyex,gssapi-with-mic)” error message can occur when GSSAPI authentication fails. This can be caused by a number of issues, including:
-
Incorrect GSSAPI configuration on the server or client. This can include issues with the GSSAPI mechanism, the GSSAPI principal, or the GSSAPI credentials.
-
A misconfigured or unreachable authentication server. If the authentication server is not reachable or is misconfigured, GSSAPI authentication will fail.
-
An incorrect or missing GSSAPI library on the client. If the client does not have the correct GSSAPI library, GSSAPI authentication will fail.
To troubleshoot GSSAPI-related authentication issues, you can use the following steps:
-
Check the GSSAPI configuration on the server and client. This includes the GSSAPI mechanism, the GSSAPI principal, and the GSSAPI credentials. Make sure that these are correctly configured and match on both the server and client.
-
Verify that the authentication server is reachable and correctly configured. You can use tools such as ping or nslookup to check the connectivity to the authentication server. If the server is not reachable, you may need to check the network configuration or contact the network administrator.
-
Check that the client has the correct GSSAPI library installed. You can use the package manager for your operating system to install the GSSAPI library, if it is not already installed.
-
Enable debug logging on the SSH client and server. This will provide detailed information about the authentication process and can help to identify any issues. To enable debug logging, you can use the -v (verbose) option when running the ssh client or sshd server.
By following these steps, you should be able to troubleshoot most GSSAPI-related authentication issues. If you are still having problems, you may need to consult the documentation for your specific SSH implementation or seek assistance from a qualified support professional.
Configuring SSH to Use Alternative Authentication Methods
While public key authentication is the recommended method for securing SSH access, there may be situations where alternative authentication methods are required. For example, you may need to use password authentication if public key authentication is not available or if you are unable to generate a key pair. In this section, we will describe how to configure SSH to use alternative authentication methods when public key authentication fails.
The two most common alternative authentication methods are password and keyboard-interactive authentication. Password authentication is the traditional method of authenticating using a username and password. Keyboard-interactive authentication is a more flexible method that allows for challenge-response authentication, such as entering a one-time password or answering a security question.
To configure SSH to use alternative authentication methods, you will need to modify the SSH server configuration file (usually located at /etc/ssh/sshd\_config). The following options are available:
-
PasswordAuthentication: This option enables or disables password authentication. The default value is “yes”. To enable password authentication, set this option to “yes”. To disable password authentication, set this option to “no”.
-
ChallengeResponseAuthentication: This option enables or disables keyboard-interactive authentication. The default value is “yes”. To enable keyboard-interactive authentication, set this option to “yes”. To disable keyboard-interactive authentication, set this option to “no”.
Once you have made the necessary changes to the SSH server configuration file, you will need to restart the SSH service for the changes to take effect. This can typically be done using the following command:
$ sudo systemctl restart ssh After restarting the SSH service, you should be able to authenticate using the alternative authentication methods that you have enabled. It is important to note that alternative authentication methods are less secure than public key authentication, and should only be used as a last resort. If possible, it is recommended to use public key authentication for all SSH access.
Securing SSH Access with Firewalls and Access Control Lists
In addition to configuring SSH for secure authentication, it is also important to restrict access to the SSH service itself. This can be done using firewalls and access control lists (ACLs). By limiting access to the SSH service, you can reduce the attack surface of the server and prevent unauthorized access.
There are several ways to restrict access to the SSH service. The most common methods are using a firewall and configuring an access control list on the SSH server itself.
Using a Firewall
A firewall is a network security system that monitors and controls incoming and outgoing network traffic based on predetermined security rules. By configuring a firewall to only allow traffic to the SSH service from trusted sources, you can prevent unauthorized access to the service.
The specific steps for configuring a firewall will depend on the type of firewall you are using. However, in general, you will need to do the following:
-
Identify the IP addresses or ranges that should be allowed to access the SSH service.
-
Configure the firewall to only allow traffic to the SSH service (usually port 22) from the identified IP addresses or ranges.
-
Test the firewall configuration to ensure that only authorized traffic is allowed.
Configuring an Access Control List
An access control list (ACL) is a set of rules that control access to a network resource, such as a file or a service. By configuring an ACL on the SSH server, you can restrict access to the SSH service based on the user’s IP address, hostname, or other criteria.
To configure an ACL on the SSH server, you will need to modify the SSH server configuration file (usually located at /etc/ssh/sshd\_config). The following options are available:
-
AllowUsers: This option specifies a list of users that are allowed to log in using SSH. Only users listed here will be able to authenticate.
-
DenyUsers: This option specifies a list of users that are not allowed to log in using SSH. Any user listed here will be denied access, regardless of any other settings.
-
AllowGroups: This option specifies a list of groups that are allowed to log in using SSH. Only members of these groups will be able to authenticate.
-
DenyGroups: This option specifies a list of groups that are not allowed to log in using SSH. Any member of these groups will be denied access, regardless of any other settings.
-
AllowHosts: This option specifies a list of hosts that are allowed to log in using SSH. Only connections from these hosts will be allowed.
-
DenyHosts: This option specifies a list of hosts that are not allowed to log in using SSH. Any connections from these hosts will be denied, regardless of any other settings.
Once you have made the necessary changes to the SSH server configuration file, you will need to restart the SSH service for the changes to take effect. This can typically be done using the following command:
$ sudo systemctl restart ssh After restarting the SSH service, only the users, groups, and hosts that you have allowed will be able to access the SSH service. This can help to prevent unauthorized access and improve the security of your server.
