Unraveling Kubernetes Namespaces: A Key Concept in Container Orchestration
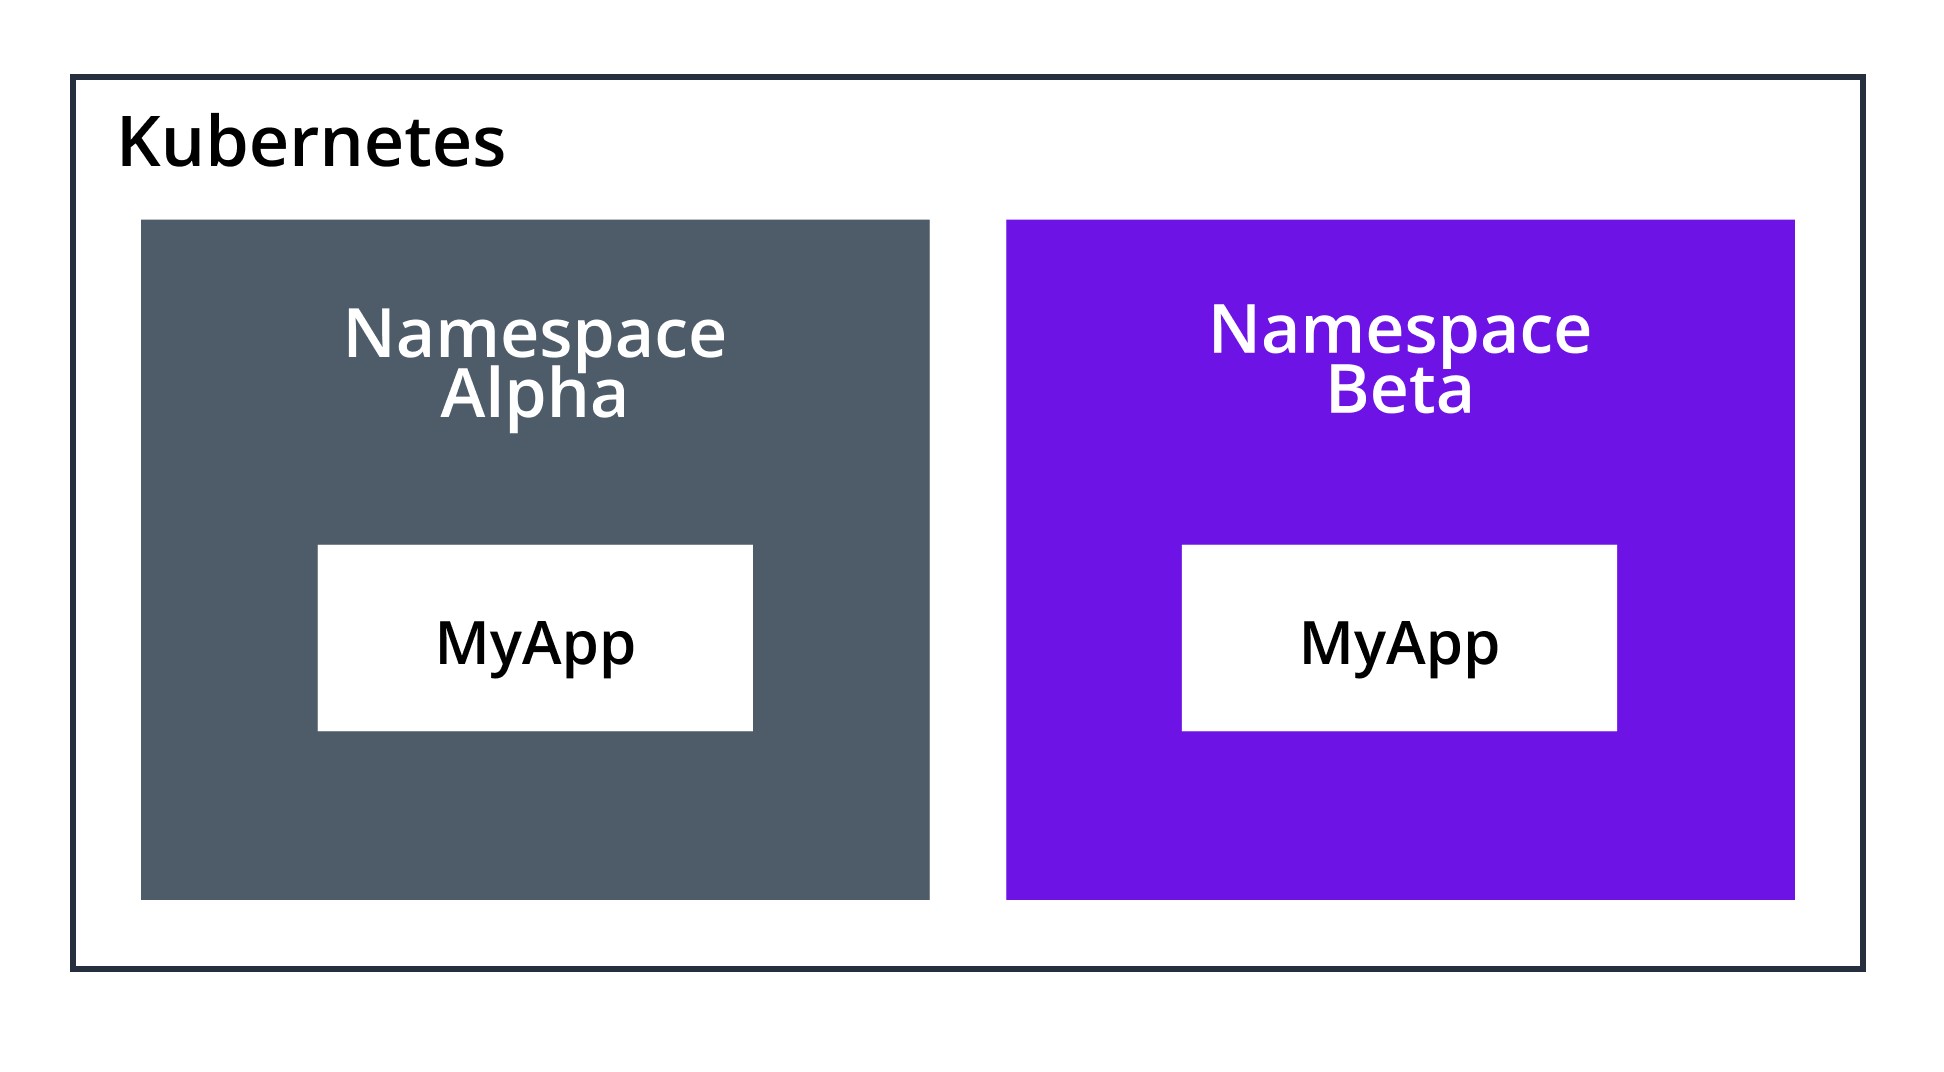
Kubernetes namespaces are a fundamental method of organizing resources within a cluster. They serve as a virtual partition of the cluster, allowing users to create separate environments for different applications, teams, or projects. Namespaces are particularly useful in managing multi-tenant environments and isolating resources, ensuring that no conflicts arise between various components or users. By dividing a cluster into multiple namespaces, administrators can enforce stricter access control policies, allocate resources more efficiently, and maintain a more organized infrastructure.

The Power of YAML: Describing Kubernetes Resources with Ease
YAML (YAML Ain’t Markup Language) is a human-readable data serialization format, widely used for defining and configuring infrastructure and resources in Kubernetes. Its simplicity and readability make it an ideal choice for describing Kubernetes objects, including namespaces. YAML is particularly useful for declarative configuration, where you specify the desired state of a system, and Kubernetes works to achieve and maintain that state. In the context of Kubernetes namespace YAML, YAML files are used to define the desired namespace configuration, including metadata, such as the namespace name, labels, and annotations, as well as any specific resource quotas or network policies associated with the namespace. By employing YAML to define namespaces, you can easily create, update, and manage namespaces in a structured and consistent manner.
To create a namespace using YAML, you can start with a simple YAML file, such as:
apiVersion: v1 kind: Namespace metadata: name: my-namespace This YAML file defines a namespace named “my-namespace”. To apply this configuration to a Kubernetes cluster, you can use the ‘kubectl apply’ command, as explained in the next section.
Creating Namespaces with YAML: A Step-by-Step Guide
How to Define a Namespace with YAML
To create a namespace using YAML, you can start with a simple YAML file, such as the following example:
apiVersion: v1 kind: Namespace metadata: name: my-namespace This YAML file defines a namespace named “my-namespace”. The ‘apiVersion’ field specifies the version of the Kubernetes API to use, and the ‘kind’ field indicates that this is a Namespace resource. The ‘metadata’ field contains data that helps define the namespace, including its name.
Applying Namespace Configuration with ‘kubectl apply’
Once you have created the YAML file, you can apply it to your Kubernetes cluster using the ‘kubectl apply’ command:
$ kubectl apply -f my-namespace.yaml namespace/my-namespace created The output indicates that the ‘my-namespace’ namespace has been successfully created. If the namespace already exists, ‘kubectl apply’ will update the existing namespace to match the configuration specified in the YAML file. If there are any errors or discrepancies, ‘kubectl apply’ will provide detailed error messages to help you troubleshoot the issue.
To verify that the namespace has been created, you can use the ‘kubectl get namespaces’ command:
$ kubectl get namespaces NAME STATUS AGE default Active 1h kube-node-lease Active 1h kube-public Active 1h kube-system Active 1h my-namespace Active 10s This output shows the ‘my-namespace’ namespace, along with the other namespaces present in the cluster.
Applying Namespace Configuration with ‘kubectl apply’
To apply the YAML configuration to a Kubernetes cluster, use the ‘kubectl apply’ command followed by the ‘-f’ flag and the path to the YAML file:
$ kubectl apply -f my-namespace.yaml namespace/my-namespace created The output indicates that the ‘my-namespace’ namespace has been successfully created. If the namespace already exists, ‘kubectl apply’ will update the existing namespace to match the configuration specified in the YAML file. If there are any errors or discrepancies, ‘kubectl apply’ will provide detailed error messages to help you troubleshoot the issue.
Understanding Output and Error Messages
When applying a YAML configuration, ‘kubectl apply’ provides feedback on the operation’s success or failure. In the example above, the output indicates that the namespace was created successfully. However, if there are any issues, the output will include error messages to help diagnose the problem. For instance:
$ kubectl apply -f my-namespace.yaml error: unable to recognize "my-namespace.yaml": no matches for kind "Namespace" in version "v1" In this case, the error message indicates that the ‘Namespace’ resource type is not recognized, suggesting that the Kubernetes cluster may not be compatible with the YAML file’s API version. To resolve this issue, you may need to update the ‘apiVersion’ field in the YAML file to match the version supported by your cluster.
By understanding the output and potential error messages provided by ‘kubectl apply’, you can effectively apply YAML configurations to your Kubernetes cluster and ensure that your namespaces are properly configured.

Exploring Namespace Resources: A Deep Dive into Kubernetes Objects
Namespaces can contain various Kubernetes objects, such as deployments, services, and config maps. These objects have relationships and dependencies within a namespace, allowing for the creation and management of complex applications and systems.
Deployments
Deployments represent a collection of replica pods, ensuring that a specified number of instances are running at any given time. By defining deployments within a namespace, you can manage and scale your applications in a controlled and organized manner.
Services
Services provide stable IP addresses and DNS names for a set of pods, enabling communication between different components within a namespace. By leveraging services, you can create a reliable and consistent communication layer for your applications.
Config Maps
Config maps allow you to store non-sensitive configuration data and decouple it from your application code. By storing config maps within a namespace, you can maintain and manage application configurations alongside the resources they affect.
Relationships and Dependencies
Kubernetes objects within a namespace often have relationships and dependencies, such as a deployment relying on a service to route traffic to its pods. Understanding these connections is crucial for effectively managing and maintaining namespaces in a production environment.
Managing Namespaces: Common Operations and Best Practices
To effectively manage namespaces, it’s essential to understand common tasks and best practices. This section covers listing, updating, and deleting namespaces, as well as best practices for organizing and maintaining namespaces in a production environment.
Listing Namespaces
To list all namespaces in a cluster, use the following command:
$ kubectl get namespaces NAME STATUS AGE default Active 1h kube-node-lease Active 1h kube-public Active 1h kube-system Active 1h my-namespace Active 10s Updating Namespaces
To update a namespace, modify the YAML file and apply it using ‘kubectl apply’. The command will update the namespace to match the new configuration:
$ kubectl apply -f my-namespace.yaml namespace/my-namespace configured Deleting Namespaces
To delete a namespace, use the ‘kubectl delete’ command followed by the namespace name:
$ kubectl delete namespace my-namespace namespace "my-namespace" deleted Best Practices for Namespace Management
When managing namespaces, consider the following best practices:
- Organize namespaces by team, environment, or project to maintain a clear structure.
- Implement resource quotas to prevent resource contention and ensure fair usage.
- Use network policies to control traffic and enhance security between namespaces.
- Regularly review and clean up unused namespaces to minimize resource waste.

Troubleshooting Namespaces: Common Issues and Solutions
Working with namespaces can sometimes result in issues, such as misconfigured resources or permission errors. This section discusses common problems and offers solutions and tips for resolving them.
Misconfigured Resources
Misconfigured resources, such as deployments or services, can cause issues within a namespace. To identify and resolve these problems, follow these steps:
- List all resources in the namespace:
kubectl get all -n - Identify resources with issues, such as failed pods or services with no endpoints.
- Check the resource configuration using
kubectl describeand look for errors or discrepancies. - Correct the configuration in the YAML file and reapply it using
kubectl apply.
Permission Errors
Permission errors can occur when users or service accounts lack the necessary permissions to perform tasks within a namespace. To address these issues, follow these steps:
- Identify the user or service account experiencing the issue.
- Check the role-based access control (RBAC) configuration for the user or service account.
- Ensure that the user or service account has the required permissions, such as
cluster-adminor custom roles. - Update the RBAC configuration if necessary, or consult your cluster administrator for assistance.
By understanding common issues and following best practices, you can effectively troubleshoot and resolve problems related to namespaces in your Kubernetes cluster.
Advanced Namespace Techniques: Quotas, Network Policies, and More
Kubernetes namespaces offer a wide range of advanced features that can help you enhance security, resource management, and network policies within your cluster. This section will explore some of these advanced techniques, including resource quotas, network policies, and role-based access control (RBAC).
Resource Quotas
Resource quotas allow you to set limits on the amount of CPU, memory, and other resources that can be consumed by namespaces. This is particularly useful in multi-tenant environments, where you want to ensure that one team or application doesn’t consume all the available resources. To create a resource quota, you can use a YAML file similar to the following:
apiVersion: v1 kind: ResourceQuota metadata: name: mem-cpu-demo spec: hard: requests.cpu: "1" requests.memory: 500Mi limits.cpu: "2" limits.memory: 1Gi In this example, the namespace “mem-cpu-demo” will have a hard limit of 1 CPU and 500Mi of memory for requests and 2 CPUs and 1Gi of memory for limits. Once the quota is applied, any attempt to create or update resources that exceed these limits will be rejected.
Network Policies
Network policies enable you to define rules that control the flow of traffic between pods and services within a namespace. This is particularly useful in multi-tenant environments, where you want to isolate traffic between different teams or applications. To create a network policy, you can use a YAML file similar to the following:
apiVersion: networking.k8s.io/v1 kind: NetworkPolicy metadata: name: default-deny spec: podSelector: {} policyTypes: - Ingress - Egress In this example, the network policy “default-deny” will deny all ingress and egress traffic for all pods in the namespace. You can then create more specific rules to allow traffic between specific pods or services. For example:
apiVersion: networking.k8s.io/v1 kind: NetworkPolicy metadata: name: allow-ingress spec: podSelector: matchLabels: app: my-app ingress: - from: - podSelector: matchLabels: app: my-other-app In this example, the network policy “allow-ingress” will allow ingress traffic from pods with the label “app: my-other-app” to pods with the label “app: my-app” in the same namespace.
Role-Based Access Control (RBAC)
Role-Based Access Control (RBAC) allows you to define roles and role bindings that control who can access and manage resources within a namespace. This is particularly useful in multi-tenant environments, where you want to ensure that only authorized users can access or modify resources. To create an RBAC role and role binding, you can use YAML files similar to the following:
apiVersion: rbac.authorization.k8s.io/v1 kind: Role metadata: name: my-role rules: - apiGroups: [""] resources: ["pods"] verbs: ["list", "watch"] apiVersion: rbac.authorization.k8s.io/v1 kind: RoleBinding metadata: name: my-role-binding roleRef: apiGroup: rbac.authorization.k8s.io kind: Role name: my-role subjects: - kind: User name: jane apiGroup: rbac.authorization.k8s.io In this example, the role “my-role” allows users to list and watch pods in the namespace. The role binding “my-role-binding” binds the role to the user “jane“, giving her the ability to list and watch pods in the namespace.
By mastering these advanced namespace techniques, you can enhance the security, resource management, and network policies within your Kubernetes cluster, making it easier to manage multi-tenant environments and complex applications.