
Understanding Kubernetes Mount Files from Host
Mounting files from a host in Kubernetes is a technique that enables containerized applications to access and interact with files residing on the host machine. This method offers several benefits and use cases, making it an essential skill for managing and scaling applications in a Kubernetes environment.
At its core, the process of Kubernetes mount file from host involves establishing a connection between a container’s file system and a specific directory on the host machine. By doing so, applications within the container can read from, write to, or modify the host’s files as needed. This capability is particularly useful in scenarios where applications require access to shared resources, such as configuration files, certificates, or log directories.
Incorporating Kubernetes mount file from host into your application management strategy offers several advantages. For instance, it simplifies the configuration of applications that rely on shared resources, as you can maintain a single set of files on the host machine rather than duplicating them within each container. Additionally, it enhances the portability of your applications, as you can easily move containerized workloads between different Kubernetes clusters or host machines while preserving their access to critical files.
To successfully implement Kubernetes mount file from host, it is crucial to understand the underlying concepts and components involved. These include volumes, persistent volumes, ConfigMaps, and Secrets, all of which play essential roles in managing file storage and sharing in Kubernetes. By mastering these techniques, you can optimize your application management workflows, improve scalability, and ensure seamless integration between your containerized applications and host machine resources.
Preparing Your Host Machine for File Mounting
Before mounting files from a host in Kubernetes, it is essential to prepare the host machine by setting up the appropriate directories and permissions. This process ensures seamless integration between your containerized applications and host resources.
To begin, identify the directories on your host machine that you wish to share with your Kubernetes applications. Typically, these directories will contain configuration files, certificates, or log directories. Once you have selected the relevant directories, create corresponding directories within your Kubernetes cluster. This step ensures that your applications can reference the shared resources using a consistent file path.
Next, configure the necessary permissions for the shared directories. Ensure that the user under which your containerized applications run has the appropriate read, write, and execute permissions for the shared directories. This step may involve adjusting ownership or group membership for the directories or applying specific access control lists (ACLs).
In addition to setting up directories and permissions, you may need to consider specific prerequisites or requirements for successful file mounting. For example, you may need to install and configure additional software components, such as the NFS server or glusterfs, depending on your chosen method for sharing files between the host and Kubernetes cluster. Additionally, you should verify that your Kubernetes nodes have the necessary storage resources available to accommodate the shared directories and their contents.
By carefully preparing your host machine for file mounting, you can ensure a smooth and efficient integration between your containerized applications and host resources. This preparation is a critical step in leveraging the benefits of Kubernetes mount file from host, enabling you to manage and scale your applications effectively.
Exploring Volumes and Persistent Volumes in Kubernetes
Volumes and persistent volumes are essential features in Kubernetes that enable effective management of file storage and sharing, making it possible to mount files from host machines. These features provide a flexible and scalable approach to managing shared resources, ensuring seamless integration between your containerized applications and host machine resources.
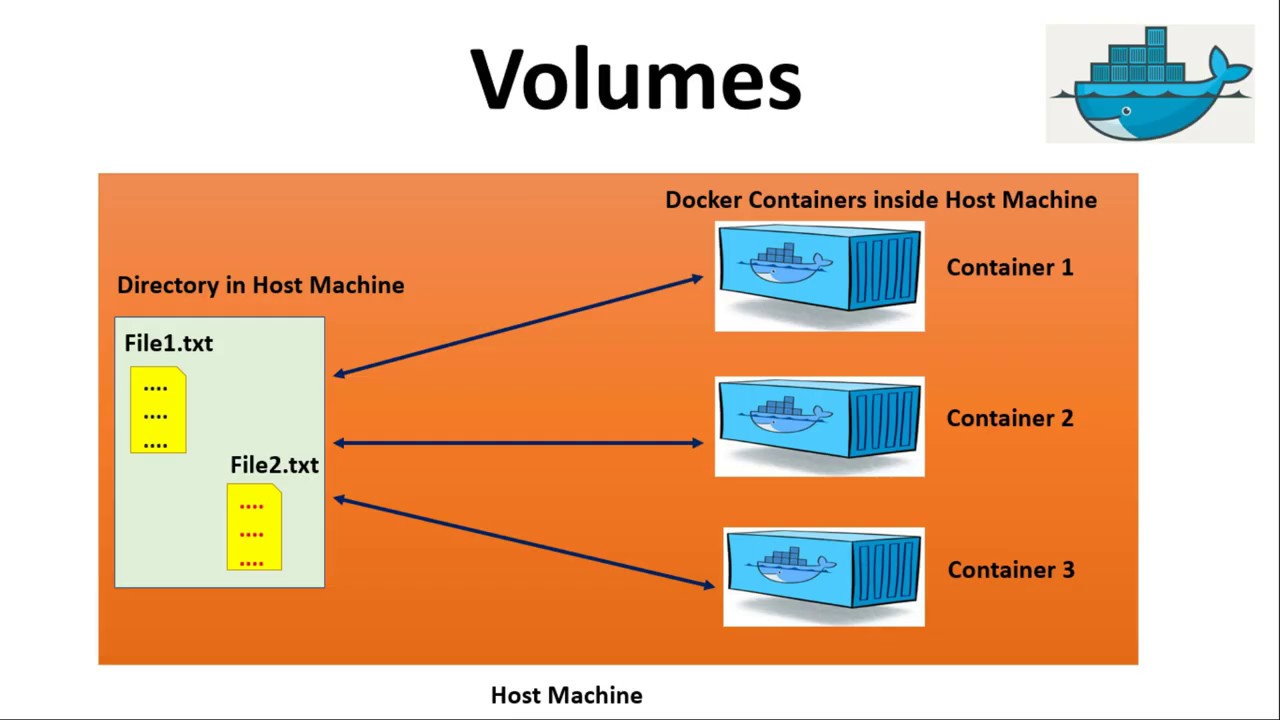
A volume in Kubernetes is a directory, containing data, which is accessible to the containers in a pod. It is a mechanism for decoupling the storage from the lifecycle of the pod, allowing data to persist beyond the lifetime of individual containers or pods. Volumes can be used to share data between containers within a pod, or to mount host directories into containers.
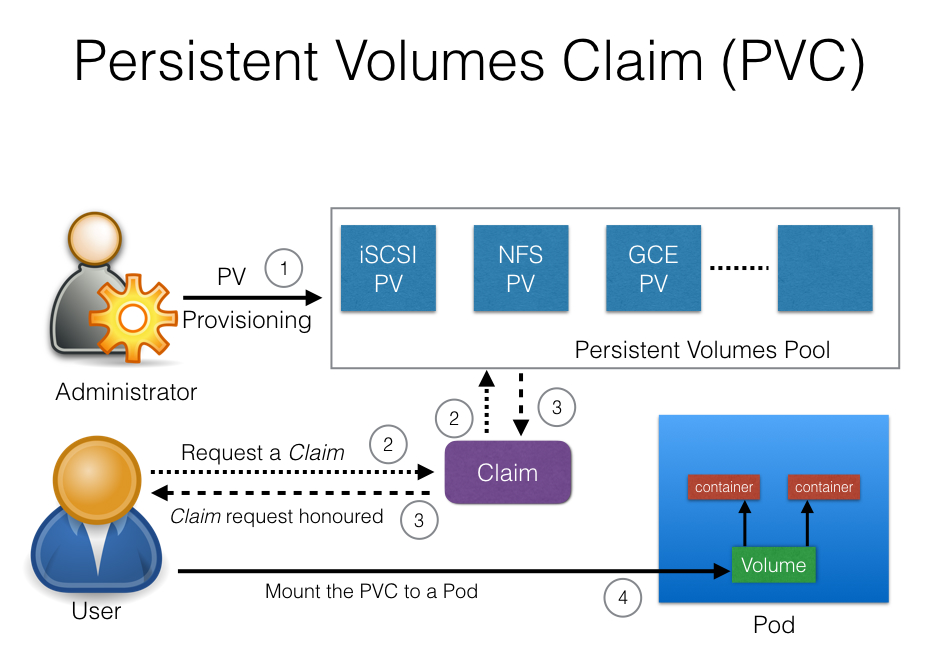
Persistent volumes, on the other hand, are a resource in the Kubernetes cluster that acts as an abstraction over various storage systems, such as local storage, network storage, or cloud-based storage. They provide a way to dynamically provision and manage storage resources, ensuring that your applications have access to the necessary resources as they scale.
To enable file mounting from host machines, you can use volumes in conjunction with the hostPath volume type. This volume type allows you to mount a file or directory from the host node’s filesystem into a pod. By combining hostPath volumes with other volume types, you can create more complex storage configurations that meet the specific needs of your applications.
When working with volumes and persistent volumes in Kubernetes, it is essential to consider best practices for managing storage resources. This includes monitoring storage usage, setting appropriate limits and requests, and ensuring that your storage configurations are aligned with your application’s scalability and performance requirements.
By leveraging volumes and persistent volumes in Kubernetes, you can create a robust and flexible storage infrastructure for your containerized applications, making it possible to mount files from host machines effectively and efficiently.
Implementing Host File Mounting with ConfigMaps
ConfigMaps in Kubernetes provide a convenient method for implementing host file mounting, allowing you to decouple configuration artifacts from container images and manage them as first-class objects within the cluster. By using ConfigMaps, you can easily manage and update configuration files without requiring modifications to your container images or redeploying your applications.
To implement host file mounting with ConfigMaps, follow these steps:
- Create a ConfigMap: You can create a ConfigMap using the
kubectl create configmapcommand or by applying a ConfigMap manifest file. When creating a ConfigMap, you can either provide key-value pairs directly or reference files containing the configuration data. For example, to create a ConfigMap based on a file namedconfig.txt, you can use the following command:kubectl create configmap my-config --from-file=config.txt - Configure a volume mount: In your pod definition, configure a volume that references the ConfigMap. This volume will be accessible to the containers within the pod. For example:
<!-- Pod definition --> apiVersion: v1 kind: Pod metadata: name: my-pod spec: containers: - name: my-container image: my-image volumeMounts: - name: config-volume mountPath: /etc/config volumes: - name: config-volume configMap: name: my-config - Deploy the pod: With the volume mount configured, you can now deploy the pod. The containers within the pod will have access to the configuration files defined in the ConfigMap at the specified mount path.
By using ConfigMaps for host file mounting, you can simplify the management of configuration files and decouple them from your container images. This approach also enables better version control and collaboration, as ConfigMaps can be easily shared and modified by multiple users.
When working with ConfigMaps and host file mounting, keep in mind the following best practices:
- Ensure that the file permissions and ownership within the ConfigMap are set appropriately for your application’s requirements.
- Monitor the size of your ConfigMaps, as large ConfigMaps may impact the performance of your pods and cluster.
- Use appropriate labeling and annotation strategies to organize and manage your ConfigMaps effectively.
By following these steps and best practices, you can successfully implement host file mounting using ConfigMaps in Kubernetes, improving the management and scalability of your containerized applications.
Leveraging Secrets for Sensitive File Mounting
When mounting sensitive files in Kubernetes, it is crucial to ensure proper security and access control. Kubernetes Secrets provide a mechanism for storing and managing sensitive information, such as passwords, tokens, or keys, separately from your application’s container images. By using Secrets, you can minimize the risk of exposing sensitive data and maintain a more secure environment for your containerized applications.
To leverage Secrets for sensitive file mounting, follow these steps:
- Create a Secret: You can create a Secret using the
kubectl create secretcommand or by applying a Secret manifest file. When creating a Secret, you can either provide the sensitive data directly or reference files containing the sensitive information. For example, to create a Secret based on a file namedpassword.txt, you can use the following command:kubectl create secret generic my-secret --from-file=password.txt - Configure a volume mount: In your pod definition, configure a volume that references the Secret. This volume will be accessible to the containers within the pod. For example:
<!-- Pod definition --> apiVersion: v1 kind: Pod metadata: name: my-pod spec: containers: - name: my-container image: my-image volumeMounts: - name: secret-volume mountPath: /etc/secrets volumes: - name: secret-volume secret: secretName: my-secret - Deploy the pod: With the volume mount configured, you can now deploy the pod. The containers within the pod will have access to the sensitive files defined in the Secret at the specified mount path. Ensure that your application is configured to read the sensitive data from the correct location.
When working with Secrets and sensitive file mounting, keep in mind the following best practices:
- Limit the number of users with access to Secrets and ensure that proper auditing and monitoring are in place.
- Rotate Secrets regularly and follow your organization’s security policies for managing sensitive data.
- Encrypt Secrets at rest and in transit to further enhance security.
- Avoid hardcoding sensitive data in your application code or configuration files whenever possible.
By following these steps and best practices, you can successfully leverage Kubernetes Secrets for sensitive file mounting, improving the security and access control of your containerized applications.
Troubleshooting Common Issues in Kubernetes File Mounting
Mounting files from host machines in Kubernetes can sometimes lead to unexpected issues or challenges. In this section, we will discuss some common problems and provide solutions and workarounds to help you overcome these obstacles.
Issue 1: Incorrect file permissions
If the files mounted from the host machine have incorrect permissions, your application might not be able to access or modify them as expected. To resolve this issue, ensure that the host directories have the appropriate permissions before mounting them in the pod.
Issue 2: Files not updating in real-time
When using host file mounting, there might be a delay in updating the files within the pod when changes are made on the host machine. To address this, consider using a file synchronization mechanism, such as rsync or inotify, to ensure that the files are updated in real-time.
Issue 3: Volume mounts not being created
If the volume mounts are not being created as expected, double-check your pod definition to ensure that the volume and volumeMounts sections are correctly configured. Also, verify that the host directory exists and is accessible by the Kubernetes node.
Issue 4: Persistent volume mounts not surviving pod restarts
When using persistent volumes for host file mounting, the mounted files might not persist across pod restarts. To resolve this, ensure that the persistent volume and persistent volume claim are correctly configured and bound. Additionally, verify that the access modes and storage capacity are appropriate for your use case.
Issue 5: Security concerns with host file mounting
Mounting files from host machines can potentially expose sensitive data or create security vulnerabilities. To mitigate these risks, consider using Kubernetes Secrets or ConfigMaps for managing sensitive files and ensure that proper access controls and auditing are in place.
By understanding these common issues and their solutions, you can effectively troubleshoot and resolve challenges related to mounting files from host machines in Kubernetes, ensuring smooth operation and maintaining the security and performance of your containerized applications.

Comparing Kubernetes File Mounting to Alternative Solutions
While mounting files from host machines in Kubernetes offers several benefits, it is essential to consider alternative solutions that might better suit your specific use case or requirements. In this section, we will compare Kubernetes file mounting to NFS servers and cloud-based storage services, discussing the pros and cons of each approach.
Option 1: NFS Servers
Network File System (NFS) servers enable file sharing across a network, making them an attractive alternative to host file mounting in Kubernetes. By using NFS servers, you can centralize your storage management and provide a unified view of your data to multiple nodes or applications.
- Pros:
- Centralized storage management
- Easy to set up and configure
- Support for multiple clients and applications
- Cons:
- Potential performance bottlenecks due to network latency
- Single point of failure if not properly configured for high availability
- Security risks if not adequately secured and monitored
Option 2: Cloud-based Storage Services
Cloud-based storage services, such as Amazon Elastic Block Store (EBS), Google Persistent Disks, or Azure Disk Storage, provide scalable and flexible storage options for containerized applications. By using these services, you can offload storage management to a third-party provider and focus on developing and deploying your applications.
- Pros:
- Scalable and flexible storage options
- Reduced storage management burden
- Integration with other cloud-based services and tools
- Cons:
- Potential vendor lock-in
- Additional costs associated with storage usage and data transfer
- Dependence on the cloud provider’s infrastructure and services
When comparing Kubernetes file mounting to alternative solutions, consider factors such as performance, scalability, security, and cost. By evaluating these options, you can make an informed decision on the best approach for your specific use case and requirements.
Optimizing File Mounting for Scalability and Performance
Mounting files from host machines in Kubernetes can significantly impact the scalability and performance of your containerized applications. To ensure smooth operation in large-scale environments, consider the following tips and strategies for optimizing file mounting configurations.
Tip 1: Use read-only file mounts when possible
When deploying applications that only require read access to mounted files, use read-only file mounts. This approach reduces the risk of accidental modifications and improves the overall security and stability of your applications.
Tip 2: Limit file mounts to necessary files and directories
Minimize the number of files and directories mounted from the host machine to reduce the attack surface and improve the performance of your applications. Only mount the files and directories that are essential for your applications to function correctly.
Tip 3: Monitor and adjust file mounting configurations
Regularly monitor the performance and resource usage of your file mounting configurations. Adjust the configurations as needed to ensure optimal performance and scalability. This may include resizing volumes, adjusting access modes, or modifying mount options.
Tip 4: Implement caching strategies
Leverage caching strategies, such as docker-sync or kube-cache, to improve the performance of file mounting in Kubernetes. Caching strategies can help reduce the latency and improve the throughput of file operations, leading to better overall application performance.
Tip 5: Evaluate the use of network-attached storage
Consider using network-attached storage solutions, such as NFS servers or cloud-based storage services, to offload storage management and improve the scalability and performance of your applications. These solutions can help distribute the storage load across multiple nodes and provide a more uniform and consistent storage experience for your applications.
By following these tips and strategies, you can optimize file mounting in Kubernetes for scalability and performance, ensuring smooth operation in large-scale environments and maintaining the security and stability of your containerized applications.
