
What are Kubectl Replicasets and Why are They Important?
Kubectl Replicasets are a fundamental component of Kubernetes, designed to manage and scale deployments with ease. They play a crucial role in ensuring high availability and fault tolerance for applications, making them indispensable for managing modern, distributed systems. By maintaining a specified number of replica pods, Kubectl Replicasets automatically replace any failed or unresponsive pods, ensuring that your application remains operational and performant.

Key Concepts and Terminology
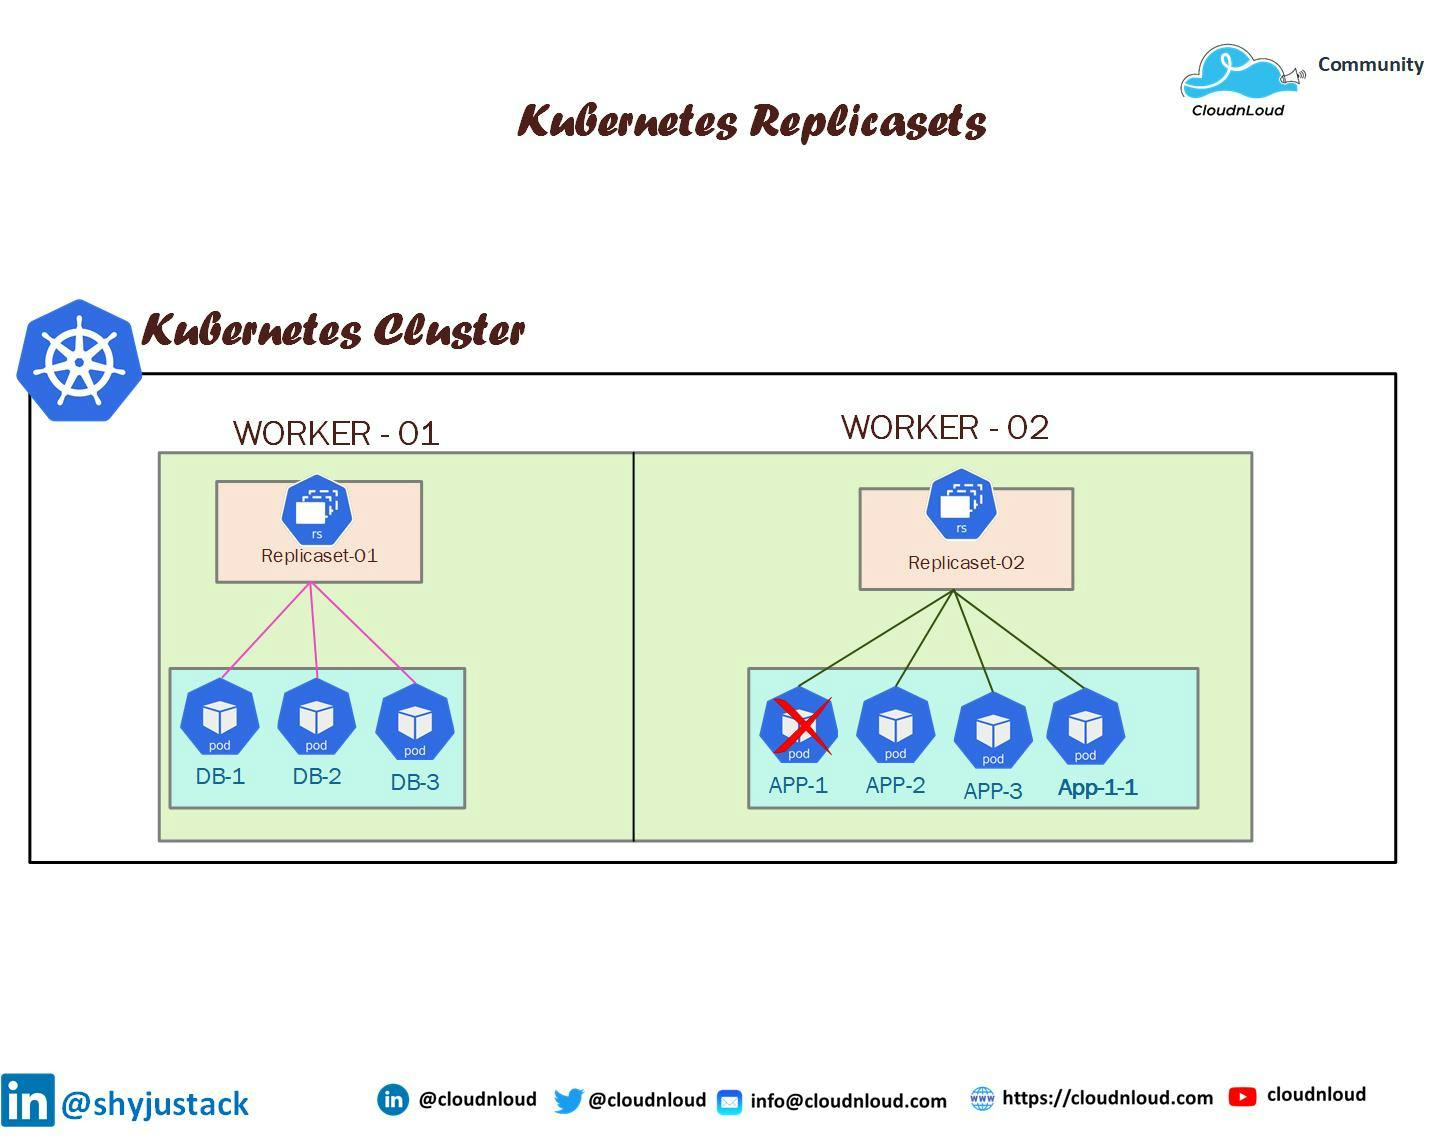
To effectively work with Kubectl Replicasets, it’s essential to understand several key concepts and terms. A Kubectl Replicaset is a Kubernetes object that maintains a stable set of replica pods, ensuring that a specified number of identical pods are running at any given time. This is achieved through the use of the following components:
- Replicas: The number of pod instances that a Kubectl Replicaset manages.
- Labels: Key-value pairs attached to Kubernetes objects, used for organizing and selecting groups of objects.
- Selectors: Label selectors are used by Kubectl Replicasets to identify which pods they should manage. They can be either equality-based or set-based.
- Pod Templates: A specification for creating new pods, including container images, environment variables, and resource requests.
By mastering these concepts, you’ll be well-equipped to create, manage, and scale your applications using Kubectl Replicasets.

Creating and Managing Replicasets with Kubectl
Kubectl Replicasets can be created and managed using various kubectl commands. To create a Replicaset, use the kubectl create command followed by the Replicaset resource type and a YAML manifest file. The YAML manifest specifies the Replicaset’s properties, such as the number of replicas, labels, selectors, and pod templates. Here’s an example:
apiVersion: apps/v1 kind: ReplicaSet metadata: name: frontend spec: replicas: 3 selector: matchLabels: app: guestbook tier: frontend template: metadata: labels: app: guestbook tier: frontend spec: containers: - name: php-redis image: gcr.io/google\_samples/gb-frontend:v3 After creating a Replicaset, you can list them using the kubectl get replicasets command, which displays a table with the Replicaset name, namespace, age, and desired/current/ready replicas. To update a Replicaset, use the kubectl edit or kubectl apply command with a new YAML manifest. To delete a Replicaset, use the kubectl delete command followed by the Replicaset name or YAML manifest.
When managing Replicasets, it’s essential to follow best practices, such as using descriptive names, applying version control to YAML manifests, and monitoring Replicaset status regularly. By mastering these processes, you’ll be able to efficiently manage your application’s availability and scalability.

Scaling Kubectl Replicasets: A ‘How to’ Guide
Kubectl Replicasets are a fundamental feature in Kubernetes, playing a crucial role in managing and scaling deployments. They help maintain high availability and ensure fault tolerance for applications. An essential aspect of working with Replicasets is the ability to scale them, either manually or automatically, to match the needs of your application or service. This section will discuss the steps for scaling Kubectl Replicasets, along with the benefits and considerations of each scaling method.
Manual Scaling with Kubectl Replicasets
To manually scale a Kubectl Replicaset, you can use the kubectl scale command followed by the --replicas flag and the desired number of replicas. For example, to scale a Replicaset named my-replicaset to 3 replicas, you would use the following command:
kubectl scale replicaset my-replicaset --replicas=3 Manual scaling is useful when you have a predictable workload and can anticipate the required number of replicas. However, it may not be the best option for workloads with fluctuating demand or unpredictable patterns.
Automatic Scaling with Kubectl Replicasets
For workloads with varying demand, automatic scaling can be more suitable. Kubernetes supports two types of automatic scaling: Horizontal Pod Autoscaler (HPA) and Cluster Autoscaler. HPA adjusts the number of replicas in a Replicaset based on CPU utilization or other selectable metrics, while Cluster Autoscaler adjusts the size of the node pool in response to resource requests and limits.
Horizontal Pod Autoscaler (HPA)
To set up HPA, you need to define a target CPU utilization for your application and create a Horizontal Pod Autoscaler resource. The HPA will monitor the CPU utilization of your application and adjust the number of replicas accordingly. For example, to create an HPA for a Deployment named my-deployment with a target CPU utilization of 50%, you would use the following command:
kubectl autoscale deployment my-deployment --cpu-percent=50 --min=1 --max=10 This command sets the minimum and maximum number of replicas to 1 and 10, respectively. The HPA will increase the number of replicas if the CPU utilization exceeds 50% and decrease it if the CPU utilization falls below 50%.
Cluster Autoscaler
Cluster Autoscaler automatically adjusts the size of the node pool in response to resource requests and limits. To use Cluster Autoscaler, you need to ensure that your nodes have the appropriate labels and that your workloads request the required resources. Cluster Autoscaler is typically enabled by default in most managed Kubernetes services.
Benefits and Considerations
Manual scaling is straightforward and allows you to have precise control over the number of replicas. However, it may not be suitable for workloads with fluctuating demand or unpredictable patterns. Automatic scaling, on the other hand, can help maintain optimal resource utilization and reduce manual intervention. However, it may introduce some latency in responding to changes in demand, and you may need to fine-tune the scaling policies to achieve the desired balance between cost and performance.
Rolling Updates and Rollbacks with Kubectl Replicasets
Kubectl Replicasets offer a powerful feature called rolling updates, which allows you to update the running version of your application with minimal downtime. Rolling updates enable you to replace old pods with new ones incrementally, ensuring that your application remains available during the update process. This section will discuss how to perform rolling updates and rollbacks with Kubectl Replicasets.
Performing a Rolling Update
To perform a rolling update, you need to update the container image or other settings in your Replicaset’s pod template and then apply the updated configuration using the kubectl apply command. Kubernetes will automatically replace the old pods with new ones, ensuring that at least one pod remains available during the update process.
# Update the container image in the Replicaset's pod template vim replicaset-pod-template.yaml
Apply the updated configuration
kubectl apply -f replicaset-pod-template.yaml
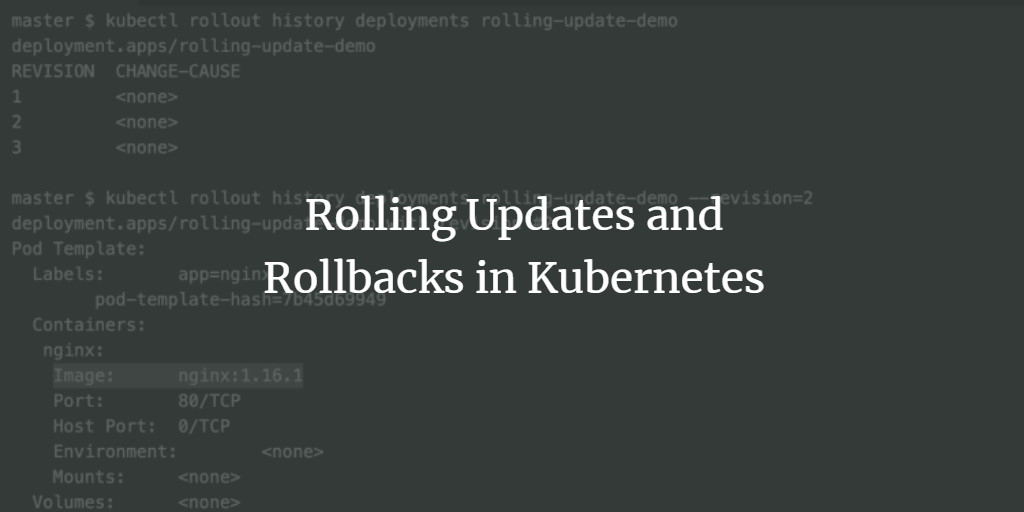
During a rolling update, Kubernetes will gradually replace the old pods with new ones, ensuring that the number of available replicas remains above the specified minimum. You can monitor the progress of the rolling update using the kubectl rollout status command.
kubectl rollout status replicaset/my-replicaset Performing a Rollback
If you encounter issues during a rolling update, you can roll back to the previous version of your application. To perform a rollback, use the kubectl rollout undo command followed by the name of the Replicaset and the revision number or label selector. For example, to roll back to the previous revision of a Replicaset named my-replicaset, use the following command:
kubectl rollout undo replicaset/my-replicaset --to-revision=2 Alternatively, you can use a label selector to roll back to a specific version. For example, to roll back to the version of the Replicaset with the label app: v1, use the following command:
kubectl rollout undo replicaset/my-replicaset --to-revision=app=v1 Benefits and Considerations
Rolling updates and rollbacks offer several benefits, including minimal downtime, improved reliability, and the ability to quickly recover from failed updates. However, they may introduce some complexity in managing your deployments, and you may need to fine-tune the update policies to achieve the desired balance between speed and stability.
Troubleshooting Kubectl Replicasets
Kubectl Replicasets are a powerful feature in Kubernetes, but they can sometimes encounter issues that require troubleshooting. This section will discuss common issues with Kubectl Replicasets and offer guidance on identifying and resolving them.
Misconfigured Selectors
Selectors are used to identify the pods that belong to a Replicaset. If the selector is misconfigured, the Replicaset may not be able to manage the pods correctly. To identify misconfigured selectors, check the spec.selector field in the Replicaset’s YAML configuration. Ensure that the selector matches the labels of the pods that you want to manage.
Unhealthy Pods
Unhealthy pods can cause issues with Replicasets, such as failed deployments or inconsistent scaling. To identify unhealthy pods, use the kubectl describe pod command to view the status and events of each pod. Check the logs and events for any errors or warnings, and take appropriate action to resolve the issues.
Resource Constraints
Resource constraints, such as CPU or memory limits, can cause issues with Replicasets, such as failed deployments or pod evictions. To identify resource constraints, use the kubectl describe pod command to view the resource requests and limits of each pod. Ensure that the requests and limits are set appropriately for your workload, and adjust them as necessary to avoid resource contention.
Troubleshooting Strategies
When troubleshooting Kubectl Replicasets, it’s essential to have a systematic approach. Here are some troubleshooting strategies that you can use:
- Check the logs: Use the
kubectl logscommand to view the logs of the pods in the Replicaset. Check for any errors or warnings that may indicate the cause of the issue. - Check the events: Use the
kubectl describecommand to view the events associated with the Replicaset. Check for any errors or warnings that may indicate the cause of the issue. - Check the configuration: Use the
kubectl getandkubectl describecommands to view the configuration of the Replicaset and its associated resources. Check for any misconfigurations or inconsistencies that may indicate the cause of the issue. - Experiment with different settings: If you’re unable to identify the cause of the issue, try experimenting with different settings, such as changing the number of replicas, adjusting the resource requests and limits, or modifying the pod template. This can help you isolate the issue and identify a solution.

Best Practices for Using Kubectl Replicasets
Kubectl Replicasets are a powerful feature in Kubernetes, but they require careful management to ensure high availability, fault tolerance, and optimal resource utilization. This section will share expert recommendations for optimizing the use of Kubectl Replicasets, including monitoring strategies, naming conventions, and version control.
Monitoring Strategies
Monitoring is essential for identifying and resolving issues with Kubectl Replicasets. Here are some monitoring strategies that you can use:
- Use a monitoring tool: Use a monitoring tool, such as Prometheus or Nagios, to monitor the health and performance of your Replicasets. Monitoring tools can alert you to issues, such as failed deployments, resource contention, or unhealthy pods.
- Check the logs: Regularly check the logs of your Replicasets and their associated resources. Look for any errors or warnings that may indicate issues with your application or infrastructure.
- Monitor resource utilization: Monitor the resource utilization of your Replicasets, including CPU, memory, and network usage. Adjust the resource requests and limits as necessary to ensure optimal resource utilization and prevent resource contention.
Naming Conventions
Naming conventions are essential for managing and scaling Kubectl Replicasets. Here are some naming conventions that you can use:
- Use a descriptive name: Use a descriptive name for your Replicaset that reflects its purpose, such as
my-app-replicasetordatabase-replicaset. - Include the version number: Include the version number of your application in the name of your Replicaset, such as
my-app-v1-replicasetormy-app-v2-replicaset. - Use a consistent naming pattern: Use a consistent naming pattern for your Replicasets, such as
[app-name]-[version]-replicasetor[app-name]-replicaset-[version].
Version Control
Version control is essential for managing and scaling Kubectl Replicasets. Here are some version control best practices that you can follow:
- Use a version control system: Use a version control system, such as Git, to manage the configuration of your Replicasets. Version control systems allow you to track changes, collaborate with others, and roll back to previous versions if necessary.
- Create a new branch for each deployment: Create a new branch for each deployment of your application. This allows you to isolate changes and test them before deploying them to production.
- Use tags for versioning: Use tags for versioning your Replicasets. Tags allow you to easily identify the version of your application and roll back to previous versions if necessary.
Exploring Advanced Kubectl Replicaset Features
Kubectl Replicasets offer several advanced features that can help you optimize your deployments and ensure high availability and fault tolerance. This section will delve into these advanced features, including custom strategies, affinity and anti-affinity rules, and pod disruption budgets.
Custom Strategies
By default, Kubectl Replicasets use a simple deployment strategy that replaces old pods with new ones. However, you can customize this strategy using the strategy field in the Replicaset’s YAML configuration. Custom strategies include RollingUpdate and Recreate.
- RollingUpdate: The RollingUpdate strategy gradually replaces old pods with new ones, ensuring that at least one pod remains available during the update process. This strategy is useful for applications that require high availability and minimal downtime.
- Recreate: The Recreate strategy deletes all the old pods before creating new ones. This strategy is useful for applications that can tolerate some downtime during the update process.
Affinity and Anti-Affinity Rules
Affinity and anti-affinity rules allow you to control the placement of pods in a Replicaset. Affinity rules attract pods to the same node, while anti-affinity rules repel pods from the same node. These rules can help you optimize the performance and availability of your applications.
- Affinity rules: Affinity rules can be used to ensure that pods are scheduled on the same node as their dependencies, such as a database or a cache. Affinity rules can also be used to balance the load across nodes.
- Anti-affinity rules: Anti-affinity rules can be used to ensure that pods are not scheduled on the same node, reducing the risk of a single point of failure. Anti-affinity rules can also be used to balance the load across nodes.
Pod Disruption Budgets
Pod disruption budgets (PDBs) allow you to control the maximum number of pods that can be unavailable during a voluntary disruption, such as a node upgrade or a maintenance operation. PDBs can help you ensure high availability and fault tolerance for your applications.
- MinAvailable: The MinAvailable policy ensures that at least a specified number of pods are available during a disruption. For example, if you set the MinAvailable policy to 2, Kubernetes will not allow more than one pod to be unavailable during a disruption.
- MaxUnavailable: The MaxUnavailable policy ensures that at most a specified number of pods can be unavailable during a disruption. For example, if you set the MaxUnavailable policy to 1, Kubernetes will not allow more than one pod to be unavailable during a disruption.
