Streamlining Kubernetes Operations with ‘kubectl create pod’
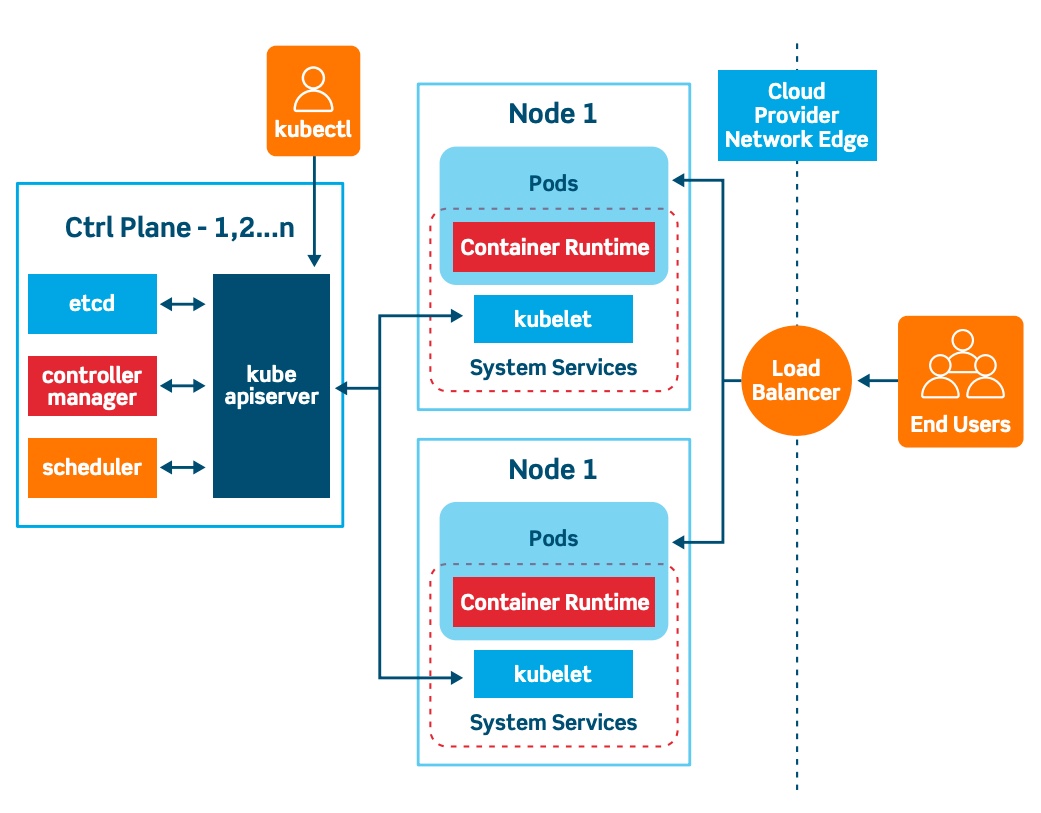
Kubernetes is a powerful open-source platform for deploying, scaling, and managing containerized applications. At the heart of Kubernetes operations lies the ‘kubectl’ command-line tool, which provides a versatile interface for interacting with Kubernetes clusters. Among the various ‘kubectl’ commands, ‘kubectl create pod’ holds a special place, as it enables users to create and manage pods, the smallest deployable units in a Kubernetes cluster.
Understanding the ‘kubectl create pod’ command is crucial for efficient Kubernetes operations. By mastering this command, users can streamline their workflows, reduce manual intervention, and ensure the consistent deployment and management of containerized applications. This article offers an in-depth examination of the ‘kubectl create pod’ functionality, covering everything from prerequisites and basic syntax to advanced usage and best practices.
Prerequisites for Utilizing ‘kubectl create pod’
To start using the ‘kubectl create pod’ command, you need to meet a few prerequisites. First and foremost, ensure that you have a functional Kubernetes cluster up and running. This cluster can be set up locally using tools like Minikube, Kind, or Docker Desktop, or it can be hosted on a cloud provider such as Amazon Web Services (AWS), Google Cloud Platform (GCP), or Microsoft Azure. For detailed instructions on setting up a Kubernetes cluster, refer to the official Kubernetes documentation:
Kubernetes Cluster Setup Guide
Additionally, you need to have the ‘kubectl’ command-line tool installed on your local machine. ‘kubectl’ is the primary interface for interacting with a Kubernetes cluster, and it allows you to execute various commands, including ‘kubectl create pod’. To install ‘kubectl’, consult the official Kubernetes documentation:
Basic Syntax and Options of ‘kubectl create pod’
‘kubectl create pod’ follows a specific syntax, which includes required and optional parameters. The basic syntax is as follows:
kubectl create pod <pod-name> --image=<container-image>
In this syntax:
<pod-name>: The name you want to assign to the pod.<container-image>: The container image that you want to run in the pod.
For example, to create a pod named ‘nginx-pod’ using the ‘nginx:latest’ container image, execute the following command:
kubectl create pod nginx-pod --image=nginx:latest
Optional parameters include labels, annotations, and additional container arguments. For instance, to add labels to the ‘nginx-pod’ pod, use the following command:
kubectl create pod nginx-pod --image=nginx:latest --labels=app=web,tier=frontend
For more information on the ‘kubectl create pod’ command and its various options, consult the official Kubernetes documentation:
kubectl create pod documentation
Creating a Simple Pod with ‘kubectl create pod’
Now that you understand the basic syntax and options of ‘kubectl create pod’, let’s walk through an example of creating a simple pod. In this example, we will create a pod named ‘nginx-pod’ using the ‘nginx:latest’ container image:
kubectl create pod nginx-pod --image=nginx:latest
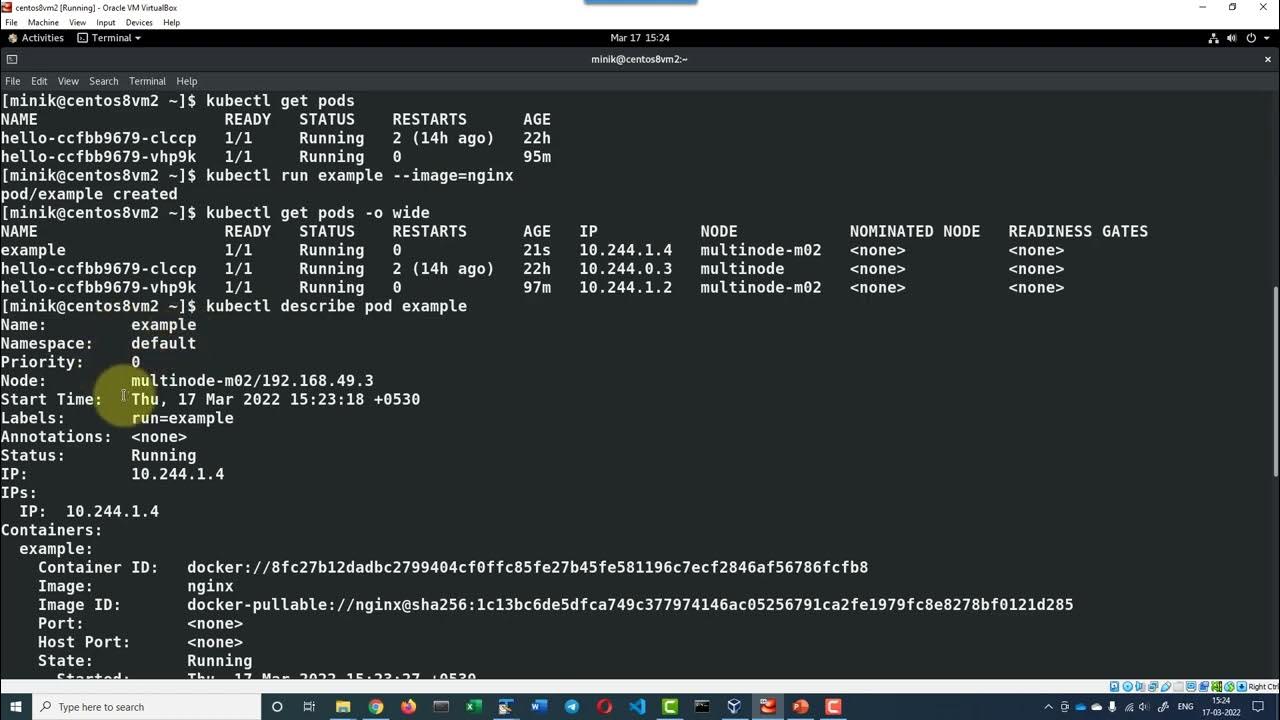
After executing the command, ‘kubectl’ will create the ‘nginx-pod’ pod and schedule it to run on a node in the cluster. To verify that the pod has been created, use the ‘kubectl get pods’ command:
kubectl get pods
You should see output similar to the following:
NAME READY STATUS RESTARTS AGE nginx-pod 1/1 Running 0 1m
The ‘READY’ column indicates that the pod has one container, and it is ready to accept traffic. The ‘STATUS’ column shows that the pod is currently running. The ‘RESTARTS’ column displays the number of times the pod has been restarted, and the ‘AGE’ column shows the time since the pod was created.
Common use cases for ‘kubectl create pod’ include:
- Quickly deploying a single-container pod for testing or debugging purposes.
- Creating a temporary pod to perform a specific task, such as running a batch job or a scheduled task.
- Experimenting with new container images or configurations before integrating them into a more complex deployment.
When using ‘kubectl create pod’, keep the following best practices in mind:
- Use descriptive pod names that clearly indicate the pod’s purpose or function.
- Specify the appropriate container image and version to ensure compatibility and maintainability.
- Add relevant labels to the pod to facilitate organization, filtering, and resource management.
- Monitor the pod’s resource usage and adjust resource requests and limits as needed to maintain cluster performance and stability.
Troubleshooting Common Issues with ‘kubectl create pod’
While using ‘kubectl create pod’, users may encounter various issues that can hinder their workflows. Here, we identify common problems and provide solutions to help users overcome these challenges:
Issue 1: Pod creation fails with an “ImagePullBackOff” status
This issue occurs when ‘kubectl’ is unable to pull the specified container image from the configured registry. To resolve this issue, ensure that the container image exists in the registry and that the registry is accessible from the cluster. Additionally, verify that the image name and tag are spelled correctly in the ‘kubectl create pod’ command.
Issue 2: Pod remains in the “Pending” status indefinitely
A pod may remain in the “Pending” status if there are insufficient resources available on the node to schedule the pod. To troubleshoot this issue, check the resource allocation on the node and consider resizing or scaling the node to accommodate the pod’s resource requirements. Additionally, ensure that the node has the necessary labels and taints to allow pod scheduling.
Issue 3: Pod fails to start due to incorrect configuration
If a pod fails to start due to incorrect configuration, review the pod’s configuration and ensure that all required parameters, such as container images, ports, and volumes, are specified correctly. Additionally, consult the pod’s logs for more information on the cause of the failure:
kubectl logs <pod-name>
Issue 4: Pod is not reachable or unresponsive
If a pod is not reachable or unresponsive, verify that the pod’s containers are running and that the appropriate ports are exposed. Additionally, ensure that the pod’s network configuration is correct and that there are no network policies or firewall rules blocking traffic to the pod.
For further assistance with troubleshooting ‘kubectl create pod’ issues, consult the official Kubernetes documentation and community resources:

Advanced ‘kubectl create pod’ Usage: YAML Files and Templates
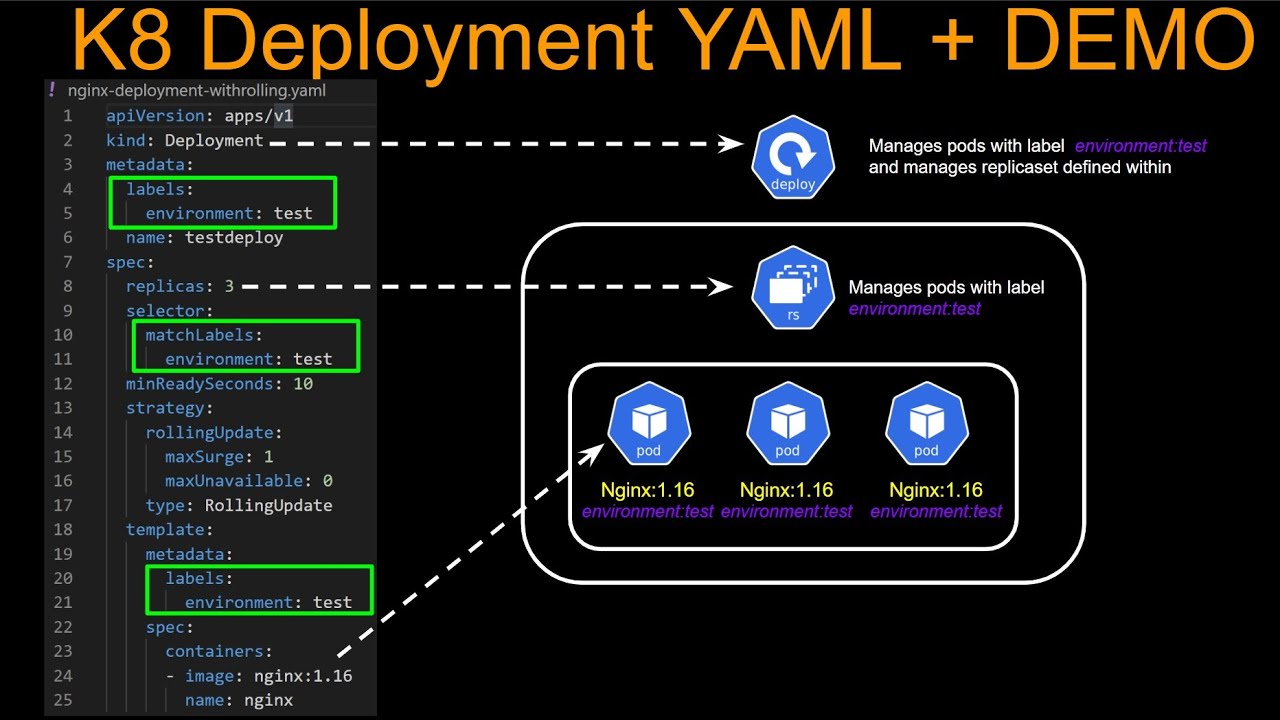
While ‘kubectl create pod’ is useful for creating simple pods, it has limitations when working with more complex configurations. For such scenarios, Kubernetes provides YAML manifests and templates, which offer a more structured and flexible approach to defining pods and other resources. Here, we introduce advanced ‘kubectl create pod’ usage, focusing on YAML files and templates.
YAML Manifests
A YAML manifest is a file that defines one or more Kubernetes resources, such as pods, services, or deployments. Manifests provide a structured and declarative way to define resources, making it easier to manage and maintain complex configurations. To create a pod using a YAML manifest, follow these steps:
- Create a YAML file named ‘nginx-pod.yaml’ with the following content:
{ "apiVersion": "v1", "kind": "Pod", "metadata": { "name": "nginx-pod" }, "spec": { "containers": [ { "name": "nginx", "image": "nginx:latest", "ports": [ { "containerPort": 80 } ] } ] } }- Apply the manifest using the ‘kubectl apply’ command:
kubectl apply -f nginx-pod.yaml
This command creates a pod named ‘nginx-pod’ with a single container running the ‘nginx:latest’ image and exposing port 80.
Templates
Templates are reusable YAML manifests that can be parameterized and used to create multiple resources with similar configurations. To create a template, use the ‘kubectl create’ command with the ‘–template’ flag:
kubectl create -f - <
This command creates a pod named ‘my-pod’ with a single container running the ‘my-image:latest’ image and exposing port 80. By using templates, you can simplify the creation and management of multiple similar resources.
When working with advanced ‘kubectl create pod’ usage, keep the following best practices in mind:
- Use version control to manage YAML manifests and templates, ensuring that changes are tracked and auditable.
- Modularize YAML manifests and templates to promote reusability and maintainability.
- Leverage Kubernetes tools and libraries, such as ‘kustomize’ and ‘Helm’, to simplify the management of complex configurations.
- Consider using higher-level abstractions, such as Deployments and StatefulSets, for managing pods in production environments.
For more information on YAML manifests and templates, consult the official Kubernetes documentation:
- YAML Schema for Kubernetes Objects
- Defining Custom Resources with a YAML Manifest
- Using Templates with kubectl
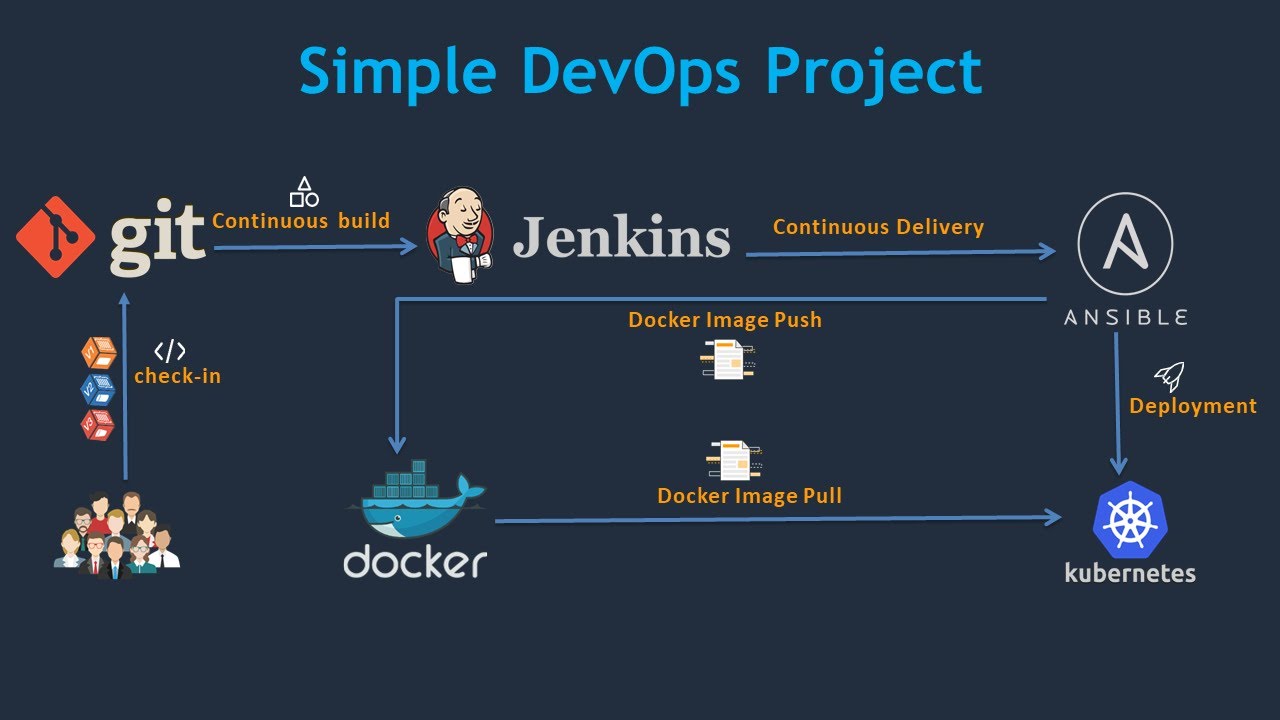
Integrating ‘kubectl create pod’ with CI/CD Pipelines
As Kubernetes deployments grow in complexity, automating pod deployment and updates becomes increasingly important. By integrating ‘kubectl create pod’ with Continuous Integration and Continuous Deployment (CI/CD) pipelines, you can streamline your deployment processes and ensure consistent, reliable, and efficient delivery of containerized applications. In this section, we will discuss how to integrate ‘kubectl create pod’ with popular CI/CD tools and Kubernetes resources.
Jenkins
Jenkins is a widely-used open-source automation server that supports CI/CD pipelines for various platforms, including Kubernetes. To integrate ‘kubectl create pod’ with Jenkins, follow these steps:
- Install the Kubernetes plugin for Jenkins.
- Configure your Jenkins environment to connect to your Kubernetes cluster.
- Create a Jenkins pipeline that uses ‘kubectl create pod’ to deploy your application.
For more information on integrating Jenkins with Kubernetes, consult the official Jenkins documentation:
GitLab CI/CD
GitLab CI/CD is a built-in CI/CD solution for GitLab that supports Kubernetes deployments. To integrate ‘kubectl create pod’ with GitLab CI/CD, follow these steps:
- Create a GitLab project and configure your repository for GitLab CI/CD.
- Create a ‘.gitlab-ci.yml’ file in your repository that defines your CI/CD pipeline and uses ‘kubectl create pod’ to deploy your application.
- Push your changes to your GitLab repository to trigger the CI/CD pipeline.
For more information on integrating GitLab CI/CD with Kubernetes, consult the official GitLab documentation:
Tips and Best Practices
When integrating ‘kubectl create pod’ with CI/CD pipelines, consider the following tips and best practices:
- Leverage Kubernetes resources, such as Deployments and StatefulSets, for managing pods in production environments.
- Use Kubernetes labels and selectors to manage and organize your resources effectively.
- Implement proper error handling and rollback strategies to ensure reliable deployments.
- Monitor your deployments and resources using tools like Prometheus, Grafana, and Elasticsearch.
- Ensure proper security and access control for your CI/CD pipelines and Kubernetes resources.
By integrating ‘kubectl create pod’ with CI/CD pipelines, you can automate your deployment processes, reduce manual intervention, and ensure consistent, reliable, and efficient delivery of your containerized applications.
Best Practices for ‘kubectl create pod’ and Pod Management
Efficiently managing and deploying containerized applications in a Kubernetes cluster requires a solid understanding of ‘kubectl create pod’ and best practices for pod management. This section summarizes best practices for using ‘kubectl create pod’ and managing pods in a Kubernetes cluster, emphasizing the importance of proper resource allocation, monitoring, and security.
Proper Resource Allocation
Proper resource allocation is crucial for ensuring the stability and performance of your Kubernetes cluster. When creating pods using ‘kubectl create pod’, consider setting appropriate resource requests and limits for each container in your pod and monitoring resource usage to adjust these settings as needed. Utilize Kubernetes Horizontal Pod Autoscaler (HPA) to automatically scale pods based on resource usage and performance metrics.
Monitoring
Monitoring your pods and Kubernetes cluster is essential for maintaining stability and performance. Use Kubernetes built-in monitoring tools, such as Metrics Server and cAdvisor, to monitor resource usage and performance metrics. Integrate Kubernetes with popular monitoring solutions, such as Prometheus, Grafana, and Elasticsearch, and configure alerts and notifications for critical events and resource usage thresholds.
Security
Security is a critical aspect of managing pods in a Kubernetes cluster. Implement proper access control and authentication for your Kubernetes cluster and resources, use Kubernetes Network Policies to control network traffic and access between pods, and regularly scan and update your container images and Kubernetes resources for security vulnerabilities and best practices.
By following these best practices, you can ensure efficient and reliable management and deployment of containerized applications using ‘kubectl create pod’ and Kubernetes resources.