What is Terraform and Why Use It?
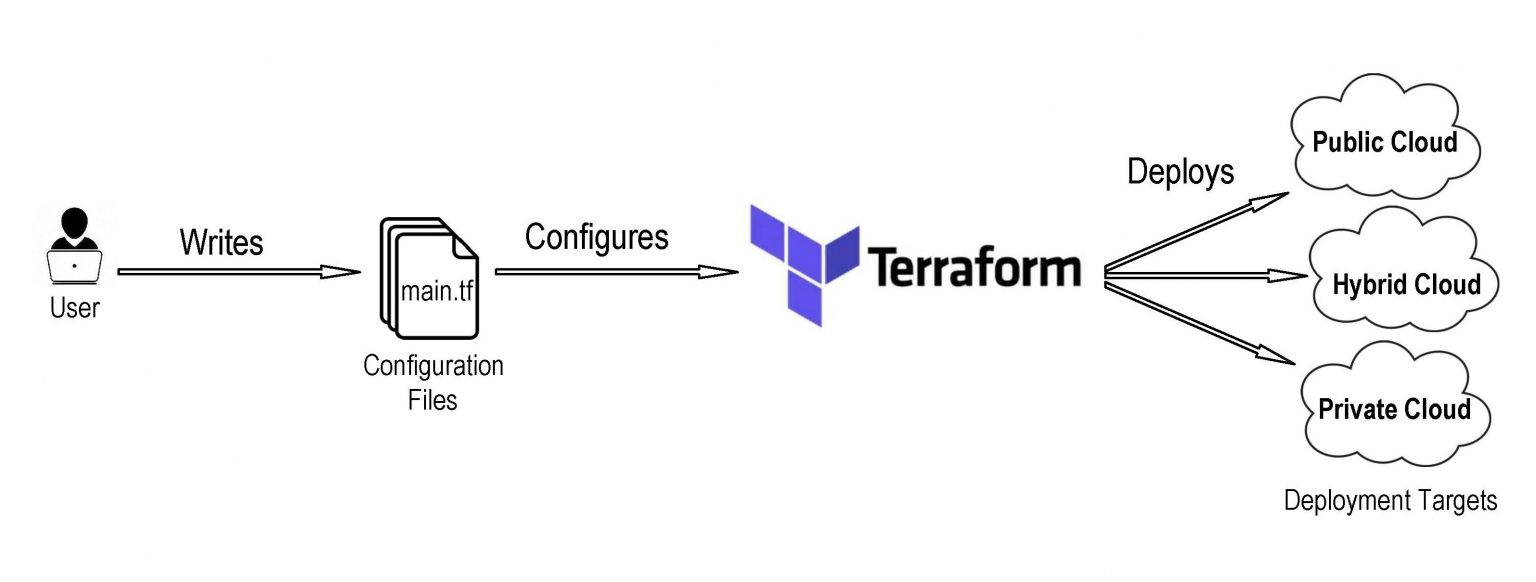
Terraform is an open-source Infrastructure as Code (IaC) software developed by HashiCorp. It simplifies the process of managing and provisioning infrastructure by automating the configuration and deployment of various resources, including virtual machines, networks, and databases. The primary goal of Terraform is to enable developers to manage infrastructure in a consistent, predictable, and scalable manner, thereby reducing human error and increasing efficiency.
Terraform uses its own declarative language to define resources and their dependencies in configuration files. This approach allows developers to create, update, and delete resources in a controlled and systematic way. By using Terraform, teams can ensure that their infrastructure is versioned, auditable, and easily reproducible, which is essential for maintaining a reliable and agile development environment.
The term “how to use Terraform” has gained popularity among DevOps professionals and developers, as it highlights the growing need for IaC tools in modern infrastructure management. Terraform’s flexibility, ease of use, and extensive provider support make it an ideal choice for managing infrastructure across various cloud platforms and on-premises environments.
Getting Started: Installing Terraform
To begin using Terraform, you must first install it on your local machine or a designated server. Terraform is available for various operating systems, including Windows, macOS, and Linux. The installation process is straightforward and requires minimal system resources.
System Requirements and Prerequisites
Before installing Terraform, ensure that your system meets the following requirements:
- 64-bit operating system
- 200 MB of free disk space
- 2 GB of RAM (4 GB recommended)
- Internet connection for downloading Terraform and accessing providers
Installing Terraform on Windows
To install Terraform on Windows, follow these steps:
- Download the latest Terraform ZIP file from the Terraform downloads page.
- Extract the ZIP file to a location of your choice (e.g., C:\Program Files\Terraform).
- Add the Terraform installation directory to your system’s PATH environment variable. To do this, open the System Properties window, click on the “Advanced” tab, and then click the “Environment Variables” button. In the “System Variables” section, scroll down and find the “Path” variable, then click “Edit”. Add the full path to the Terraform installation directory (e.g., C:\Program Files\Terraform) and click “OK” to save your changes.
- Verify the installation by opening a new command prompt and typing “terraform -version”. You should see the installed version of Terraform displayed.
Installing Terraform on macOS
To install Terraform on macOS, follow these steps:
- Download the latest Terraform DMG file from the Terraform downloads page.
- Open the DMG file and drag the Terraform application to your “Applications” folder.
- Add the Terraform application to your system’s PATH environment variable. Open the Terminal application and enter the following command: “echo ‘export PATH=”$PATH:/Applications/Terraform”‘ >> ~/.bash\_profile”. Close and reopen the Terminal application to apply the changes.
- Verify the installation by typing “terraform -version” in the Terminal. You should see the installed version of Terraform displayed.
Installing Terraform on Linux
To install Terraform on Linux, follow these steps:
- Download the latest Terraform package for your Linux distribution from the Terraform downloads page.
- Open a terminal and navigate to the directory where you downloaded the package.
- Install Terraform using the appropriate package manager for your distribution. For example, on Ubuntu, you can use the following command: “sudo apt-key adv –keyserver keyserver.ubuntu.com –recv-keys 2C68D409”. Then, add the following line to your “sources.list” file: “deb [arch=amd64] https://releases.hashicorp.com/terraform/$(terraform -v | cut -d’ ‘ -f2)/terraform-$(lsb\_release -cs) main”. Finally, update your package list and install Terraform with the following commands: “sudo apt-get update” and “sudo apt-get install terraform”.
- Verify the installation by typing “terraform -version” in the terminal. You should see the installed version of Terraform displayed.
Understanding Terraform Configuration Files
Terraform configuration files, with the file extension “.tf”, define the resources and infrastructure managed by Terraform. These files use a simple and human-readable syntax, making it easy to learn and understand. Configuration files consist of several key components, including providers, resources, variables, and outputs.
Providers
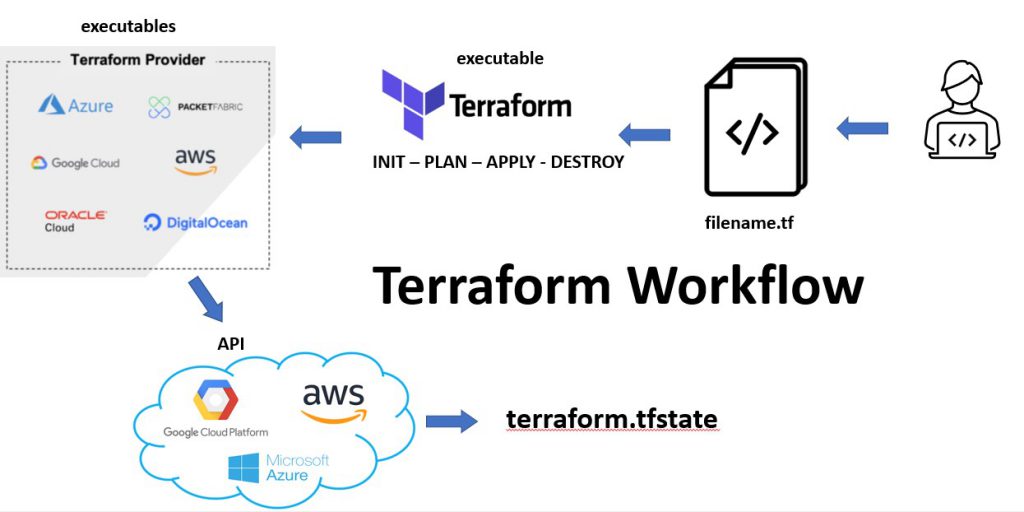
Providers in Terraform represent the APIs and tools used to interact with various infrastructure platforms, such as AWS, Azure, or Google Cloud Platform. Each provider is configured with a set of arguments, allowing you to specify the required credentials and endpoint information. To use a provider, you must import its module from the Terraform Registry or a custom module repository.
Resources
Resources in Terraform configuration files represent the actual infrastructure components managed by Terraform, such as virtual machines, networks, or databases. Each resource is defined by a unique type and a set of arguments that configure its properties. Resources are declared using the “resource” block, and their dependencies are managed automatically by Terraform.
Variables
Variables in Terraform configuration files allow you to parameterize your infrastructure definitions, making it easier to reuse and share your configurations. Variables are defined using the “variable” block and are assigned values using input variables or environment variables. Using variables also enables you to separate configuration data from the configuration code, improving the maintainability and readability of your Terraform files.
Outputs
Outputs in Terraform configuration files provide a way to extract and display information about the managed infrastructure. Outputs are defined using the “output” block and can be used to display the public IP addresses of virtual machines, the URLs of load balancers, or any other relevant information. Outputs are especially useful when integrating Terraform with other tools or scripts, as they allow you to programmatically access the managed infrastructure details.
Example Configuration File
Here’s a simple example of a Terraform configuration file that creates a single AWS virtual machine:
provider "aws" { region = "us-west-2" } resource "aws_instance" "example" {
ami = "ami-0c55b159cbfafe1f0"
instance_type = "t2.micro"
tags = {
Name = "example-instance"
}
}
output "instance_public_ip" {
value = aws_instance.example.public_ip
}
In this example, the “aws” provider is configured with the “us-west-2” region. A single resource, “aws\_instance.example”, is created using the Amazon Machine Image (AMI) “ami-0c55b159cbfafe1f0” and the “t2.micro” instance type. The “Name” tag is set to “example-instance”. Finally, the “instance\_public\_ip” output is defined to display the public IP address of the created virtual machine.
Creating Your First Infrastructure with Terraform
Now that you have a basic understanding of Terraform configuration files, it’s time to create your first infrastructure using Terraform. In this example, you will create a simple infrastructure on AWS, consisting of a virtual machine (EC2 instance) and a security group to control access to the instance.
Step 1: Create a Directory for Your Configuration
Create a new directory for your Terraform configuration files:
$ mkdir terraform-example $ cd terraform-exampleStep 2: Create a Configuration File (main.tf)
Create a new file named “main.tf” in the “terraform-example” directory and add the following content:
provider "aws" { region = "us-west-2" } resource "aws_instance" "example" {
ami = "ami-0c55b159cbfafe1f0"
instance_type = "t2.micro"
vpc_security_group_ids = [aws_security_group.instance_sg.id]
tags = {
Name =
Managing State in Terraform: Understanding Its Importance and How to Use It
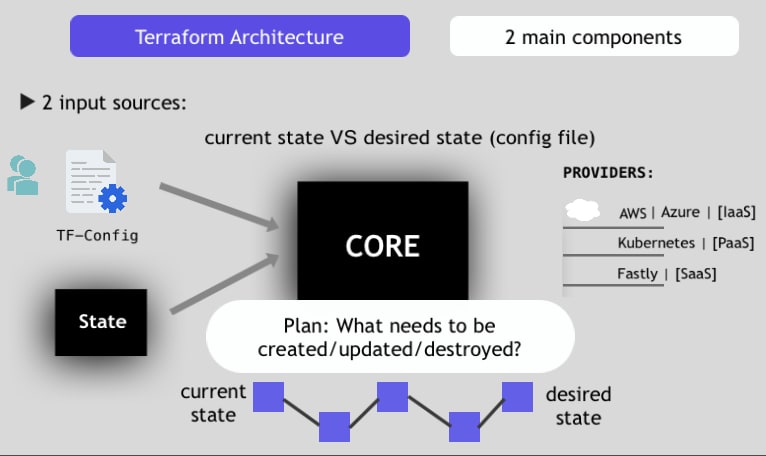
Terraform, an open-source Infrastructure as Code (IaC) software, simplifies infrastructure management by automating the provisioning of resources such as virtual machines, networks, and databases. A critical aspect of using Terraform effectively is understanding and managing its state, which tracks the managed resources and their current configurations. Properly managing the state is essential to ensure consistent infrastructure deployments and avoid conflicts or configuration drift. This article will discuss the concept of state in Terraform, its importance, and how to configure local and remote state backends.
In Terraform, the state is a JSON file containing a mapping of real-world resources to their corresponding configurations managed by Terraform. This file, usually named terraform.tfstate, is essential for Terraform to understand the current state of your infrastructure and plan future changes accordingly.
By default, Terraform stores the state file locally on your machine. However, this approach has limitations, especially when working with teams or deploying infrastructure across multiple environments. To overcome these limitations, Terraform supports remote state backends, which store the state file in a centralized location accessible by all team members.
Local State Backend
To configure a local state backend, you don't need to modify any settings, as Terraform uses it by default. However, it's crucial to understand the limitations of this approach:
- Local state is not suitable for team collaboration since it's stored on a single machine.
- It doesn't provide versioning or locking mechanisms to prevent conflicts or configuration drift.
- Local state is deleted when you remove the state file or uninstall Terraform, potentially leading to data loss.
Remote State Backends
Remote state backends offer several advantages over local state, including versioning, locking, and collaboration features. Terraform supports various remote state backends, such as Terraform Cloud, Consul, Amazon S3, and Azure Blob Storage.
To configure a remote state backend, you need to modify your Terraform configuration file (.tf) by adding a backend block. Here's an example using Terraform Cloud:
terraform { backend "remote" { organization = "your-org-name" workspaces { name = "your-workspace-name" } } }
In this example, replace your-org-name and your-workspace-name with your actual Terraform Cloud organization and workspace names.
When using remote state backends, ensure that you follow best practices, such as restricting access to the backend storage, enabling encryption, and regularly reviewing the state file's permissions.
Understanding and managing Terraform state is crucial for successful infrastructure management. By using remote state backends, you can overcome the limitations of local state and enable collaboration, versioning, and locking features for your Terraform configurations.
Version Control and Collaboration with Terraform: Using Git for Tracking Changes and Collaboration
Terraform, an open-source Infrastructure as Code (IaC) software, simplifies infrastructure management by automating the provisioning of resources such as virtual machines, networks, and databases. Collaboration and version control are essential for managing Terraform configurations, especially in team environments. This article will discuss how to use version control systems, such as Git, with Terraform for tracking changes and collaborating with teams.
Version control systems allow you to track changes, manage revisions, and collaborate with your team on infrastructure configurations. Git, a popular distributed version control system, is a powerful tool for managing Terraform configurations. By integrating Git with Terraform, you can ensure that your infrastructure configurations are versioned, documented, and easily auditable.
Tracking Changes with Git
To start using Git with Terraform, follow these steps:
- Initialize a new Git repository in your Terraform working directory:
git init
- Add your Terraform configuration files to the Git repository:
git add .tf
- Commit your changes:
git commit -m "Initial commit"
- Create a new Git repository on a remote hosting service (e.g., GitHub, GitLab, or Bitbucket) and push your local repository to the remote repository:
git remote add origin remote-repository-url git push -u origin master
After completing these steps, your Terraform configuration files will be versioned and accessible to your team members.
Collaborating with Teams
To collaborate with your team on Terraform configurations, follow these best practices:
- Create separate branches for each feature or bugfix to isolate changes and simplify code reviews.
- Regularly merge changes from the
master branch to your working branch to avoid conflicts and ensure that your changes are up-to-date.
- Perform code reviews to ensure that changes adhere to your team's coding standards and best practices.
- Document your changes using clear and concise commit messages and pull request descriptions.
By using Git with Terraform, you can ensure that your infrastructure configurations are versioned, documented, and easily auditable. Additionally, Git enables collaboration and streamlines the process of managing Terraform configurations in team environments.
Terraform Modules: Simplifying Infrastructure Management with Reusable Components
Terraform, an open-source Infrastructure as Code (IaC) software, simplifies infrastructure management by automating the provisioning of resources such as virtual machines, networks, and databases. Terraform modules are reusable components that help streamline infrastructure management by packaging and sharing common infrastructure patterns. This article will discuss how to create, share, and consume Terraform modules to improve your infrastructure management workflow.
A Terraform module is a collection of Terraform configuration files that define one or more resources and their dependencies. Modules enable you to encapsulate infrastructure patterns, making it easier to reuse and share them across your organization. By using modules, you can reduce the complexity of your Terraform configurations, improve code reusability, and enforce consistent infrastructure patterns.
Creating a Terraform Module
To create a Terraform module, follow these steps:
- Create a new directory for your module and initialize it as a Terraform module:
mkdir my-module cd my-module terraform init
- Define the module's resources and dependencies in the
.tf files.
- Create a
README.md file to document the module's purpose, inputs, outputs, and usage examples.
- Version your module using a version control system, such as Git, and publish it to a module registry, such as the Terraform Registry or a private Git repository.
Sharing and Consuming Terraform Modules
To share and consume Terraform modules, follow these steps:
- Locate a module that meets your requirements in a module registry or a Git repository.
- Add the module to your Terraform configuration by specifying the module source and inputs:
module "example" { source = "module-source" input_variable1 = "value1"
input_variable2 = "value2"
}
- Apply your Terraform configuration to provision the infrastructure defined by the module.
By using Terraform modules, you can simplify infrastructure management, improve code reusability, and enforce consistent infrastructure patterns across your organization.
Tips and Best Practices for Using Terraform Effectively: Troubleshooting, Performance Optimization, and Security
Terraform, an open-source Infrastructure as Code (IaC) software, simplifies infrastructure management by automating the provisioning of resources such as virtual machines, networks, and databases. To use Terraform effectively, it's essential to follow best practices, troubleshoot common issues, optimize performance, and ensure security. This article will provide tips and best practices for using Terraform effectively, including troubleshooting common issues, optimizing performance, and following security best practices.
Troubleshooting Common Issues
When using Terraform, you may encounter issues related to configuration syntax, resource dependencies, or state management. To troubleshoot these issues, follow these best practices:
- Use the
terraform plan command to validate your configuration before applying it. This command checks for syntax errors, resource dependencies, and other issues that may cause your configuration to fail.
- Use the
-debug flag with Terraform commands to enable debugging output, which can help you identify and resolve issues.
- Consult the Terraform documentation and community resources, such as the Terraform Community Forum and GitHub issue tracker, for guidance on resolving common issues.
Optimizing Performance
To optimize Terraform performance, follow these best practices:
- Use Terraform workspaces to manage multiple environments, such as development, staging, and production, separately. This approach reduces the time required to plan and apply configurations across multiple environments.
- Use Terraform modules to encapsulate infrastructure patterns and improve code reusability. Modules can help reduce the time required to plan and apply configurations by reducing the amount of code you need to manage.
- Use the
-parallelism flag with the terraform apply command to specify the maximum number of resources that can be created or updated concurrently. Increasing the parallelism value can help reduce the time required to apply configurations.
Following Security Best Practices
To ensure security when using Terraform, follow these best practices:
- Use a remote state backend, such as Terraform Cloud or a cloud storage service, to securely store and manage your Terraform state files. Remote state backends provide encryption, access control, and versioning features that help protect your infrastructure configurations.
- Use variables and outputs to parameterize your configurations and reduce the risk of exposing sensitive information, such as access keys and passwords.
- Regularly review your Terraform configurations for security vulnerabilities and best practices using tools such as Terrascan or Checkov.
By following these tips and best practices, you can use Terraform effectively, troubleshoot common issues, optimize performance, and ensure security.


