Introduction to Microsoft Azure Service Bus
Microsoft Azure Service Bus is a cloud-based messaging service that enables applications and services to communicate with each other in a reliable, secure, and scalable manner. It is a fully managed enterprise integration message broker that can be used to decouple applications and services, enabling them to communicate asynchronously. This guide will focus on how to connect to Azure Service Bus, which is the first step in leveraging its powerful features for your applications and services.
Creating an Azure Service Bus Namespace: A Key Step in Connecting to the Service Bus
To connect to Azure Service Bus, the first essential step is creating a namespace. A namespace serves as a container for messaging entities, such as queues and topics, which enable applications to communicate with each other. By creating a namespace, you ensure a clear separation between different messaging components, allowing for efficient and organized management.
To create a namespace in the Azure portal, follow these steps:
- Log in to the Azure portal using your Azure account.
- In the left-hand menu, click on the Create a resource button (+).
- Search for Service Bus and click on the Create button in the search results.
- Fill out the required fields:
- Namespace name: Enter a unique name for your namespace.
- Subscription: Choose the Azure subscription you want to use.
- Resource group: Either create a new one or select an existing resource group.
- Location: Select the geographical region closest to your users.
- Pricing tier: Choose the appropriate pricing tier based on your requirements.
- Click on the Review + Create button to review your settings and create the namespace.
- Once the deployment is complete, click on the Go to resource button to access your newly created namespace.
Now that you have created a namespace, you can proceed to the next step in connecting to Azure Service Bus: creating a queue or topic.
/answer/imgckeditor_15.2.jpg)
Creating a Queue or Topic in Azure Service Bus: Understanding the Differences and How to Create Each One
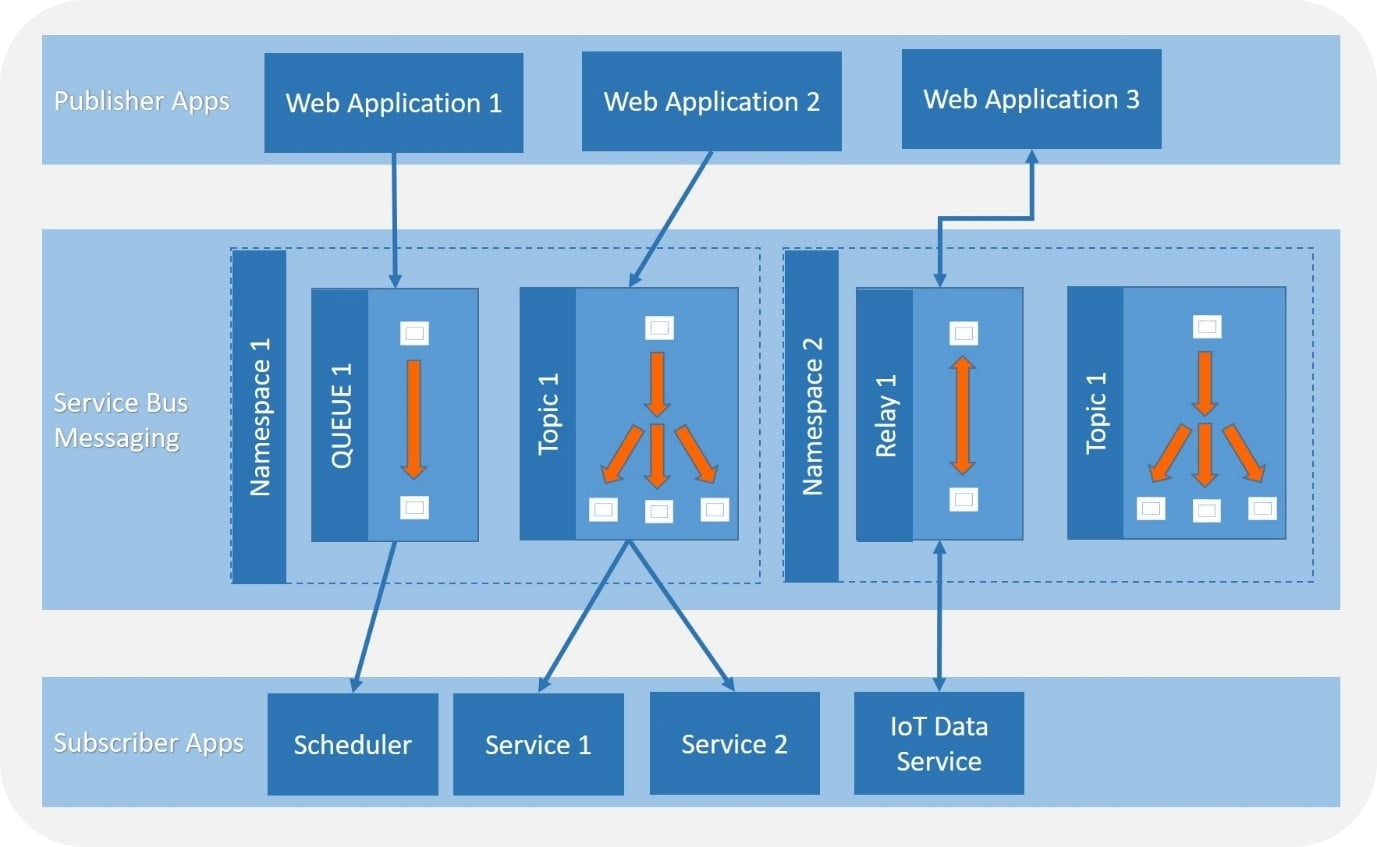
After creating an Azure Service Bus namespace, the next step in connecting to the service bus is creating a queue or topic. These components enable applications to send and receive messages. While queues and topics serve similar purposes, they differ in their handling of message routing and consumption.
Queues
Queues function as first-in, first-out (FIFO) message channels, ensuring that messages are processed in the order they were received. They are best suited for point-to-point communication, where a single receiver processes messages.
Topics
Topics, on the other hand, allow for publish-subscribe patterns, enabling multiple subscribers to receive a copy of messages based on filters. This makes topics ideal for one-to-many or many-to-many communication scenarios.
Creating a Queue in the Azure Portal
To create a queue in the Azure portal, follow these steps:
- Navigate to your Azure Service Bus namespace and click on the Queues option.
- Click on the + Queue button to create a new queue.
- Enter a Name for your queue and click on the Create button.
Creating a Topic in the Azure Portal
To create a topic in the Azure portal, follow these steps:
- Navigate to your Azure Service Bus namespace and click on the Topics option.
- Click on the + Topic button to create a new topic.
- Enter a Name for your topic, and click on the Create button.
Now that you have created a queue or topic, you can proceed to connecting to Azure Service Bus using Shared Access Signatures, Managed Identities, or connection strings.
Connecting to Azure Service Bus using Shared Access Signatures (SAS): A Comprehensive Guide
In this section, we will discuss how to connect to Azure Service Bus using Shared Access Signatures (SAS). SAS is a token-based security mechanism that enables secure access to specific resources within a namespace without sharing the entire namespace’s connection string.
Generating a Shared Access Signature
To generate a SAS token, follow these steps:
- Navigate to your Azure Service Bus namespace in the Azure portal.
- Click on the Shared access policies option and then click on the + Add button.
- Enter a Name for the policy, select the Send and/or Listen permissions, and click on the Create button.
- After creating the policy, click on the policy name to view its details.
- Copy the Primary key value, as it will be used to generate the SAS token.
Now that you have generated a SAS token, you can use it to connect to Azure Service Bus using various programming languages and SDKs.
Using a SAS Token to Connect to Azure Service Bus
Here’s an example of how to use a SAS token to connect to Azure Service Bus using the .NET SDK:
string connectionString = $"Endpoint=sb://{namespaceName}.servicebus.windows.net/{queueName};SharedAccessKeyName={policyName};SharedAccessKey={primaryKey}"; string sasToken = GenerateSasToken(connectionString); var serviceBusClient = new ServiceBusClient(connectionString + sasToken);
var receiver = serviceBusClient.CreateReceiver(queueName);
// Process messages
await foreach (var message in receiver.ReceiveMessagesAsync())
{
Console.WriteLine($"Received message: {message.Body}");
await receiver.CompleteMessageAsync(message);
}
In this example, the GenerateSasToken method generates a SAS token based on the connection string and policy key. The token is then appended to the connection string, allowing the client to connect securely to the Azure Service Bus queue.
/filters:no_upscale()/articles/event-driven-architecture-clouds/en/resources/35figure-1-1687173481115.jpg)
Connecting to Azure Service Bus using Managed Identities: A Comprehensive Guide
In this section, we will discuss how to connect to Azure Service Bus using Managed Identities. Managed Identities provide a convenient and secure way to authenticate applications running in Azure without managing credentials.
Managed Identity Overview
Managed Identities for Azure resources (MIAR) is a platform service that provides an identity for Azure services to authenticate to other Azure resources without the need for managing credentials. By using Managed Identities, you can eliminate the need to store sensitive information, such as connection strings, in your application’s code.
Setting Up a Managed Identity
To set up a Managed Identity, follow these steps:
- Navigate to your Azure Service Bus namespace in the Azure portal.
- Click on the Identity option under the Settings section.
- Set the Status to On and click on the Save button.
- Create a new managed identity or use an existing one by navigating to the Managed Identities page in the Azure portal.
- Grant the managed identity the necessary permissions to your Azure Service Bus namespace by creating a role assignment.
Using a Managed Identity to Connect to Azure Service Bus
Here’s an example of how to use a Managed Identity to connect to Azure Service Bus using the .NET SDK:
var credential = new DefaultAzureCredential(); var serviceBusClient = new ServiceBusAdministrationClient(new Uri($"sb://{namespaceName}.servicebus.windows.net"), credential); // Perform administrative tasks, such as creating a queue
QueueDescription queueDescription = await serviceBusClient.CreateQueueAsync(queueName);
In this example, the DefaultAzureCredential class automatically handles authentication using the system-assigned managed identity.

Connecting to Azure Service Bus using Connection Strings: A Comprehensive Guide
In this section, we will discuss how to connect to Azure Service Bus using connection strings. Connection strings provide a simple and direct method for connecting to a namespace, queue, or topic.
Finding the Connection String
To find the connection string for your Azure Service Bus namespace, follow these steps:
- Navigate to your Azure Service Bus namespace in the Azure portal.
- Click on the Shared access policies option under the Settings section.
- Click on the policy that has the necessary permissions (e.g., Send and/or Listen).
- Copy the Primary connection string value.
Using the Connection String to Connect to Azure Service Bus
Here’s an example of how to use the connection string to connect to Azure Service Bus using the .NET SDK:
string connectionString = "{your_connection_string}"; var serviceBusClient = new ServiceBusClient(connectionString); // Perform operations, such as sending or receiving messages
var sender = serviceBusClient.CreateSender(queueName);
await sender.SendMessagesAsync(messageList);
Replace {your_connection_string} with the actual connection string you copied from the Azure portal.
Using connection strings is a straightforward method for connecting to Azure Service Bus, but it is essential to manage and protect these strings securely, as they contain sensitive information.
Best Practices for Connecting to Azure Service Bus: Security, Performance, and Error Handling
When connecting to Azure Service Bus, it is essential to follow best practices to ensure security, performance, and error handling. This section discusses these best practices and provides recommendations for implementing them.
Security Best Practices
- Limit access: Only grant the minimum necessary permissions to users and applications. Use Shared Access Policies or Managed Identities to control access to queues and topics.
- Use HTTPS: Always use HTTPS when connecting to Azure Service Bus to encrypt data in transit.
- Rotate keys: Regularly rotate SAS keys and access keys for managed identities to minimize the risk of unauthorized access.
Performance Best Practices
- Batch operations: Batch operations, such as sending or receiving multiple messages at once, can significantly improve performance.
- Use the correct messaging tier: Choose the appropriate messaging tier based on your application’s requirements. For example, consider using the Premium tier for high-throughput applications.
- Monitor and scale: Monitor the performance of your Azure Service Bus resources and scale them up or out as needed.
Error Handling Best Practices
- Implement retries: Implement retry policies to handle transient errors, such as temporary network issues or service unavailability.
- Use dead-letter queues: Configure dead-letter queues to handle messages that cannot be processed successfully, allowing for further investigation and resolution.
- Monitor and alert: Monitor your Azure Service Bus resources for errors and set up alerts to notify you of potential issues.
Conclusion: Connecting to Azure Service Bus with Confidence
In this comprehensive guide, we have covered various methods for connecting to Azure Service Bus, including Shared Access Signatures, Managed Identities, and connection strings. By following the steps outlined in this article, you can now confidently connect to Azure Service Bus and leverage its powerful messaging capabilities.
When connecting to Azure Service Bus, always keep security, performance, and error handling best practices in mind. By implementing these best practices, you can ensure a secure, efficient, and reliable messaging solution for your applications.
Now that you have learned how to connect to Azure Service Bus, it’s time to put this knowledge into practice. Choose the method that best suits your needs and start integrating Azure Service Bus into your applications today.