Identifying the Project You Want to Delete
To begin the process of deleting a Google Cloud Project, you must first identify the specific project you wish to remove. Google Cloud Console, the web-based user interface for Google Cloud, allows you to manage and organize your projects with ease. Follow these steps to locate the project you want to delete:
- Sign in to your Google Cloud Console account at console.cloud.google.com.
- Ensure you are in the correct organization or folder by checking the project name displayed at the top of the console.
- On the left-hand side menu, click on “Project selector” (represented by a downward arrow) to display a list of your projects.
- Locate the project you wish to delete from the list and click on its name to open it.
By following these simple steps, you can quickly identify the Google Cloud Project you want to delete. Once you have selected the project, you can proceed with the deletion process. Remember to double-check the project’s name and resources before deleting to ensure you are removing the correct project.

Preparing for Google Cloud Project Deletion
Deleting a Google Cloud Project is a significant action with several implications. Before proceeding, it’s crucial to understand the consequences of deleting a project, including the impact on resources, data, and billing. This section will provide a comprehensive overview of what to expect when deleting a Google Cloud Project.
Resources and Data
Deleting a Google Cloud Project will permanently remove all associated resources and data. This includes:
- Compute Engine instances and their associated data.
- Cloud Storage buckets and their contents.
- Cloud SQL instances and databases.
- Pub/Sub topics and subscriptions.
- Kubernetes Engine clusters and their workloads.
- Any other resources created within the project.
Billing and Invoicing
Deleting a Google Cloud Project will stop any further billing for the project’s resources. However, you will still be responsible for any outstanding charges or invoices related to the project. Make sure to review your billing information and settle any outstanding payments before deleting the project.
Access Controls and Permissions
Deleting a Google Cloud Project will also remove all associated access controls and permissions. If you have granted access to other users or services, ensure that you revoke or transfer these permissions before deleting the project. This will help maintain a secure and organized environment in your Google Cloud account.
Alternatives to Deletion
Before deleting a Google Cloud Project, consider alternative methods to manage resources and data. These may include:
- Transferring ownership of resources to another project or user.
- Archiving resources to reduce costs and maintain access.
- Pausing billing for the project to prevent further charges.
By understanding the implications of deleting a Google Cloud Project, you can make informed decisions and ensure a smooth transition. Proper preparation will help maintain the integrity of your resources, data, and billing information.
How to Delete a Google Cloud Project: Step-by-Step Instructions
Once you have identified the project you want to delete and prepared for the consequences, you can proceed with the deletion process. Follow these simple steps to delete a Google Cloud Project:
Step 1: Access the Google Cloud Console
Sign in to your Google Cloud Console account at console.cloud.google.com.
Step 2: Select the Project to Delete
Ensure you are in the correct organization or folder by checking the project name displayed at the top of the console. Use the “Project selector” (represented by a downward arrow) to display a list of your projects. Locate the project you wish to delete from the list and click on its name to open it.
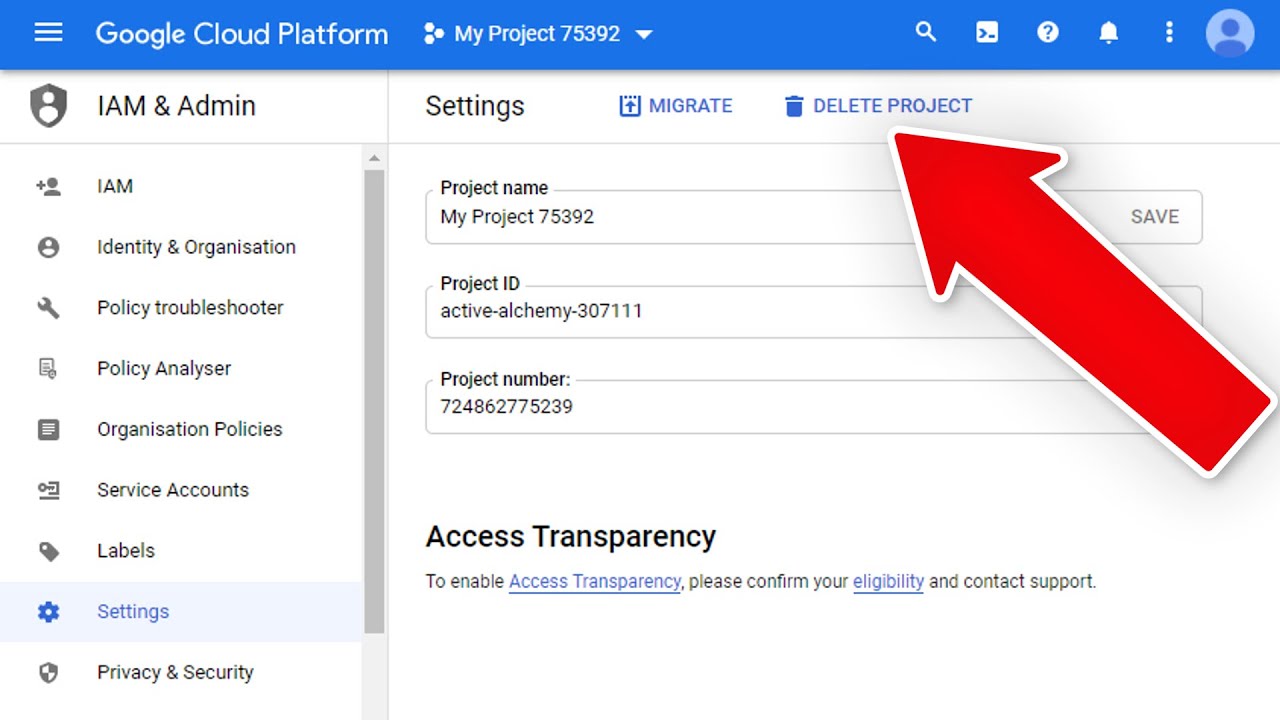
Step 3: Initiate the Deletion Process
In the project’s navigation menu, click on “Settings” (represented by a gear icon). Under the “Project settings” section, click on “Shut down” to initiate the deletion process.
Step 4: Confirm Project Deletion
A confirmation dialog will appear, displaying the project name and a warning about the irreversible nature of the deletion. To proceed, type the project name in the provided field and click “Shut down“.
Google Cloud Console will confirm the deletion and provide a reference number for future reference. The deleted project will enter a 30-day grace period before being permanently removed.
For more information and official documentation, visit Google’s official guide on deleting projects.

Confirming Project Deletion and Grace Period
After initiating the deletion of a Google Cloud Project, you will receive a confirmation message with a reference number. This number serves as proof that the deletion process has started. However, the project is not immediately and permanently removed. Instead, it enters a 30-day grace period.
What is the Grace Period?
The 30-day grace period is a safety net provided by Google Cloud to prevent accidental or unwanted deletions. During this time, deleted projects can still be recovered with all their resources and data intact. After the grace period, the project and all its associated resources will be permanently removed and cannot be recovered.
How to Confirm Project Deletion
To confirm that a project has been deleted and is in the grace period, follow these steps:
- Sign in to your Google Cloud Console account at console.cloud.google.com.
- Ensure you are in the correct organization or folder by checking the project name displayed at the top of the console.
- Use the “Project selector” (represented by a downward arrow) to display a list of your projects.
- Deleted projects will be listed as “Deleted” with their creation date and the deletion reference number.
By following these steps, you can confirm that a project has been deleted and is in the 30-day grace period. Keep in mind that during this time, you can still recover the project if needed.
For more information about the grace period and Google Cloud’s deletion policies, visit Google’s official guide on deleting projects.

Recovering a Deleted Google Cloud Project
During the 30-day grace period after deleting a Google Cloud Project, you have the option to recover the project and its associated resources. This can be helpful if you accidentally deleted the project or changed your mind about its removal. Here’s how to recover a deleted Google Cloud Project:
Step 1: Access the Google Cloud Console
Sign in to your Google Cloud Console account at console.cloud.google.com.
Step 2: Display Deleted Projects
Ensure you are in the correct organization or folder by checking the project name displayed at the top of the console. Use the “Project selector” (represented by a downward arrow) to display a list of your projects. At the bottom of the list, click on “Show deleted projects” to display deleted projects.
Step 3: Recover the Deleted Project
Locate the deleted project you wish to recover from the list. Click on the project name to open it. In the project’s navigation menu, click on “Settings” (represented by a gear icon). Under the “Project settings” section, click on “Undelete” to recover the project. A confirmation message will appear, notifying you that the project has been successfully recovered.
Please note that there are some limitations to recovering a deleted Google Cloud Project:
- You can only recover projects within the 30-day grace period.
- Once a project is permanently removed after the grace period, it cannot be recovered.
- Some resources, such as Cloud Storage buckets or Pub/Sub topics, may need to be manually restored after recovering the project.
For more information about recovering deleted projects, visit Google’s official guide on recovering deleted projects.
Preventing Accidental Deletion of Google Cloud Projects
Accidental deletion of Google Cloud Projects can lead to data loss and service disruptions. To prevent such incidents, consider implementing the following best practices:
Set Up Access Controls
Limit who can delete projects by implementing access controls. Use Google Cloud’s Identity and Access Management (IAM) system to assign roles and permissions to users and service accounts. For example, you can create a custom role that only allows users to view or modify projects but not delete them.
Configure Deletion Alerts
Google Cloud provides alerts that can notify you when a project is scheduled for deletion. To set up deletion alerts:
- In the Google Cloud Console, navigate to “Billing” and then “Billing alerts“.
- Click on “Create alert” and configure the alert settings. Set the alert condition to “Project about to be deleted” and specify the projects you want to monitor.
- Save the alert and configure the notification channels to receive alerts via email, SMS, or other communication platforms.
Regularly Review Projects
Periodically review your Google Cloud projects to ensure that they are still needed and being used. Remove or archive projects that are no longer required, and consider transferring ownership of projects that are managed by other teams or users.
Educate and Train Users
Educate users about the implications of deleting Google Cloud projects and the proper procedures for deleting or archiving projects. Provide training resources and documentation to help users understand the risks and best practices associated with project deletion.
By implementing these best practices, you can minimize the risk of accidental deletion of Google Cloud projects and maintain a secure and organized environment for managing your cloud resources.
Alternatives to Deleting a Google Cloud Project
Deleting a Google Cloud Project is a significant action that results in the permanent loss of resources and data. Before deleting a project, consider alternative methods for managing resources and costs. Here are some alternatives to deleting a Google Cloud Project:
Transfer Ownership
Transfer ownership of the project to another user or team within your organization. This allows the new owner to manage the project while preserving its resources and data. To transfer ownership:
- In the Google Cloud Console, navigate to “IAM & Admin” and then “IAM“.
- Locate the user or group you want to transfer ownership to and click on their “Edit” button.
- Under the “Project” section, select “Is owner” and save the changes.
Archive the Project
Archive the project to hide it from the main projects list and reduce costs. Archiving a project stops all billing and suspends most resource usage, but keeps the project’s resources and data intact. To archive a project:
- In the Google Cloud Console, navigate to “IAM & Admin” and then “Settings“.
- Click on “Manage resources” and locate the project you want to archive.
- Click on the “Actions” button and select “Archive“.
Pause Billing
Pause billing for the project to stop all costs associated with running resources. This is useful when you don’t need to use the project for an extended period but want to preserve its resources and data. To pause billing:
- In the Google Cloud Console, navigate to “Billing” and then “Billing accounts“.
- Locate the project you want to pause billing for and click on its “Manage” button.
- Click on “Pause billing” and confirm the action.
By considering these alternatives, you can effectively manage your Google Cloud resources and costs without deleting a project and losing its resources and data permanently.