
Understanding Azure Private DNS Zones
Azure Private DNS Zones are a specialized feature of Microsoft Azure, a leading cloud computing platform. These zones provide a private DNS namespace within Azure, enabling seamless name resolution for virtual networks. The primary purpose of Azure Private DNS Zones is to offer a dedicated DNS service for managing and resolving domain names within a private network, enhancing security and control over DNS resolution.
Azure Private DNS Zones are particularly useful for organizations that want to maintain a separate DNS namespace for their internal resources, such as virtual machines, applications, and services. By using Azure Private DNS Zones, these organizations can ensure that their internal DNS queries are not exposed to the public internet, reducing the risk of DNS-based attacks and unauthorized access. Additionally, Azure Private DNS Zones provide automatic record management, simplifying DNS record maintenance and reducing the potential for human error.
Moreover, Azure Private DNS Zones offer seamless integration with Azure services, allowing organizations to leverage the full potential of Azure’s cloud computing platform. With Azure Private DNS Zones, organizations can easily manage their DNS infrastructure alongside their other Azure resources, improving operational efficiency and reducing the complexity of managing a hybrid or multi-cloud environment.
Key Features of Azure Private DNS Zones
Azure Private DNS Zones offer several key features that make them an attractive option for organizations looking to maintain a separate DNS namespace for their internal resources. These features include support for virtual network linking, automatic record management, and seamless integration with Azure services.
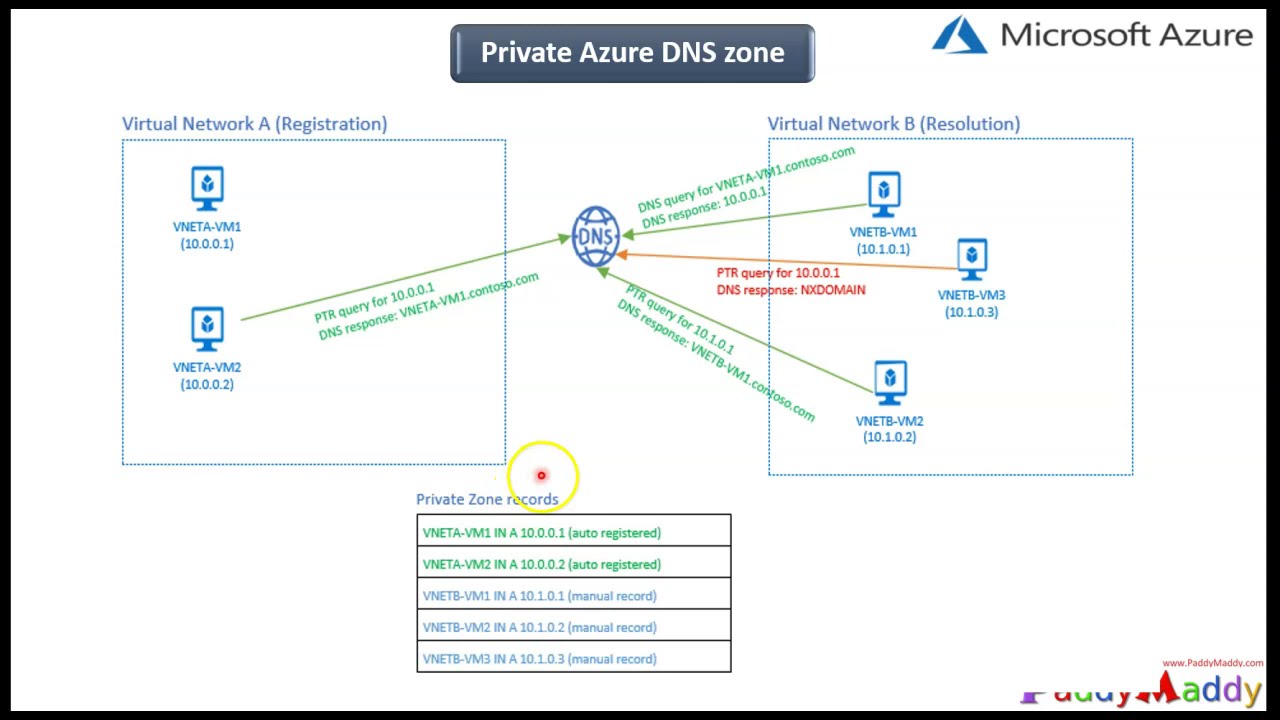
Virtual network linking allows organizations to link their Azure Private DNS Zones to one or more virtual networks, enabling seamless name resolution for virtual machines, applications, and services within those networks. This feature ensures that internal DNS queries are kept private and secure, reducing the risk of DNS-based attacks and unauthorized access.
Automatic record management is another critical feature of Azure Private DNS Zones. This feature simplifies DNS record maintenance by automatically managing DNS records for linked virtual networks. By reducing the potential for human error, automatic record management helps ensure a functional and reliable DNS infrastructure.
Seamless integration with Azure services is another significant benefit of Azure Private DNS Zones. This feature allows organizations to manage their DNS infrastructure alongside their other Azure resources, improving operational efficiency and reducing the complexity of managing a hybrid or multi-cloud environment. With Azure Private DNS Zones, organizations can easily manage their DNS records for Azure services such as Azure App Service, Azure Kubernetes Service, and Azure Virtual Machines.
How to Create an Azure Private DNS Zone
Creating an Azure Private DNS Zone is a straightforward process that can be accomplished in a few simple steps. Here’s a step-by-step guide to creating an Azure Private DNS Zone:
- Select a subscription: Begin by selecting an Azure subscription that will host the new Azure Private DNS Zone. If you don’t have an Azure subscription, you can create a free account at https://portal.azure.com/#create/Microsoft.FreeTrialV2.
- Create a resource group: Next, create a new resource group to host the Azure Private DNS Zone. A resource group is a logical container for Azure resources that enables easy management and deployment. To create a new resource group, navigate to the Azure portal, click on “Resource groups,” and then click on “Add.” Enter a name for the resource group, select a subscription, and then click on “Create.”
- Configure the DNS zone settings: After creating a resource group, configure the DNS zone settings. To do this, navigate to the Azure portal, click on “Private DNS zones,” and then click on “Add.” Enter a name for the DNS zone, select the resource group created in the previous step, and then click on “Create.”
Once the Azure Private DNS Zone has been created, you can start adding DNS records to it. DNS records are used to map domain names to IP addresses, enabling seamless name resolution for virtual networks.
Linking Virtual Networks to an Azure Private DNS Zone
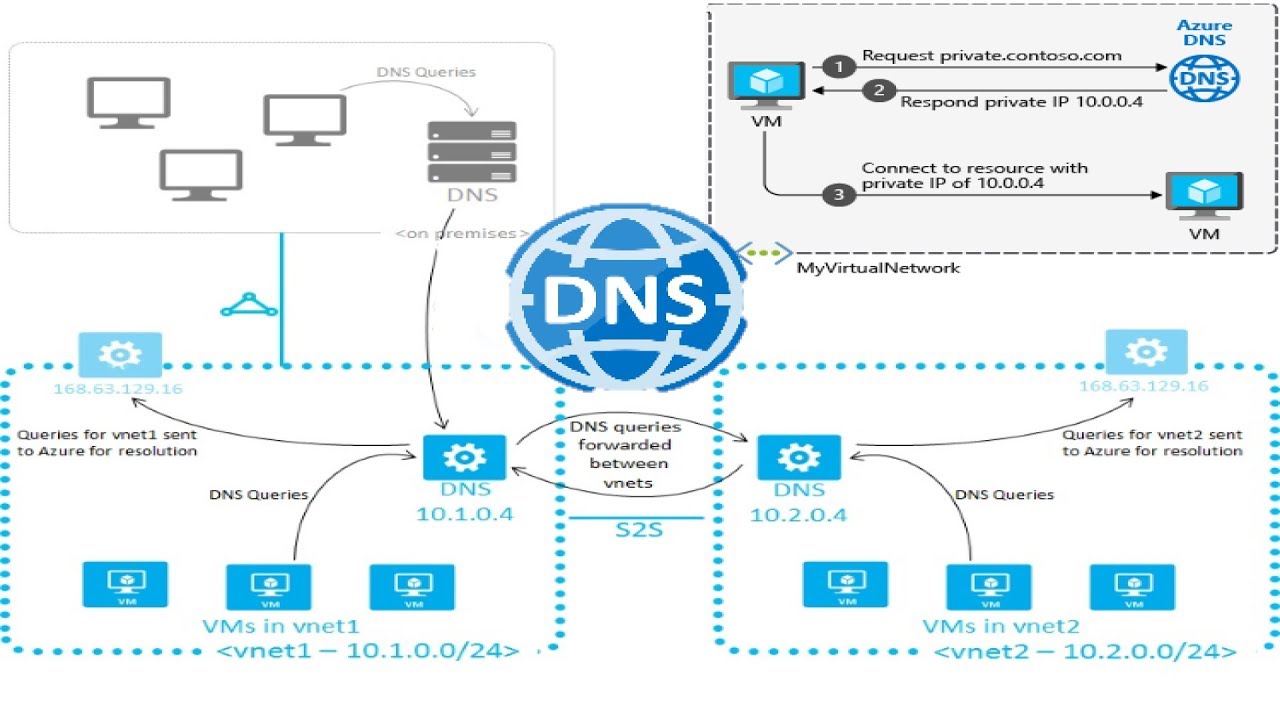
Linking virtual networks to an Azure Private DNS Zone is a crucial step in ensuring seamless name resolution for virtual networks within a private DNS namespace. Proper network configuration is essential for ensuring that virtual machines, applications, and services can communicate with each other using friendly domain names instead of IP addresses.
To link a virtual network to an Azure Private DNS Zone, follow these steps:
- Navigate to the Azure portal: Begin by navigating to the Azure portal at https://portal.azure.com/.
- Select the virtual network: Next, select the virtual network that you want to link to the Azure Private DNS Zone. Virtual networks are logical containers for Azure resources that enable secure communication between resources within the same network.
- Configure DNS settings: After selecting the virtual network, configure the DNS settings to use the Azure Private DNS Zone. To do this, click on “DNS servers” and then click on “Custom.” Enter the name or IP address of the Azure Private DNS Zone and then click on “Save.”
- Link the virtual network: Finally, link the virtual network to the Azure Private DNS Zone. To do this, click on “Virtual network links” and then click on “Add.” Enter a name for the link, select the Azure Private DNS Zone, and then click on “Create.”
Once the virtual network is linked to the Azure Private DNS Zone, you can start adding DNS records to it. DNS records are used to map domain names to IP addresses, enabling seamless name resolution for virtual networks.
It’s important to note that you can link multiple virtual networks to the same Azure Private DNS Zone. This feature enables seamless name resolution across virtual networks, improving operational efficiency and reducing the complexity of managing a hybrid or multi-cloud environment.

Managing DNS Records in Azure Private DNS Zones
Managing DNS records in Azure Private DNS Zones is a crucial step in ensuring seamless name resolution for virtual networks within a private DNS namespace. Proper record management is essential for maintaining a functional DNS infrastructure and enabling communication between virtual machines, applications, and services.
Azure Private DNS Zones support several types of DNS records, including A, AAAA, CNAME, MX, NS, SRV, and TXT records. These records are used to map domain names to IP addresses, enabling seamless name resolution for virtual networks.
Creating DNS Records
To create a DNS record in an Azure Private DNS Zone, follow these steps:
- Navigate to the Azure portal: Begin by navigating to the Azure portal at https://portal.azure.com/.
- Select the DNS zone: Next, select the DNS zone that you want to manage. DNS zones are logical containers for DNS records that enable seamless name resolution for virtual networks.
- Create a new record: After selecting the DNS zone, create a new record by clicking on “Add” and then selecting the record type. Enter the name, IP address, and other relevant information for the record, and then click on “Create.”
Updating DNS Records
To update a DNS record in an Azure Private DNS Zone, follow these steps:
- Navigate to the Azure portal: Begin by navigating to the Azure portal at https://portal.azure.com/.
- Select the DNS zone: Next, select the DNS zone that contains the record that you want to update. DNS zones are logical containers for DNS records that enable seamless name resolution for virtual networks.
- Update the record: After selecting the DNS zone, update the record by clicking on the record and then entering the new information. Once you’ve updated the record, click on “Save” to save the changes.
Deleting DNS Records
To delete a DNS record in an Azure Private DNS Zone, follow these steps:
- Navigate to the Azure portal: Begin by navigating to the Azure portal at https://portal.azure.com/.
- Select the DNS zone: Next, select the DNS zone that contains the record that you want to delete. DNS zones are logical containers for DNS records that enable seamless name resolution for virtual networks.
- Delete the record: After selecting the DNS zone, delete the record by clicking on the record and then clicking on “Delete.” Confirm the deletion by clicking on “Yes” when prompted.
Proper record management is essential for maintaining a functional DNS infrastructure. By regularly managing DNS records in Azure Private DNS Zones, you can ensure seamless name resolution for virtual networks and improve operational efficiency.

Azure Private DNS Zones vs. Azure Public DNS: A Comparison
Azure Private DNS Zones and Azure Public DNS are two services offered by Microsoft Azure that provide DNS resolution for virtual networks. While both services offer DNS resolution, they differ in their purpose, use cases, and features. Understanding these differences is essential for ensuring seamless name resolution for virtual networks within Azure.
Azure Private DNS Zones
Azure Private DNS Zones provide a private DNS namespace within Azure, enabling seamless name resolution for virtual networks. Private DNS zones are isolated from the public internet, ensuring that DNS queries are not exposed to external threats. Private DNS zones support virtual network linking, automatic record management, and seamless integration with Azure services, making them an ideal choice for managing DNS records within a private network.
Azure Public DNS
Azure Public DNS, on the other hand, provides DNS resolution for public domains and services hosted on Azure. Public DNS zones are accessible from the public internet, enabling external clients to resolve domain names to IP addresses. Public DNS zones support DNS record management, including A, AAAA, CNAME, MX, NS, SRV, and TXT records, making them an ideal choice for hosting public-facing services on Azure.
When to Use Each Service
Choosing between Azure Private DNS Zones and Azure Public DNS depends on the use case and the requirements of the virtual network. Private DNS zones are ideal for managing DNS records within a private network, while public DNS zones are ideal for hosting public-facing services on Azure.
For example, if you’re deploying a virtual network that contains virtual machines, applications, and services that need to communicate with each other using friendly domain names, you should use Azure Private DNS Zones. On the other hand, if you’re deploying a public-facing service on Azure, such as a website or an API, you should use Azure Public DNS.
Benefits of Using One Over the Other
Azure Private DNS Zones offer several benefits over Azure Public DNS, including improved security, isolation from the public internet, and seamless integration with Azure services. Private DNS zones enable you to manage DNS records within a private network, reducing the risk of external threats and improving operational efficiency.
On the other hand, Azure Public DNS offers several benefits over Azure Private DNS Zones, including support for public-facing services, DNS record management, and accessibility from the public internet. Public DNS zones enable you to host public-facing services on Azure, improving accessibility and reducing the complexity of managing DNS records for public-facing services.
In conclusion, Azure Private DNS Zones and Azure Public DNS are two services offered by Microsoft Azure that provide DNS resolution for virtual networks. Understanding the differences between these two services and their respective use cases is essential for ensuring seamless name resolution for virtual networks within Azure. By choosing the right service for your use case, you can improve operational efficiency, reduce the risk of external threats, and ensure seamless name resolution for virtual networks within Azure.
Best Practices for Implementing Azure Private DNS Zones
Azure Private DNS Zones offer several benefits for managing DNS records within a private network. However, to ensure a secure and functional DNS infrastructure, it’s essential to follow best practices for implementing Azure Private DNS Zones. In this section, we’ll outline some best practices for implementing Azure Private DNS Zones, including proper network configuration, regular record management, and monitoring.
Proper Network Configuration
Proper network configuration is essential for ensuring seamless name resolution for virtual networks within Azure. When implementing Azure Private DNS Zones, it’s essential to configure virtual network linking properly. Virtual network linking enables you to link multiple virtual networks to a private DNS zone, enabling seamless name resolution across virtual networks.
To configure virtual network linking, navigate to the private DNS zone in the Azure portal, click on “Virtual network links,” and then click on “Add.” Enter the name, virtual network, and other relevant information, and then click on “Create” to create the virtual network link.
Regular Record Management
Regular record management is essential for maintaining a functional DNS infrastructure. When implementing Azure Private DNS Zones, it’s essential to manage DNS records regularly, including creating, updating, and deleting records as necessary.
To manage DNS records in Azure Private DNS Zones, navigate to the private DNS zone in the Azure portal, click on “Record sets,” and then click on “Add.” Enter the name, record type, TTL, and other relevant information, and then click on “Create” to create the DNS record.
Monitoring
Monitoring is essential for ensuring the security and functionality of the DNS infrastructure. When implementing Azure Private DNS Zones, it’s essential to monitor DNS traffic, including query traffic, response traffic, and error rates.
To monitor DNS traffic in Azure Private DNS Zones, use Azure Monitor, which provides detailed metrics and logs for DNS traffic. With Azure Monitor, you can monitor DNS traffic in real-time, set up alerts for anomalies, and troubleshoot issues quickly.
Other Best Practices
Other best practices for implementing Azure Private DNS Zones include using private endpoints for Azure services, enabling DNSSEC for secure DNS communication, and using Azure Policy for enforcing DNS zone policies.
By following these best practices, you can ensure a secure and functional DNS infrastructure within Azure. Proper network configuration, regular record management, and monitoring are essential for maintaining a functional DNS infrastructure and improving operational efficiency.

Scaling Azure Private DNS Zones for Large Deployments
Azure Private DNS Zones offer several benefits for managing DNS records within a private network. However, when deploying Azure Private DNS Zones in large environments, it’s essential to have a strategy for managing multiple DNS zones, automating DNS record management, and monitoring DNS performance. In this section, we’ll outline some best practices for scaling Azure Private DNS Zones for large deployments.
Managing Multiple DNS Zones
Managing multiple DNS zones in large environments can be challenging. To simplify DNS zone management, consider using Azure Private DNS Zone groups. Azure Private DNS Zone groups enable you to group related DNS zones together, making it easier to manage and monitor DNS zones.
To create an Azure Private DNS Zone group, navigate to the private DNS zone in the Azure portal, click on “Zone groups,” and then click on “Add.” Enter the name, resource group, and other relevant information, and then click on “Create” to create the DNS zone group.
Automating DNS Record Management
Automating DNS record management is essential for maintaining a functional DNS infrastructure in large environments. Consider using Azure PowerShell or Azure CLI to automate DNS record management. Azure PowerShell and Azure CLI provide several cmdlets and commands for managing DNS records, including creating, updating, and deleting records.
For example, to create a DNS record using Azure PowerShell, use the following cmdlet:
New-AzPrivateDnsRecordSet -Name "www" -RecordType "A" -ZoneName "contoso.com" -ResourceGroupName "my-resource-group" -Ttl 3600 -Ipv4Address "10.0.0.1" Monitoring DNS Performance
Monitoring DNS performance is essential for ensuring the availability and reliability of the DNS infrastructure. Consider using Azure Monitor for monitoring DNS performance. Azure Monitor provides detailed metrics and logs for DNS traffic, including query traffic, response traffic, and error rates.
To monitor DNS performance using Azure Monitor, create a metric alert for DNS traffic. A metric alert triggers an action when the metric value exceeds a specified threshold. For example, to create a metric alert for query traffic, use the following steps:
- Navigate to Azure Monitor in the Azure portal.
- Click on “Alerts” and then click on “New alert rule.”
- Select the scope, condition, and alert criteria, and then click on “Create” to create the alert rule.
Other Best Practices
Other best practices for scaling Azure Private DNS Zones for large deployments include using Azure Policy for enforcing DNS zone policies, using private endpoints for Azure services, and enabling DNSSEC for secure DNS communication.
By following these best practices, you can ensure a secure and functional DNS infrastructure in large environments. Proper network configuration, regular record management, and monitoring are essential for maintaining a functional DNS infrastructure and improving operational efficiency.
