What is AWS CLI and Why Install it on Windows?
The AWS Command Line Interface (CLI) is a unified tool to manage AWS services from Windows, macOS, or Linux. AWS CLI enables developers, IT professionals, and students to handle various AWS services through commands in a local terminal or command prompt. This tool is particularly useful for automating tasks, managing resources, and interacting with AWS services programmatically.

System Requirements and Preparing for the Installation
Before installing AWS CLI on a Windows system, ensure that your machine meets the necessary requirements. The following system specifications are recommended:
- Windows 10, Windows 8.1, or Windows 7 (64-bit versions)
- Python 2 (version 2.6.5 and later) or Python 3 (version 3.3 and later)
- At least 50 MB of free disk space
To prepare your system for the installation, follow these steps:
- Check your current operating system version and ensure it is up-to-date.
- Verify that Python is installed on your system. If not, download and install the latest version of Python from the official website.
- Confirm that Python is added to your system’s PATH variable. This step is crucial for AWS CLI to function correctly.
- Ensure you have sufficient storage space for AWS CLI and any associated files.

Downloading and Installing AWS CLI on Windows
Follow these steps to download and install AWS CLI on your Windows system:
- Navigate to the official AWS CLI download page and click the “Download for Windows” button.
- Once the download is complete, locate the installer file (usually named “AWSCLIV2.msi”) and double-click it to start the installation process.
- On the first screen of the installer, click “Next” to proceed.
- Accept the license agreement and click “Next” again.
- Choose the installation directory or accept the default location and click “Next”.
- Select the “Add Python to PATH” option and click “Install” to begin the installation.
- Wait for the installation to complete. This process might take a few minutes.
- Once the installation is finished, click “Finish” to close the installer.
Congratulations! You have successfully installed AWS CLI on your Windows system.

Configuring AWS CLI on Windows
After installing AWS CLI on your Windows system, you need to configure it to access your AWS services. Follow these steps to configure AWS CLI:
- Launch a command prompt window by pressing “Win + R”, typing “cmd”, and hitting “Enter”.
- Type the following command to initiate the configuration process:
aws configure - You will be prompted to enter your Access Key ID, Secret Access Key, Default region name, and Output format. Follow these guidelines:
- Access Key ID: Retrieve this value from the AWS Management Console’s “My Security Credentials” page.
- Secret Access Key: Retrieve this value from the AWS Management Console’s “My Security Credentials” page. Be cautious with this key, as it provides access to your AWS resources.
- Default region name: Enter the region code for the region where your resources are located (e.g., “us-west-2”).
- Output format: Choose “json”, “text”, or “table” based on your preference for how AWS CLI displays output.
- Press “Enter” after entering each value to proceed to the next prompt.
Congratulations! You have successfully configured AWS CLI on your Windows system.

Testing the AWS CLI Installation on Windows
After configuring AWS CLI on your Windows system, it’s essential to test the installation to ensure it’s working correctly. Follow these steps to test the AWS CLI installation:
- Launch a command prompt window by pressing “Win + R”, typing “cmd”, and hitting “Enter”.
- Type the following command to list available AWS services:
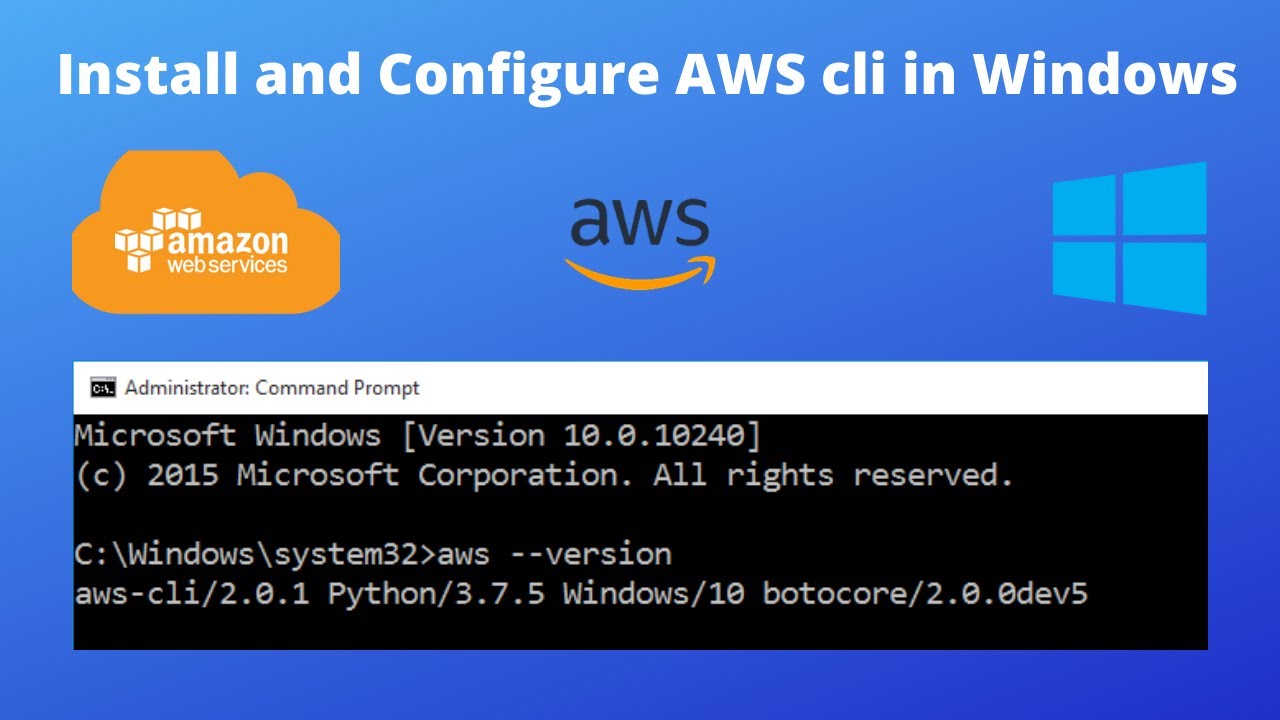
aws help - To verify the AWS CLI version, type the following command:
aws --version - To test your configuration, try listing S3 buckets (replace “your-bucket-name” with an actual bucket name in your AWS account):
aws s3 ls s3://your-bucket-name
If the commands run successfully and return the expected output, you have successfully tested the AWS CLI installation on your Windows system.
Troubleshooting Common AWS CLI Installation Issues on Windows
Even with clear instructions, users may still encounter issues during the AWS CLI installation process. Here are some common problems and their solutions:
- Error: Python not found in PATH: Ensure that Python is installed and added to the system’s PATH variable. If not, reinstall Python and select the “Add Python to PATH” option during installation.
- Error: AWS CLI installer fails to execute: Check if your system meets the minimum requirements and has sufficient storage. If necessary, update your operating system or clear space on your hard drive.
- Error: AWS CLI configuration fails: Double-check your input for Access Key ID, Secret Access Key, Default region name, and Output format. Ensure that you have entered the correct values and that there are no typos.
If you still encounter issues, consult the official AWS documentation or seek help from the AWS community forums.

Maintaining and Updating AWS CLI on Windows
Maintaining and updating the AWS CLI on Windows is crucial to ensure its smooth operation and to take advantage of the latest features and improvements. In this section, we will discuss how to keep your AWS CLI up-to-date and how to uninstall it if necessary.
Checking for Updates
To check for updates, open your command prompt and run the following command:
aws --versionThe output will display the current version of your AWS CLI. To compare this with the latest version available, visit the AWS CLI download page and look for the version number.
Updating AWS CLI
If an update is available, you can download and install the latest version by repeating the process described in the “Downloading and Installing AWS CLI on Windows” section. The installation process will automatically replace the older version with the new one.
Uninstalling AWS CLI
If you need to uninstall the AWS CLI, follow these steps:
- Close any command prompt windows or applications that are using the AWS CLI.
- Open the Windows Control Panel and navigate to “Programs and Features” or “Add or Remove Programs” (depending on your Windows version).
- Find “AWS CLI” in the list of installed programs, right-click it, and select “Uninstall” or “Change/Remove”.
- Follow the on-screen instructions to complete the uninstallation process.
Tips for Maintaining AWS CLI
- Regularly check for updates and install them promptly to benefit from new features and improvements.
- Monitor the AWS CLI documentation and release notes for information on bug fixes, security updates, and other relevant details.
- Remove any unnecessary or outdated AWS profiles and access keys to maintain security and reduce clutter.
- Consider integrating AWS CLI with version control systems (VCS) or configuration management tools to track changes and maintain consistency across your team or organization.
By following these guidelines, you can maintain and update your AWS CLI on Windows effectively, ensuring seamless integration with AWS services and improved productivity.

Maximizing the Benefits of AWS CLI on Windows
To maximize the benefits of AWS CLI on Windows, it’s essential to follow best practices and make the most of its features and integration capabilities with other AWS services. In this section, we will discuss some tips and strategies to help you achieve this.
Best Practices for Using AWS CLI on Windows
- Create dedicated profiles for different users or projects to maintain security and organization.
- Use the “–dry-run” flag to test commands and ensure they work as expected before executing them.
- Leverage command history and tab completion to save time and reduce typing errors.
- Use the “–debug” flag to troubleshoot issues and gain more information about command execution.
- Monitor AWS CLI output for any warnings, errors, or unexpected results.
Integrating AWS CLI with Other AWS Services
AWS CLI can be integrated with various AWS services to streamline workflows and automate tasks. Some popular integration examples include:
- AWS CodeStar: Simplify software development by managing your development projects and tools in one place.
- AWS CloudFormation: Create and manage infrastructure as code using templates and AWS CLI commands.
- AWS Elastic Beanstalk: Deploy, manage, and scale web applications with ease using AWS CLI commands.
- AWS Lambda: Automate tasks and workflows by running AWS Lambda functions with AWS CLI commands.
Case Studies and Examples
Many organizations have successfully integrated AWS CLI with their Windows systems to improve productivity and streamline operations. For example, a software development team might use AWS CLI to automate code deployments, while a DevOps team could leverage AWS CLI to manage and monitor infrastructure resources.
By following best practices and integrating AWS CLI with other AWS services, you can unlock the full potential of this powerful command-line tool and enhance your Windows system’s capabilities.