Ansible: A Brief Overview
Ansible is a popular open-source automation tool, praised for its simplicity, power, and agentless architecture. It is designed to automate IT infrastructure tasks, thereby saving time, reducing errors, and increasing efficiency. Ansible’s primary focus is on configuration management, allowing users to define system configurations and maintain them consistently across multiple nodes or servers.

How Ansible Works: A High-Level Overview
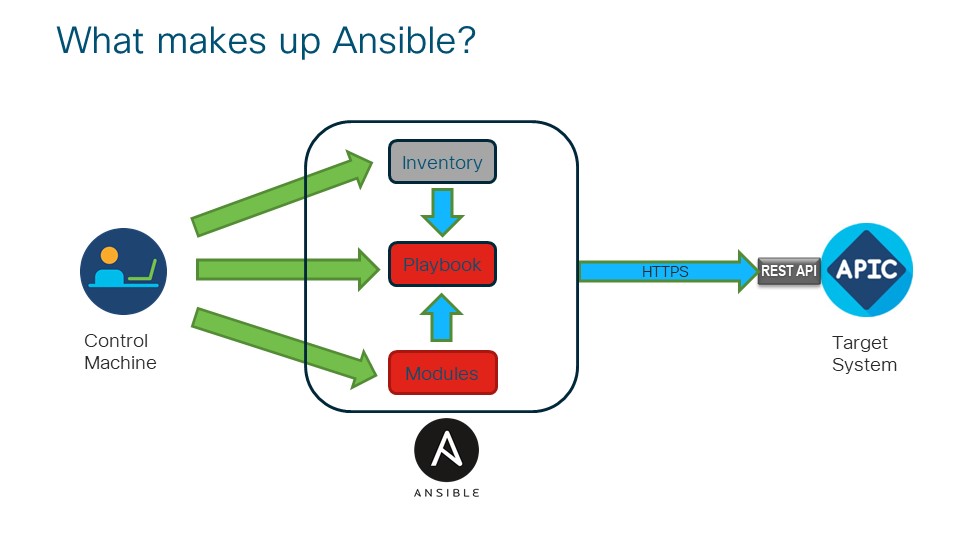
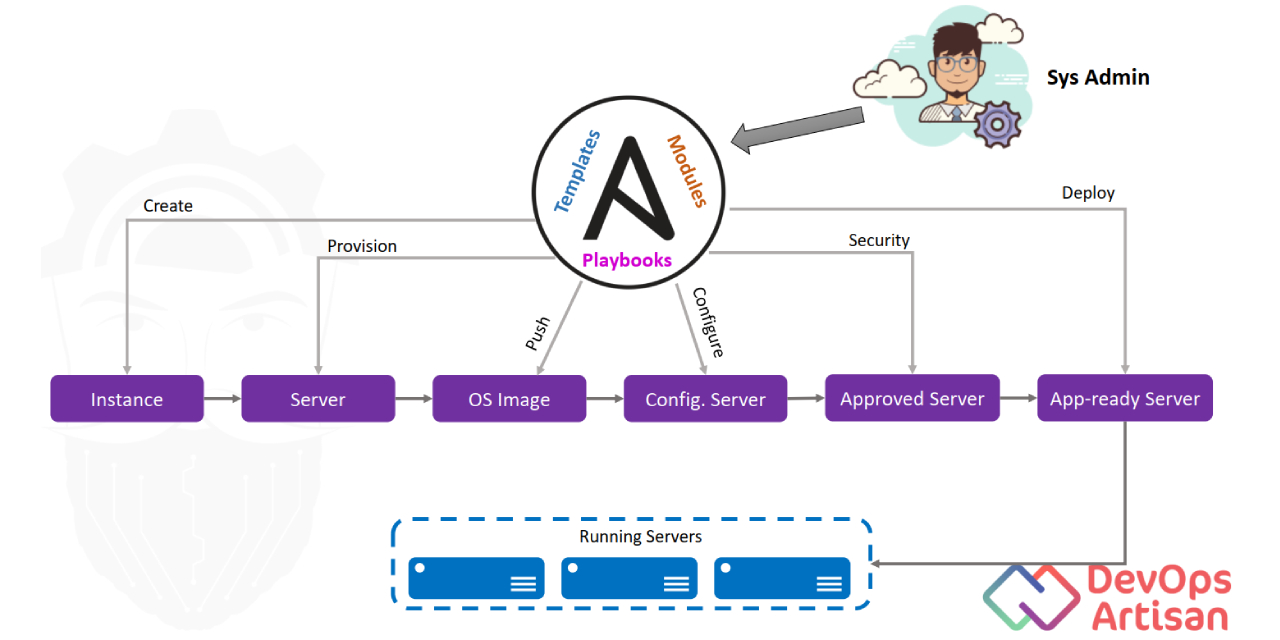
Ansible operates using a push model, connecting to nodes and pushing out modules to execute tasks. This approach eliminates the need for agents on the managed nodes, simplifying the setup and maintenance process. Ansible uses YAML files called playbooks for configuration management, making it easy to understand and manage.
Key Ansible Concepts and Terminology
Ansible uses several essential concepts and terms to manage and automate IT infrastructure tasks. Familiarizing yourself with these terms will help you better understand Ansible and write effective playbooks.
- Playbooks: Playbooks are Ansible’s configuration management scripts, written in YAML format. They consist of a list of tasks to be executed on target nodes.
- Tasks: Tasks are the smallest units of work in Ansible. Each task is a single action, such as installing a package or starting a service.
- Handlers: Handlers are special tasks that are triggered by other tasks when a specific condition is met. They help manage services and ensure that they are started, stopped, or restarted as needed.
- Modules: Modules are the reusable, standalone scripts that Ansible uses to perform tasks. Ansible has a wide range of built-in modules, and you can also create custom modules to extend its functionality.
- Roles: Roles are reusable, modular components that encapsulate specific functionality. They help organize playbooks and make them more maintainable by allowing you to separate configuration-related tasks from other tasks.
- Inventories: Inventories are lists of managed nodes, along with their associated configuration details. Ansible uses inventories to determine which nodes should be managed and how they should be configured.

Ansible Playbooks: Real-Life Use Cases
Ansible playbooks are versatile and can be used for various IT infrastructure tasks. Here are some practical examples of Ansible playbooks in action:
Configuration Management
Ansible playbooks can manage and maintain system configurations, ensuring that servers are consistently configured across an organization. For instance, you can create a playbook that installs and configures a specific version of Apache on multiple servers.
Application Deployment
Ansible playbooks can automate application deployment, reducing the risk of errors and saving time. For example, you can create a playbook that installs and configures a web application, its dependencies, and supporting services on a staging or production environment.
Infrastructure Provisioning
Ansible playbooks can automate infrastructure provisioning, enabling you to quickly set up new servers or environments. For instance, you can create a playbook that provisions a new virtual machine, installs an operating system, and configures the necessary services.
Ansible’s flexibility and adaptability make it an excellent choice for managing and automating various IT infrastructure tasks. By using Ansible playbooks, you can streamline your workflows, reduce errors, and save time.

Ansible vs. Competitors: A Comparative Analysis
Ansible is a powerful automation tool, but it’s not the only one in the market. Here’s a comparative analysis of Ansible with other popular automation tools like Puppet, Chef, and SaltStack:
Ansible vs. Puppet
Puppet is a mature automation tool that uses a declarative language to define system configurations. While both Ansible and Puppet are powerful, Ansible’s agentless architecture and ease of use make it a better choice for many organizations. Puppet, on the other hand, offers more advanced features and a larger community, making it a better choice for complex environments.
Ansible vs. Chef
Chef is another popular automation tool that uses a Ruby-based DSL to define system configurations. Chef requires an agent on managed nodes, which can make it more complex to set up and maintain than Ansible. However, Chef offers more advanced features and a larger community, making it a better choice for complex environments.
Ansible vs. SaltStack
SaltStack is an automation tool that uses a Python-based DSL to define system configurations. SaltStack is known for its speed and scalability, making it a better choice for large environments. However, SaltStack’s complexity and steep learning curve can make it challenging to set up and maintain, especially for smaller organizations.
Ansible’s unique selling points include its simplicity, ease of use, and agentless architecture. While other automation tools offer more advanced features and larger communities, Ansible’s simplicity and ease of use make it an excellent choice for many organizations looking to automate their IT infrastructure tasks.
Getting Started with Ansible: Installation and Setup
To get started with Ansible, you need to install it on your control machine and configure it to manage your target nodes. Here’s a step-by-step guide on installing Ansible on various platforms:
Installing Ansible on Ubuntu
To install Ansible on Ubuntu, run the following commands:
sudo apt-add-repository ppa:ansible/ansible sudo apt-get update sudo apt-get install ansibleInstalling Ansible on CentOS
To install Ansible on CentOS, run the following commands:
sudo yum install epel-release sudo yum install ansibleInstalling Ansible on macOS
To install Ansible on macOS, use Homebrew by running the following commands:
brew update brew install ansibleAfter installing Ansible, you need to configure it by creating an inventory file that lists your target nodes. Here’s an example inventory file:
[webservers] 192.168.1.100 192.168.1.101 [dbservers]
192.168.1.102
192.168.1.103
In this example, the inventory file defines two groups of servers: webservers and dbservers. You can define variables for each group or node, such as the user or SSH port, by adding them to the inventory file.
Once you have configured Ansible, you can start managing your target nodes using playbooks, which are YAML files that define a series of tasks to be executed on the target nodes.

Building a Simple Ansible Playbook: A Hands-On Tutorial
Now that you have a basic understanding of Ansible and its concepts let’s create a simple playbook. A playbook is a YAML file that defines a series of tasks to be executed on target nodes.
Creating a Simple Playbook
Let’s create a playbook that installs Apache on a target node. Create a new file called “install\_apache.yml” and add the following content:
--- - hosts: webservers tasks: - name: Install Apache apt: name: apache2 state: present In this playbook, we define a single task that installs Apache using the “apt” module. The “hosts” parameter specifies the target nodes, which we defined in the inventory file.
Running the Playbook
To run the playbook, use the “ansible-playbook” command:
ansible-playbook install_apache.ymlAnsible will connect to the target nodes, push out the “apt” module, and execute the task. Once the task is completed, you can verify that Apache is installed by logging into the target node and running the “apache2” command.
Best Practices for Writing Effective Playbooks
- Use descriptive names for tasks and playbooks.
- Define variables for reusable values, such as package names or usernames.
- Use handlers for tasks that need to be executed only when other tasks are changed.
- Use roles for reusable, modular components that can be shared across playbooks.
- Test your playbooks thoroughly before deploying them in production.
By following these best practices, you can write effective playbooks that automate your IT infrastructure tasks, saving time and reducing errors.

Expanding Ansible’s Capabilities: Roles, Modules, and APIs
Ansible’s flexibility and adaptability allow you to extend its functionality to meet your specific needs. Here are some ways to expand Ansible’s capabilities:
Using Roles
Roles are reusable, modular components that encapsulate specific functionality. By using roles, you can create modular playbooks that are easier to maintain and share. Ansible Galaxy, a public repository of Ansible roles, allows you to download and use pre-built roles for common tasks, such as installing web servers or databases.
Creating Custom Modules
Ansible modules are standalone programs that can be executed on target nodes. By creating custom modules, you can extend Ansible’s functionality to perform tasks that are not supported by the built-in modules. Custom modules can be written in any programming language that can output JSON, such as Python, Ruby, or Bash.
Using Ansible’s API
Ansible’s API allows you to integrate Ansible with other tools and platforms. By using the API, you can automate the execution of playbooks, retrieve information about the target nodes, and monitor the status of the tasks. Ansible’s API is based on the REST architecture and can be accessed using HTTP requests.
Best Practices for Extending Ansible
- Use roles for reusable, modular components that can be shared across playbooks.
- Create custom modules for tasks that are not supported by the built-in modules.
- Use Ansible’s API to integrate Ansible with other tools and platforms.
- Test your custom modules and roles thoroughly before deploying them in production.
By extending Ansible’s functionality using roles, modules, and APIs, you can automate complex IT infrastructure tasks, saving time and reducing errors.