What is Kubernetes and Why Setup Your Own Cluster?
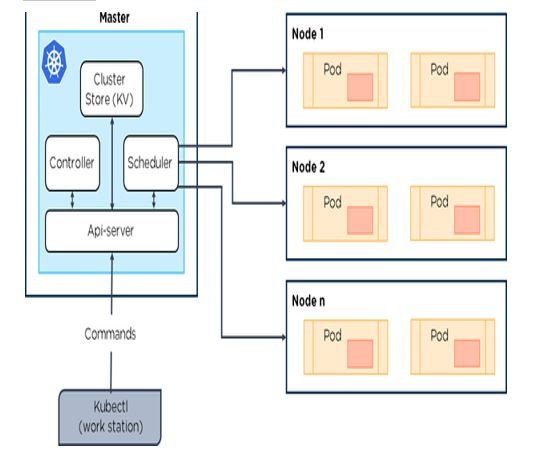
Kubernetes, also known as K8s, is an open-source container orchestration system designed to automate the deployment, scaling, and management of containerized applications. Developed by Google and now maintained by the Cloud Native Computing Foundation (CNCF), Kubernetes has gained popularity due to its flexibility, scalability, and robustness.
Setting up your own Kubernetes cluster offers several benefits, including customization, cost savings, and enhanced security. By managing your own cluster, you have complete control over the configuration, enabling you to tailor the environment to your specific needs. This can lead to cost savings, as you only pay for the resources you require. Additionally, managing your own cluster allows you to implement stricter security measures, ensuring the protection of your data and applications.
To get started with setting up Kubernetes, you need a basic understanding of Linux, containerization, and networking. Familiarity with tools such as Docker, kubectl, and a cloud provider or local machine for deployment is also essential.

Prerequisites for Setting Up Kubernetes
Before diving into the process of setting up Kubernetes, it’s essential to understand the necessary prerequisites. First and foremost, you should have a solid foundation in Linux basics, containerization, and networking concepts. This knowledge will enable you to navigate the Kubernetes environment with ease and confidence.
In addition to foundational knowledge, you’ll need specific tools to get started with Kubernetes. First on the list is Docker, a popular containerization platform. Familiarity with Docker commands and concepts will streamline your Kubernetes learning experience. Another critical tool is kubectl, the Kubernetes command-line interface, which allows you to run commands against Kubernetes clusters.
Lastly, you’ll need a platform to deploy your Kubernetes cluster. This can be a cloud provider such as Amazon Web Services (AWS), Google Cloud Platform (GCP), or Microsoft Azure, or a local machine capable of running virtualization software like VirtualBox or VMware.
Choosing the Right Kubernetes Setup: Minikube, MicroK8s, or Kind
With several Kubernetes setups available for beginners, it’s crucial to choose the one that best fits your needs. Here’s a brief overview of three popular options: Minikube, MicroK8s, and Kind.
Minikube
Minikube is a local Kubernetes deployment that runs on your machine, making it an excellent choice for learning and testing purposes. It supports multiple platforms, including Linux, macOS, and Windows, and is compatible with various virtualization tools like VirtualBox, Hyper-V, and VMware. Minikube is lightweight and easy to set up, but it may not be suitable for production workloads due to its single-node architecture.
MicroK8s
MicroK8s is a single-node Kubernetes distribution developed by Canonical, the company behind Ubuntu. It is designed for edge, IoT, and CI/CD workloads and offers a simple, fast, and secure way to deploy Kubernetes. MicroK8s can be installed on various platforms, including Linux, macOS, and Windows, and supports features like automatic updates, built-in add-ons, and multi-cluster management.
Kind (Kubernetes IN Docker)
Kind is a local Kubernetes cluster created using Docker containers as nodes. It is ideal for development, testing, and CI/CD pipelines and is particularly useful for Kubernetes developers who are already familiar with Docker. Kind offers a simple setup process, supports multi-node clusters, and allows for easy customization of the Kubernetes environment.
When choosing between Minikube, MicroK8s, and Kind, consider factors such as your use case, platform compatibility, and desired features. Each option has its strengths and weaknesses, so selecting the one that best aligns with your needs is essential.

Step-by-Step Guide: Setting Up Kubernetes with Minikube
Minikube is a lightweight Kubernetes environment that runs on your local machine, making it perfect for learning and testing purposes. In this guide, we’ll walk you through setting up Minikube, configuring it, and deploying a simple application.
Installing Minikube
First, download and install Minikube for your operating system from the official Minikube documentation. For example, on a macOS system, you can use Homebrew:
brew install minikube Starting Minikube
After installing Minikube, start it using your preferred virtualization software, such as VirtualBox or Hyperkit. For instance, to start Minikube with Hyperkit on macOS:
minikube start --driver=hyperkit Configuring kubectl
To interact with your Minikube cluster, you need to configure kubectl, the Kubernetes command-line tool. Minikube makes this easy with the following command:
minikube kubectl -- Deploying a Simple Application
Create a simple deployment YAML file, deployment.yaml, containing the following:
{copy}apiVersion: apps/v1 kind: Deployment metadata: name: my-app spec: replicas: 3 selector: matchLabels: app: my-app template: metadata: labels: app: my-app spec: containers: - name: my-app image: nginx:1.14.2 ports: - containerPort: 80 Deploy the application using kubectl:
kubectl apply -f deployment.yaml Expose the application as a service:
kubectl expose deployment my-app --type=LoadBalancer --port=80 Access the application using the Minikube service command:
minikube service my-app Congratulations! You’ve successfully set up a Kubernetes cluster using Minikube and deployed a simple application.

Step-by-Step Guide: Setting Up Kubernetes with MicroK8s
MicroK8s is a lightweight, single-node Kubernetes distribution developed by Canonical, the company behind Ubuntu. It’s perfect for edge, IoT, and CI/CD workloads, as well as for learning and testing purposes. In this guide, we’ll walk you through setting up MicroK8s, configuring it, and deploying a simple application.
Installing MicroK8s
To install MicroK8s, first add Canonical’s MicroK8s repository to your system:
curl -sL https://microk8s.io/install | sudo tee /etc/apt/sources.list.d/microk8s.list Next, update your package lists and install MicroK8s:
sudo apt update sudo apt install microk8s Starting MicroK8s
After installing MicroK8s, start it with the following command:
sudo microk8s start Configuring kubectl
To interact with your MicroK8s cluster, configure kubectl with the following command:
sudo microk8s kubectl config view --raw > ~/.kube/config Deploying a Simple Application
Create a simple deployment YAML file, deployment.yaml, containing the following:
{copy}apiVersion: apps/v1 kind: Deployment metadata: name: my-app spec: replicas: 3 selector: matchLabels: app: my-app template: metadata: labels: app: my-app spec: containers: - name: my-app image: nginx:1.14.2 ports: - containerPort: 80 Deploy the application using kubectl:
kubectl apply -f deployment.yaml Expose the application as a service:
kubectl expose deployment my-app --type=LoadBalancer --port=80 Access the application using the MicroK8s service command:
microk8s kubectl get service my-app -o jsonpath='{.status.loadBalancer.ingress[0].ip}' Congratulations! You’ve successfully set up a Kubernetes cluster using MicroK8s and deployed a simple application.

Step-by-Step Guide: Setting Up Kubernetes with Kind
Kind (Kubernetes IN Docker) is a tool for running local Kubernetes clusters using Docker container “nodes.” It’s an excellent choice for development, testing, and CI/CD pipelines. In this guide, we’ll walk you through setting up Kind, configuring it, and deploying a simple application.
Installing Kind
To install Kind, first download the appropriate binary for your operating system from the Kind documentation. For example, on a Linux system, you can use the following cURL command:
curl -Lo kind https://kind.sigs.k8s.io/dl/v0.12.0/kind-linux-amd64 && chmod +x kind Next, move the Kind binary to a directory in your system’s PATH, such as /usr/local/bin:
sudo mv kind /usr/local/bin/ Starting a Kind Cluster
Create a new Kind cluster with the following command:
kind create cluster Configuring kubectl
Kind automatically configures kubectl for you. To ensure kubectl is pointing to your Kind cluster, run:
kubectl config view Deploying a Simple Application
Create a simple deployment YAML file, deployment.yaml, containing the following:
{copy}apiVersion: apps/v1 kind: Deployment metadata: name: my-app spec: replicas: 3 selector: matchLabels: app: my-app template: metadata: labels: app: my-app spec: containers: - name: my-app image: nginx:1.14.2 ports: - containerPort: 80 Deploy the application using kubectl:
kubectl apply -f deployment.yaml Expose the application as a service:
kubectl expose deployment my-app --type=LoadBalancer --port=80 Access the application using the Kind load balancer IP:
kind get kubeconfig-yaml > kubeconfig.yaml export KUBECONFIG=$(pwd)/kubeconfig.yaml kubectl get services my-app -o jsonpath='{.status.loadBalancer.ingress[0].ip}' Congratulations! You’ve successfully set up a Kubernetes cluster using Kind and deployed a simple application.

Troubleshooting Common Issues in Kubernetes Setup
Setting up Kubernetes can sometimes be challenging, with various issues arising during the process. Here, we’ll discuss common problems and their solutions to help you overcome obstacles and successfully deploy your applications.
Connectivity Problems
If you encounter connectivity issues when interacting with your Kubernetes cluster, ensure that your kubectl configuration is pointing to the correct cluster. You can check your current context with the following command:
kubectl config current-context To switch contexts, use:
kubectl config use-context Resource Allocation Errors
Resource allocation errors can occur when deploying applications that require more resources than available. To resolve this issue, you can:
-
Increase the resources allocated to your cluster nodes.
-
Optimize your application’s resource requirements.
-
Scale your cluster horizontally by adding more nodes.
Application Deployment Failures
Application deployment failures can be caused by various factors, such as incorrect image tags, misconfigured environment variables, or insufficient permissions. To diagnose and resolve these issues, use the following commands:
-
kubectl describe pods: Get detailed information about your pods, including events and container statuses. -
kubectl logs: Retrieve logs for a specific container in a pod. -
kubectl apply -f: Reapply your application’s configuration to ensure it matches the desired state.
By understanding and addressing these common issues, you can ensure a smooth Kubernetes setup process and maintain a stable, secure, and optimized environment for your applications.
Optimizing and Scaling Your Kubernetes Cluster
Once you’ve successfully set up your Kubernetes cluster, it’s essential to optimize and scale it effectively to ensure high performance, cost savings, and a secure environment. Here, we’ll discuss best practices for resource management, monitoring, and auto-scaling techniques.
Resource Management
Proper resource management is crucial for maintaining a stable and efficient Kubernetes cluster. To optimize resource usage:
-
Set resource requests and limits for your containers to ensure they have access to the necessary resources while preventing over-provisioning.
-
Monitor resource utilization using tools like
kubectl topor third-party monitoring solutions to identify bottlenecks and optimize resource allocation. -
Use horizontal pod autoscaling (HPA) and cluster autoscaling to automatically scale your applications and nodes based on resource usage and performance metrics.
Monitoring
Monitoring your Kubernetes cluster is essential for identifying issues, optimizing performance, and maintaining a secure environment. Implement monitoring for:
-
Cluster components, such as nodes, pods, and services.
-
Resource utilization, including CPU, memory, and network usage.
-
Application performance, such as response times and error rates.
-
Security events, like unauthorized access attempts or policy violations.
Auto-Scaling Techniques
Auto-scaling allows your Kubernetes cluster to adapt to changing workloads and resource demands automatically. Implement auto-scaling for:
-
Horizontal pod autoscaling (HPA): Automatically scale the number of replicas for a deployment or statefulset based on CPU utilization or custom metrics.
-
Cluster autoscaling: Automatically add or remove nodes from your cluster based on resource usage and availability.
-
Custom metrics autoscaling: Scale your applications based on custom metrics, such as queue length or request rate, using the Kubernetes Metrics Server or a third-party solution.
By following these best practices for optimizing and scaling your Kubernetes cluster, you can maintain a high-performing, secure, and cost-effective environment for your applications.