What is Jenkins and Why Use It for Continuous Integration?
Jenkins is an open-source automation server that enables developers to build, test, and deploy their software applications continuously. It is a powerful tool that streamlines the development process, improves collaboration, and reduces the risk of errors. Jenkins offers several key features that make it an ideal choice for continuous integration, including ease of installation, a wide range of plugins, and a large community of users. With Jenkins, developers can automate repetitive tasks, such as code compilation, testing, and deployment, and focus on writing high-quality code. By integrating Jenkins into the development workflow, teams can catch and fix bugs earlier, reduce the time to market, and improve overall software quality.

Prerequisites for Installing a Jenkins Server
Before installing a Jenkins server, there are several prerequisites that you need to consider. First, you need to choose an operating system that is compatible with Jenkins. Jenkins supports various operating systems, including Windows, Linux, and MacOS. Once you have selected an operating system, you need to install the Java Development Kit (JDK) as Jenkins is a Java-based application. You can download the latest version of JDK from the Oracle website. Additionally, you need to install a web server, such as Apache Tomcat, to run Jenkins. When it comes to hardware specifications, Jenkins recommends a minimum of 256 MB of RAM and 1 GB of disk space. However, for optimal performance, it is recommended to have at least 2 GB of RAM and 10 GB of disk space. If you plan to run multiple builds simultaneously, you may need to allocate more resources to your Jenkins server. It is also recommended to have a dedicated server or virtual machine for Jenkins to avoid performance issues caused by other applications running on the same machine.

Installing Jenkins on Different Platforms
Jenkins can be installed on various platforms, including Windows, Linux, and MacOS. The installation process is straightforward, and this section will provide step-by-step instructions for each platform.
Installing Jenkins on Windows
To install Jenkins on Windows, follow these steps:
Download the latest version of Jenkins from the official website.
Extract the downloaded file to a folder of your choice.
Open a command prompt and navigate to the Jenkins folder.
Run the command jenkins.exe start to start the Jenkins server.
Open a web browser and navigate to localhost:8080 to access the Jenkins dashboard.
Installing Jenkins on Linux
To install Jenkins on Linux, follow these steps:
Install the Java Development Kit (JDK) and Apache Tomcat web server.
Download the latest version of Jenkins from the official website.
Extract the downloaded file to a folder of your choice.
Navigate to the Jenkins folder and run the command java -jar jenkins.war to start the Jenkins server.
Open a web browser and navigate to localhost:8080 to access the Jenkins dashboard.
Installing Jenkins on MacOS
To install Jenkins on MacOS, follow these steps:
Install the Java Development Kit (JDK) and a web server, such as Apache Tomcat.
Download the latest version of Jenkins from the official website.
Extract the downloaded file to a folder of your choice.
Navigate to the Jenkins folder and run the command java -jar jenkins.war to start the Jenkins server.
Open a web browser and navigate to localhost:8080 to access the Jenkins dashboard.
It is important to note that the installation process may vary slightly depending on the version of the operating system and the web server used. It is recommended to check the official Jenkins documentation for the most up-to-date installation instructions.
Configuring Jenkins for Continuous Integration
Once Jenkins is installed, the next step is to configure it for continuous integration. This section will provide an overview of the basic configuration settings for Jenkins, including creating a new job, configuring source code management, and setting up build triggers.
Creating a New Job
To create a new job in Jenkins, follow these steps:
- Click on the “New Item” button on the Jenkins dashboard.
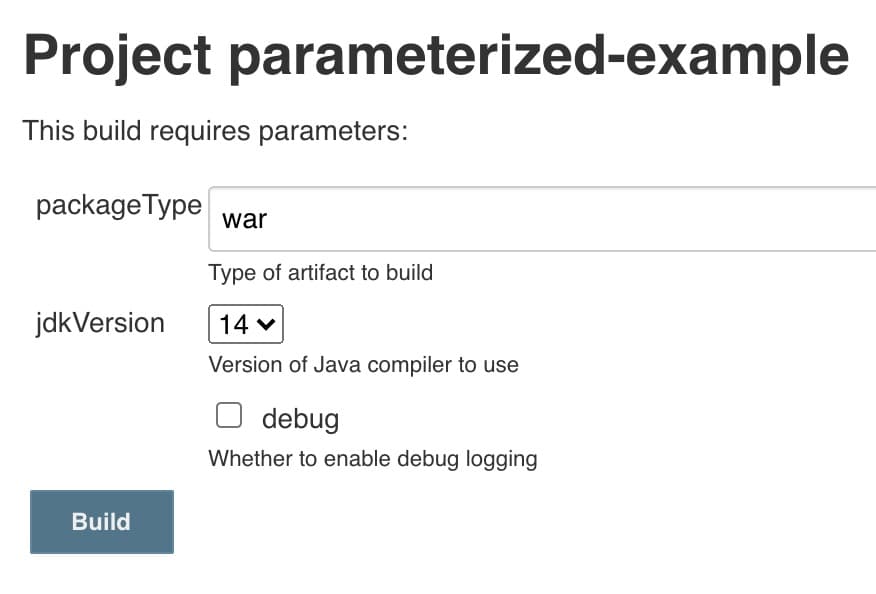
- Enter a name for the job and select the job type (e.g., Freestyle Project, Pipeline, etc.).
- Configure the job settings, such as the source code management, build triggers, and build steps.
- Save the job configuration.
Configuring Source Code Management
Jenkins supports various source code management tools, such as Git, Subversion, and Mercurial. To configure source code management in Jenkins, follow these steps:
- Select the source code management tool from the list.
- Enter the repository URL and credentials.
- Configure the branch specifier to specify which branches to build.
- Save the job configuration.
Setting Up Build Triggers
Build triggers in Jenkins allow you to automate the build process based on specific events, such as code commits or time-based schedules. To set up build triggers in Jenkins, follow these steps:
- Select the build trigger type (e.g., Poll SCM, GitHub hook trigger for GITScm polling, etc.).
- Configure the trigger settings, such as the schedule or event criteria.
- Save the job configuration.
By configuring Jenkins for continuous integration, developers can automate the build, test, and deployment process, reducing the risk of errors and improving overall software quality. It is recommended to test the job configuration thoroughly to ensure that it is working as expected.

Best Practices for Using Jenkins Plugins
Jenkins plugins are third-party extensions that add new features and functionality to the Jenkins server. There are hundreds of plugins available for Jenkins, and it can be tempting to install as many as possible. However, it is important to follow best practices for using plugins to ensure optimal performance and security.
List of Recommended Plugins for Continuous Integration
Here is a list of recommended plugins for continuous integration:
- Git Plugin: Allows Jenkins to connect to Git repositories and perform version control operations.
- Subversion Plugin: Allows Jenkins to connect to Subversion repositories and perform version control operations.
- Maven Integration Plugin: Provides integration with Maven projects and builds.
- JUnit Plugin: Allows Jenkins to generate test reports for JUnit test cases.
- Email Extension Plugin: Provides email notifications for build status changes and other events.
Best Practices for Using Plugins
Here are some best practices for using Jenkins plugins:
- Keep plugins up-to-date: Regularly update plugins to the latest version to ensure compatibility and security.
- Test plugins thoroughly: Before using a new plugin, test it thoroughly to ensure that it works as expected and does not introduce any security vulnerabilities.
- Avoid unnecessary plugins: Only install plugins that are necessary for your use case. Unnecessary plugins can slow down the Jenkins server and introduce security vulnerabilities.
- Check plugin compatibility: Before installing a new plugin, check that it is compatible with your version of Jenkins.
- Remove unused plugins: Regularly review the list of installed plugins and remove any that are no longer needed.
By following these best practices for using Jenkins plugins, you can ensure optimal performance and security for your Jenkins server. It is recommended to regularly review the list of installed plugins and remove any that are no longer needed to keep the Jenkins server running smoothly.

Securing Your Jenkins Server
Running a Jenkins server can expose your organization to security risks if not properly secured. Here are some best practices for securing your Jenkins server.
User Authentication
Jenkins supports various user authentication methods, including built-in, LDAP, and single sign-on (SSO) using protocols such as SAML and OAuth. It is recommended to use a centralized user authentication system such as LDAP or SSO to manage user access and permissions.
Access Control
Jenkins provides various access control mechanisms, including matrix-based security, project-based security, and global security. It is recommended to use a combination of these mechanisms to restrict access to sensitive areas of the Jenkins server.
Encryption
Jenkins supports encryption of sensitive data such as API keys and credentials using plugins such as the Credentials plugin. It is recommended to use encryption to protect sensitive data and prevent unauthorized access.
Step-by-Step Instructions for Setting Up Security Features in Jenkins
- Install the required plugins for user authentication, access control, and encryption.
- Configure user authentication using LDAP or SSO.
- Configure access control using matrix-based security, project-based security, or global security.
- Configure encryption using the Credentials plugin.
- Test the security configuration thoroughly to ensure that it is working as expected.
By following these best practices for securing your Jenkins server, you can ensure that your organization’s data and assets are protected from unauthorized access and security threats. It is recommended to regularly review and update the security configuration to ensure that it remains up-to-date and effective.

Monitoring and Troubleshooting Your Jenkins Server
Monitoring and troubleshooting your Jenkins server is crucial to ensure optimal performance and minimize downtime. Here are some best practices for monitoring and troubleshooting your Jenkins server.
Monitoring System Resources
Monitoring system resources such as CPU, memory, and disk usage is essential to ensure that your Jenkins server is running smoothly. You can use tools such as the Java Melody plugin, which provides detailed statistics on system resources and can help identify performance bottlenecks.
Diagnosing Issues
Jenkins provides detailed logs and error messages that can help diagnose issues. You can access the logs from the Jenkins dashboard or by using the command line interface. It is recommended to regularly review the logs to identify and resolve issues before they become critical.
Resolving Common Problems
Here are some common problems that you may encounter when using Jenkins and how to resolve them:
- Failed builds: Check the build logs for error messages and investigate the root cause. It may be due to code changes, environment issues, or plugin conflicts.
- Plugin conflicts: Plugins can sometimes conflict with each other, causing issues with the Jenkins server. It is recommended to keep plugins up-to-date and test them thoroughly before using them in production.
- Memory leaks: Memory leaks can cause the Jenkins server to slow down or crash. Use tools such as Java Melody to identify memory leaks and optimize memory usage.
Jenkins Plugins for Monitoring and Troubleshooting
Here are some Jenkins plugins that can help with monitoring and troubleshooting:
- Java Melody: Provides detailed statistics on system resources and can help identify performance bottlenecks.
- GitHub plugin: Provides integration with GitHub and can help diagnose issues with GitHub repositories.
- Exceptional Plugin: Provides detailed error reports and can help diagnose issues with builds and plugins.
By following these best practices for monitoring and troubleshooting your Jenkins server, you can ensure optimal performance and minimize downtime. It is recommended to regularly review the system resources and logs to identify and resolve issues before they become critical.
Optimizing Your Jenkins Server for Scalability
As your continuous integration needs grow, you may need to scale your Jenkins server to handle the increased workload. Here are some best practices for optimizing your Jenkins server for large-scale continuous integration.
Distributed Builds
Distributed builds allow you to distribute the build load across multiple machines, improving performance and reducing build times. Jenkins supports distributed builds using the master-slave architecture, where the master node controls the build process and the slave nodes execute the build tasks.
Master-Slave Architecture
The master-slave architecture in Jenkins allows you to distribute the build load across multiple machines, improving performance and reducing build times. The master node controls the build process, and the slave nodes execute the build tasks. You can configure the slave nodes to run on physical machines, virtual machines, or in the cloud.
Load Balancing
Load balancing allows you to distribute the build load across multiple Jenkins servers, improving performance and reducing build times. You can use tools such as the HAProxy load balancer to distribute the build load across multiple Jenkins servers.
Configuring Jenkins for Scalability
Here are some examples of how to configure Jenkins for scalability:
- Distributed Builds: To configure distributed builds in Jenkins, you need to install the Jenkins slave agent on the slave nodes and configure the master node to communicate with the slave nodes.
- Master-Slave Architecture: To configure the master-slave architecture in Jenkins, you need to install the Jenkins slave agent on the slave nodes and configure the master node to communicate with the slave nodes. You can also configure the slave nodes to run on physical machines, virtual machines, or in the cloud.
- Load Balancing: To configure load balancing in Jenkins, you need to install a load balancer such as HAProxy and configure it to distribute the build load across multiple Jenkins servers.
By following these best practices for optimizing your Jenkins server for scalability, you can ensure that it can handle large-scale continuous integration workloads. It is recommended to regularly monitor the system resources and performance of your Jenkins server to identify and resolve any issues before they become critical.